2021 April
Day-trip: Febar Tor
Macha Tor
Bress Peak
Spirey View
Breadknife
Grand High Tops
Balor Hut
Warrumbungle National Park, NSW, Australia
Preview
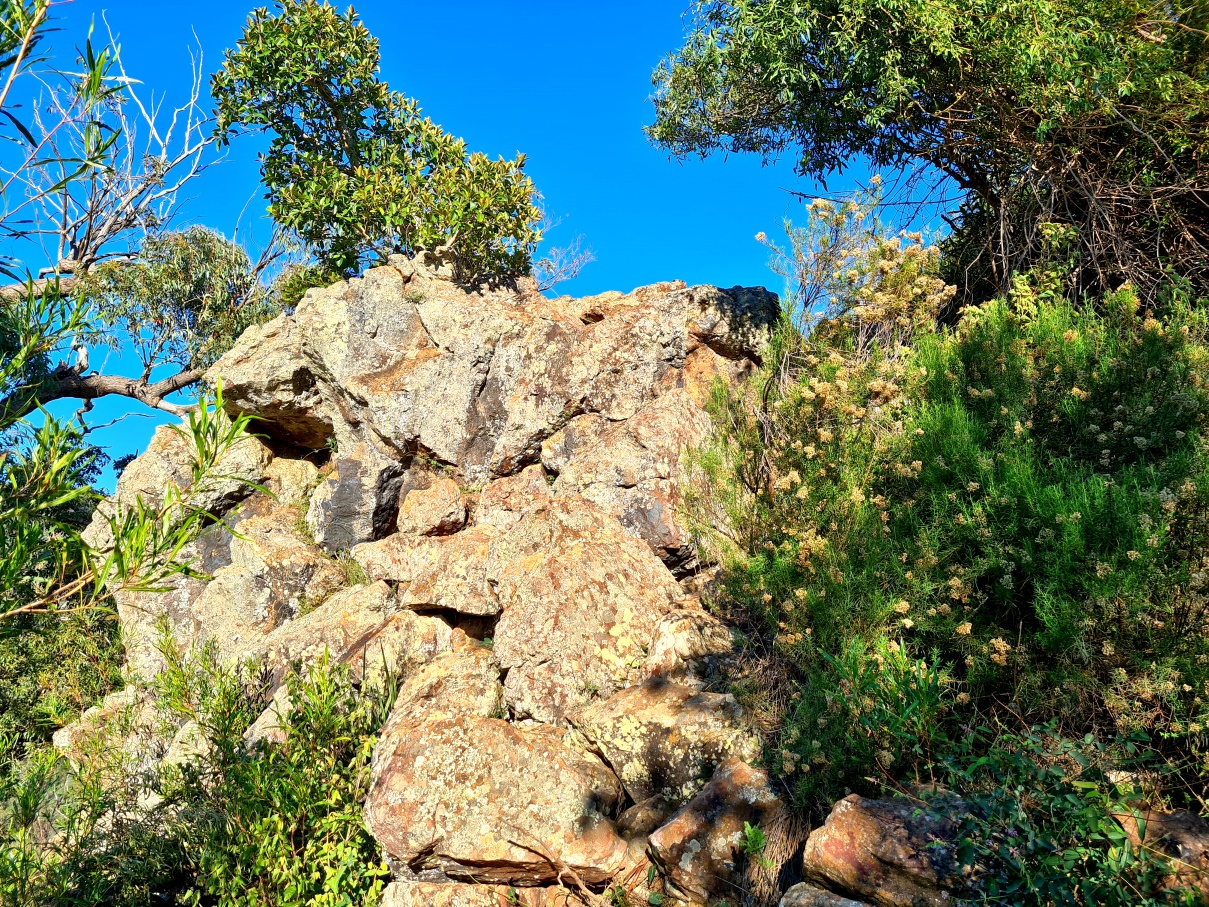
Bress Peak Impressive cliffs !

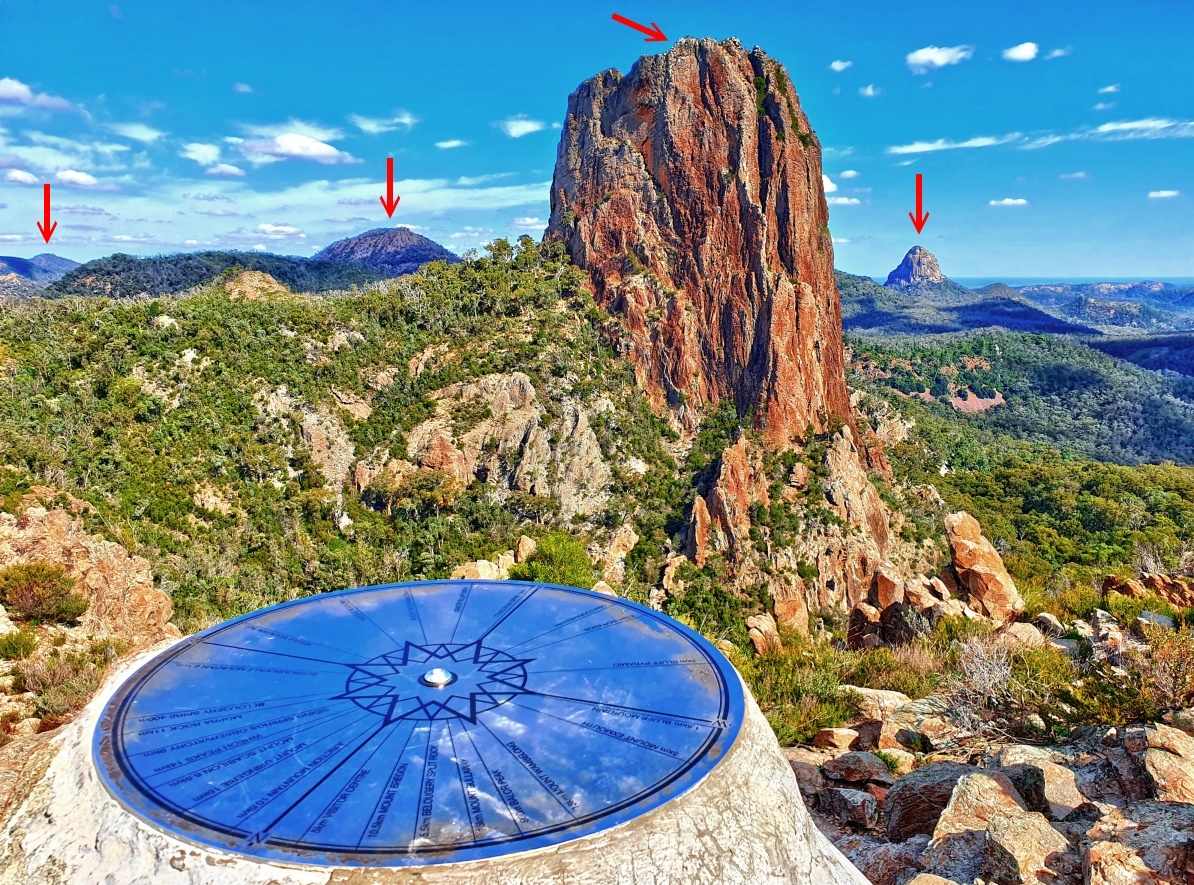
Breadknife
It is a 90-metre high dyke that stretches for half a kilometre. It was formed when volcanic processes and subsequent erosion sculpted an amazing rock formation that is like the blade of a knife.

Grand High Tops lookout Facing Belougery Spire

Prolog - Warrumbungle National Park
A group of us were meant to visit Girraween Nat Pk (Qld) and Bald Rock NP (NSW).
Inclement weather over there resulted in a change to Warrumbungle Nat Pk.
Only John and I ended up going :-)
Warrumbungle National Park was once a huge volcano.
By the time it uttered its last gasps 13 million years ago, the volcano had built up a vast shield that was 50 kilometers across and rose 1000 meters above the surrounding countryside. Millions of years of erosion have since stripped away successive layers of ash and lava, and the volcano's broad flanks have given way to the rugged landscape of today's Warrumbungle Range.
The impressive jumble of spires, dyke, and domes represent parts of the volcano's internal plumbing that, were it not for erosion, would otherwise be hidden from view. We are therefore presented with a rare opportunity to see the insides of a volcano.
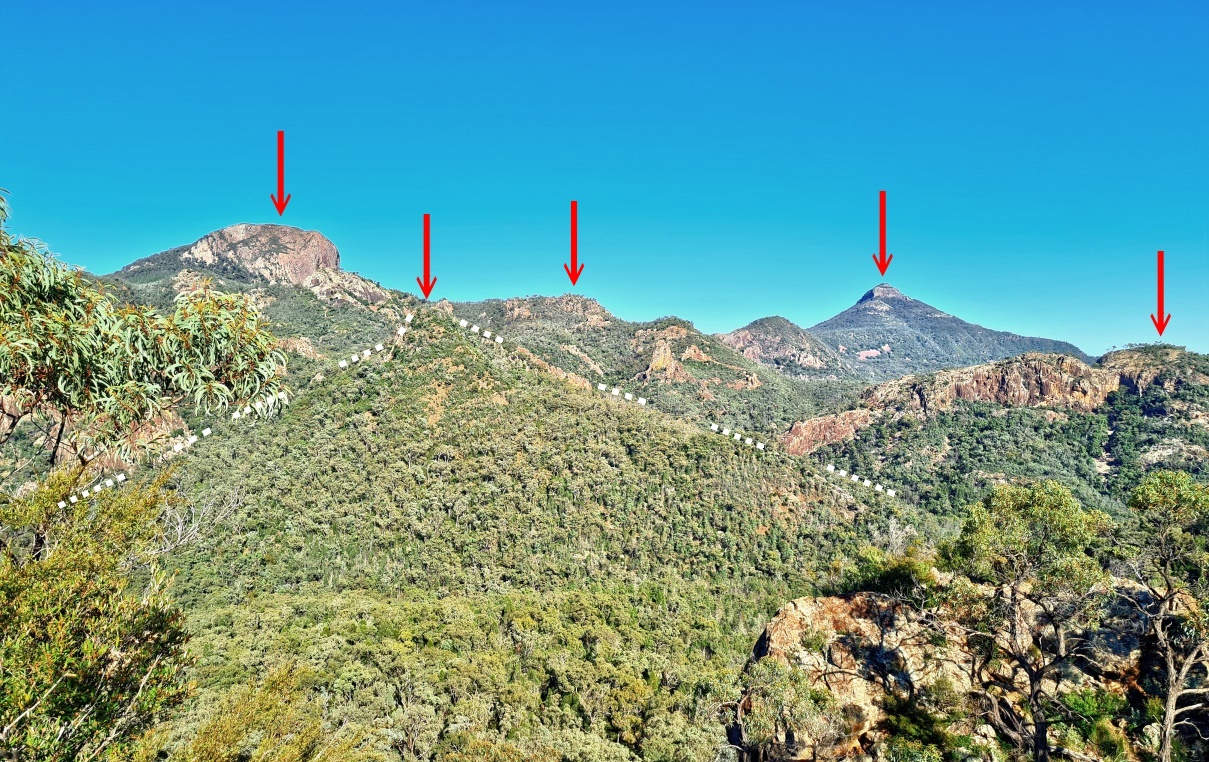
Below is a poster at the start of the walk at Pincham Carpark.
A 30-km cross-section of the 50 km diameter Warrumbungle Volcano showing how erosion has stripped away a large part of the original shield.
• Black dotted line: Estimated profile of the volcano prior to erosion
• 7 blue arrows, left to right:
1 Siding Spring Mountain
2 Spirey Creek
3 Belougery Spire
4 Crater Bluff
5 The Breadknife
6 Bluff Mountain
7 Mt Exmouth (Wambelong Mountain)

Previous trip to Grand High Tops
I had been to Grand High Tops 5 and a half years ago in 2015 October.
Link: http://mntviews.blogspot.com/2015/10/grand-high-tops-warrumbungle-np-nsw.html
It was a half-day trip, missing out on:
Febar Tor
Macha Tor
Bress Peak
Breadknife
And so, making amends today :-)
Maps
LPI 1:50,000 scaled 8635-S Tooraweenah
Map 1) The relevant part of the 1:50,000 topographic map
Warning:
- Some labels are not properly placed. For example, Spirey View should be the 3rd arrow from the top in Map 3.
- Foot track to Bress Peak no longer exists.

Map 2) Non-topographic map given out at the visitor centre at Camp Blackman
It is more accurate; and the name labels are better placed.

GPS tracklog files & route
The GPX tracklog file can be downloaded from:
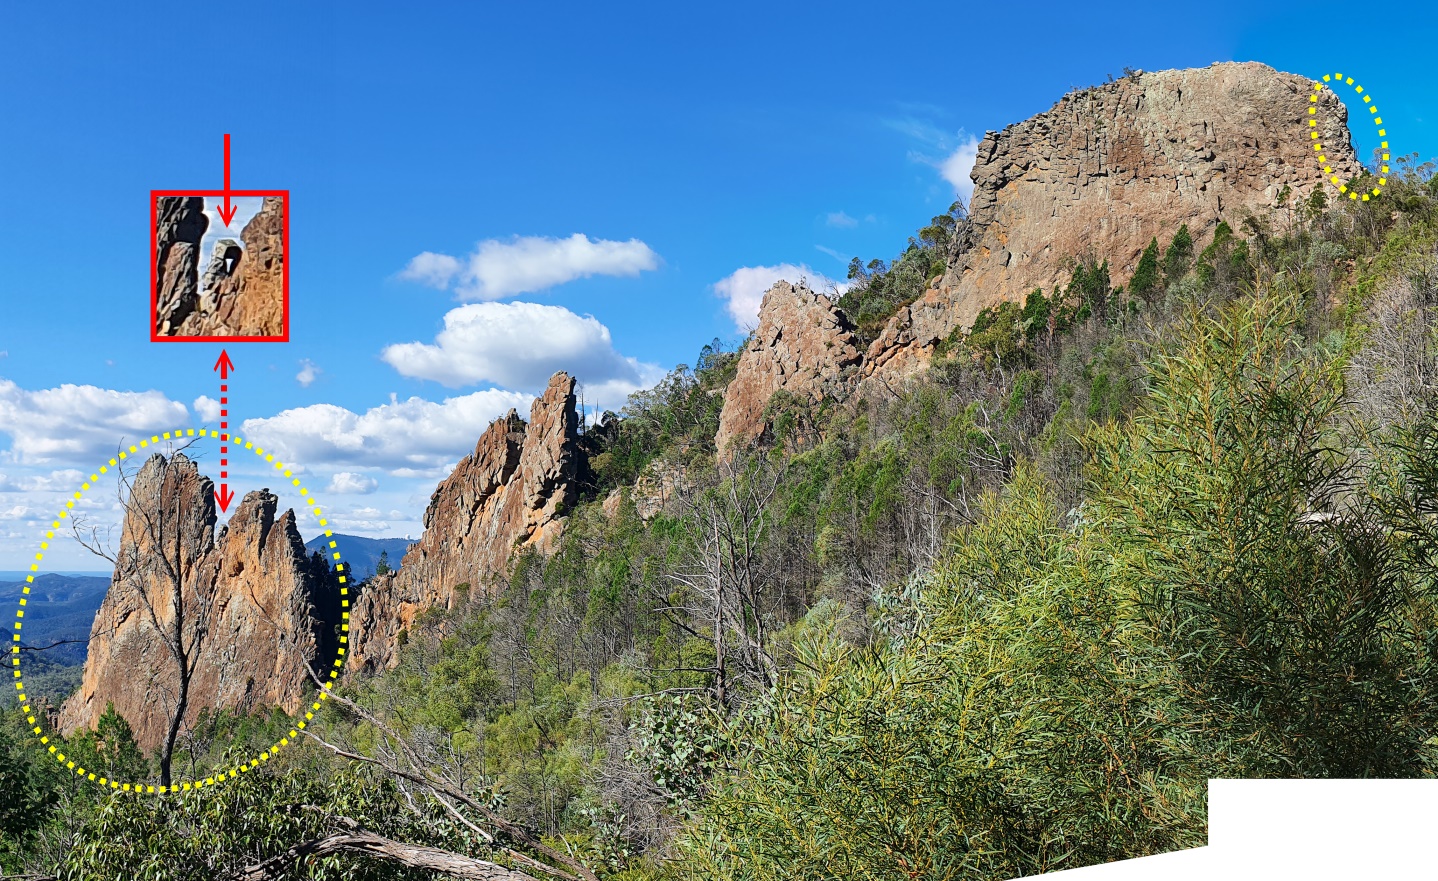
https://drive.google.com/file/d/1DGLK8zWvHmVabfcvAwz-PZYngdqwp2Sy/view?usp=sharing
Map 3) GPS tracklog in red is in the following 1:50,000 topographic map:
- Warning:
• Some labels are not properly placed. For example, Spirey View should be the 3rd blue arrow from the top.
• Foot track to Bress Peak no longer exists.
- 7 blue arrows, top to bottom:
1 GR 8986 3588 Pincham Carpark ... start and end of walk
2 GR 9025 3390 Febar Tor
3 GR 9026 3328 Spirey View
4 GR 8989 3243 Balor Hut
5 Breadknife ... The gap in Breadknife we go to is GR 8988 3203.
6 Razor-blade-like rocky ridge
7 GR 8988 3182 Grand High Tops lookout

Map 4) Satellite image

In summary:
- Park car at Pincham Carpark, GR 8986 3588, at the end of Pincham Road.
- Walk on Pincham Trail, the main foot track to Grand High Tops.
- Detour to Febar Tor.
- To Macha Tor.
- Climb down to Pincham Trail.
- Bushbash up Bress Peak.
- Climb down Bress Peak to Pincham Trail.
- To Breadknife.
- To Razor-blade-like rocky ridge.
- To Grand High Tops lookout.
- Return via Balor Hut at Dagda Short Cut trail.
- Back to the car at Pincham Carpark.
Timeline and Distance
Park my car at Pincham Carpark, GR 8986 3588, at the end of Pincham Road.
The carpark is quite large.
07:22 0.0 km Start walking on Pincham Trail, the main foot track to Grand High Tops.
07:47 1.6 km At a junction ... We take the foot track to Febar Tor & Macha Tor.
08:11 2.9 km At Febar Tor.
08:16 2.95km Leave Febar Tor.
08:39 3.77km At Macha Tor.
09:10 3.83km Leave Macha Tor.
09:29 4.8 km At Pincham Trail, the main foot track to Grand High Tops.
09:32 5.0 km At GR 8992 3394 (north of a footbridge), where we'll go off-track towards Bress Peak.
Explore around.
09:34 5.08km Go off-track towards Bress Peak.
09:48 5.37km Stop for morning tea.
Morning tea.
10:00 5.43km Resume walking.
10:53 6.08km At secondary summit east of Bress Peak main summit.
Drop backpacks here.
10:54 6.1 km Resume walking ... towards Bress Peak main summit.
11:02 6.2 km At Bress Peak main summit.
Explore around the main summit.
11:23 6,4 km Leave main summit.
11:35 6.53km Back at secondary summit ... same spot as at 10:53.
Lunch.
11:55 6.55km Start to climb down Bress Peak.
12:34 7.33km At Pincham Trail. (We are immediately south of a footbridge.)
Fill up water from Spirey Creek.
I gulp down almost a litre of water here.
Temperature is around 28 degrees Celsius, quite warm.
12:41 7.38km Resume walking.
12.48 7.88km At junction of Pincham Trail & access track to Spirey View ... Drop our backpacks here.
12:52 8.02km At Spirey View.
12:54 8.03km Leave Spirey View.
12:57 8.18km At Pincham Trail ... same spot as at 12:48 ... Pick up our backpacks.
13:24 9.58km At a junction ... One foot track goes to Grand High Tops. The other goes to Balor Hut.
13:36 9.88km I take a rest while John explores around.
Rest.
13:42 9.88km Resume walking.
13:47 9.95km Veer off-track to go to Breadknife.
13:50 10.02km At Breadknife ... specifically, at a gap in the Breadknife.
Explore around.
14:06 10.07km Leave Breadknife.
14:14 10.27km At a razor-blade-like rocky ridge.
John explores ways to climb over the sharp ridge. He gives up, too dangerous.
14:22 10.3 km Leave razor-blade-like rocky ridge.
14:27 10.43km At Grand High Tops lookout.
14:36 10.43km Resume walking.
14:38 10.5 km I take a rest while John explores around.
Rest.
14:43 10.5 km Resume walking.
15:01 11.03km At Dagda Gap/Saddle.
15:15 12.05km At Balor Hut.
15:16 12.08km Resume walking.
15:18 12:17km At a junction ... One foot track goes to Pincham Carpark. The other goes to Grand High Tops.
Same spot as at 13:24.
15:37 13.55km At junction of Pincham Trail & access track to Spirey View ... same spot as at 12:48.
15:43 14.08km At where we got off Bress Peak, just south of a footbridge ... same spot as at 12:34.
15:54 14.95km At a junction ... One foot track goes to Pincham Carpark. The other goes to Febar Tor & Macha Tor.
Same spot as at 07:47.
16.18 16.52km Back at Pincham Carpark.
==============================================
Total: 8 hrs 56 mins
16.52 km Distance is from Google Earth
Pictures - Pincham Trail
1) Monument at start of Pincham Trail at Pincham Carpark ~~~
THE WARRUMBUNGLE NATIONAL PARK
To the memory of
Alfred J. Pincham
who donated much of the land
in the park to the people.
The Pincham Trail
commences at this monument

2) Parrot nesting boxes high up on the trees along Pincham Trail ~~~

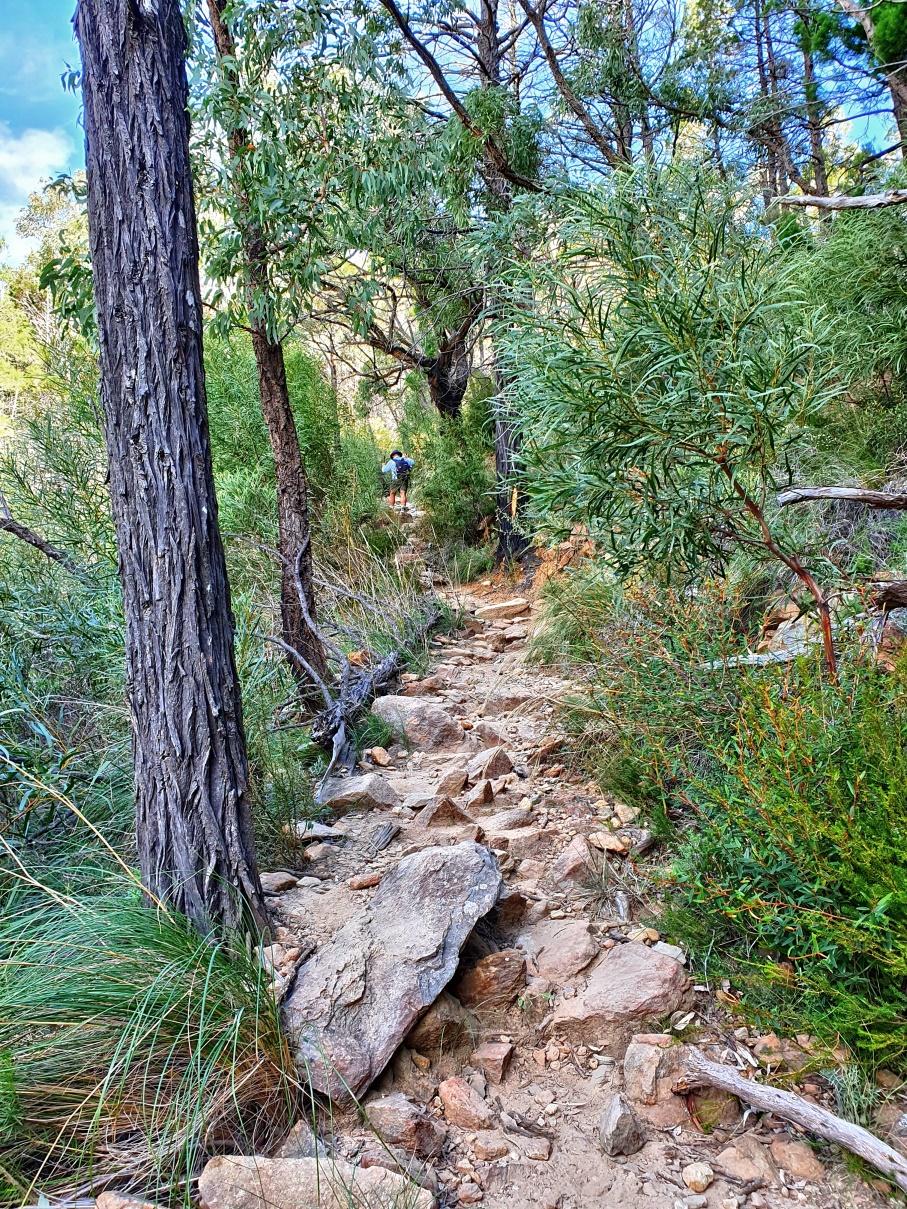
3) Pincham Trail ... John

4) 3 different footbridges on Pincham Trail ~~~
John is fast and is always in front :-)
- 3rd pic below: Different from the bridge in the 2nd pic.
• John always likes to have fun :-)

5) Spirey Creek on 2 different points on Pincham Trail ~~~
- Upper pic: Facing upstream
• 2 red arrows: Unnamed peaks ... Refer to middle 2 arrows in photo #6.
- Lower pic: Facing upstream
• Taken from the 3rd bridge in photo #4

6) Scenery on Pincham Trail ~~~
- 4 red arrows, left to right: Same as the 4 blue arrows, top to bottom in the map below
- Bress Peak: Upper pic's left-most red arrow ... We'll be climbing it.

To Febar Tor
7) From Pincham Trail, turn left (east) into Goulds Circuit which will lead us to Febar Tor ~~~
As usual, John is in front.

Febar Tor
8) This is it ... Febar Tor.
9) Panorama from top of Febar Tor ~~~
- Upper pic: John
• White oval: Breadknife
• 5 red arrows, left to right:
1 Needle Mountain
2 Roana Peak
3 Belougery Spire
4 Crater Bluff
5 Grand High Tops
- Middle pic: (Continuation from the right of the upper pic)
• White oval: Breadknife
• 5 red arrows, left to right:
1 Crater Bluff
2 Grand High Tops
3 Balor Peak
4 Bress Peak
5 Bluff Mountain
- Lower pic: (Continuation from the right of the middle pic)
• White oval: The peaks are close to each other in the same mountain range.
• 4 red arrows, left to right:
1 Point Wilderness
2 Mt Exmouth
3-4 Unnamed peaks ... They are the middle 2 arrows in photo #6.

To Macha Tor
10) Goulds Circuit ... We are walking from Febar Tor to Macha Tor.

11) Macha Tor is behind the rock here ~~~
- Yellow arrow: We are going to Macha Tor now.
- Cyan arrow: Go this way if you wish to bypass it.

Macha Tor
12) Macha Tor ~~~
- Red arrows in both pics below: They point to the same feature.
- Upper pic, white oval: Macha Tor
- Lower pic: Rocks forming Macha Tor plateau

13) Macha Tor ~~~
- Upper pic:
• 5 red arrows, left to right:
1 Mt Bregon
2 Mumbedah Gap ... due north
3 Junction Mountain
4 Mt Scabilon ... north-east
5 Mt Woorut
- Middle & lower pics: Zooming to Macha Tor
• Left to right: John, Paul

14) Panorama from top of Macha Tor ~~~
- Upper pic: Red arrows & white oval: Refer to lower pic.
- Lower pic: Zooming out from the upper pic
• John taking photographs
• 4 red arrows, left to right:
1 Belougery Spire
2 Crater Bluff
3 Grand High Tops
4 Bluff Mountain
• White oval: Breadknife
• This pic and photos #15, #16 form a 360-degree panorama.

15) (Continuation from the right of previous pic)
- 4 red arrows, left to right:
1 Bluff Mountain ... west-south-west
2 Bress Peak
3 Point Wilderness
4 Mt Exmouth
5 Unnamed peak, 2nd arrow from left in photo #6's upper pic.
3rd arrow from top in the map in photo #6's lower pic.
- White dashes: It is hard to discern Bress Peak from the background.
The dashes mark the shape of the mountain.
We’ll climb it next.
16) Panorama from top of Macha Tor ~~~
- Upper pic: (Continuation from the right of previous pic)
• John taking photographs
• 14 red arrows, left to right:
1 Mt Exmouth
2-3 Unnamed peaks ... Refer to middle 2 arrows in photo #6.
4 Febar Tor
5 Fans Horizon summit in Map #2
6 Fans Horizon lookout in Map #1 or Map #3 (1:50,000 topographic map)
7 Belougery Split Rock
8 Bullaway Mountain
9 Jeffs Mountain (flattish)
10 Pincham Carpark where we started our walk is behind and below the hill.
11 Mt Aranon
12 Mt Donn
13 Mt Bregon
14 Mumbedah Gap ... due north
- Middle pic: (Continuation from the right of the upper pic)
• John taking photographs
• Yellow arrow: I'll be standing on this rock in photo #17.
• 12 red arrows, left to right:
1 Mumbedah Gap ... due north
2 Junction Mountain
3 ?
4 Round Hill
5 Mt Scabilon ... north-east
6 Mt Woorut
7 Siding Spring Observatory
8 ?
9 Mopra Rock
10 ? (Well in front of Westons Mountain)
11 Westons Mountain (faraway, much further back)
12 Echo Mountain
• Left half of this pic is photo #17.
- Lower pic: (Continuation from the right of the middle pic)
• 6 red arrows, left to right:
1 Eaglehawk Peak ... east
2 Figtree Spring Mountain
3 Burrumbuckle Mountain
4 Mt Caraghnan
5 Needle Mountain ... south-south-east
6 Roana Peak
- Continuation to the right of the lower pic is photo #14's lower pic, completing a 360-degree panorama.

17) Scenery here is left half of photo #16's middle pic (Photographer: John) ~~~
- I'm standing on the rock pointed by the yellow arrow of photo #16's middle pic.
- 6 red arrows, left to right:
1 Junction Mountain
2 ?
3 Round Hill
4 Mt Scabilon ... north-east
5 Mt Woorut
6 Siding Spring Observatory

To Bress Peak
After Macha Tor, at GR 8992 3394 on Pincham Trail, we go off-track to climb Bress Peak.
There used to be a foot track to Bress Peak. Not anymore :-(
18) First, cross Spirey Creek ~~~
- Upper pic: Facing downstream at John
- Lower pic: Facing upstream

19) Climbing up the slope of Bress Peak ... as usual, John is in front.

20) Panorama from a fifth of the way up Bress Peak slope ~~~
- Upper pic: John
• 3 red arrows, left to right:
1 Bluff Mountain ... south-west
2 Point Wilderness
3 Same as middle pic's 1st arrow from the left
- Middle pic: (Continuation from the right of the upper pic)
• 6 red arrows, left to right:
1-2 Unnamed peaks ... Middle 2 arrows of photo #6
3 Belougery Split Rock
4 Mt Donn
5 Unnamed hill approx 670 meters; east of Fans Horizon lookout in Map #1 or Map #3
Pincham Carpark where we started our walk is behind and below the hill.
6 Mt Bregon
- Lower pic: (Continuation from the right of the middle pic)
• Yellow dot: Where we crossed Spirey Creek ... approx ... photo #18
• Cyan arrows: Spirey Creek
• 4 red arrow, left to right:
1 Mt Donn
2 Unnamed hill approx 670 meters; east of Fans Horizon lookout in Map #1 or Map #3
Pincham Carpark where we started our walk is behind and below this hill.
3 Mt Bregon
4 Looks like a column, but actually a wall ... We are looking at it side on.
Refer to the red oval in photo #36.
This area is near Febar Tor.
And is approximately the top blue arrow of the map insert.
- Map insert:
• 3 blue arrows, left to right:
1 Where the 3 pics here are taken ... a fifth of the way up Bress Peak slope
2 Approximately same area as the right-most red arrow of the lower pic
3 Febar Tor ... photos #8, #9
• The label "Spirey View" is incorrectly placed. It shouldn't be there.

21) Climbing up the slope of Bress Peak ~~~
We are climbing up a ridge which is composed of volcanic rocks with not much scrub.
Also refer to photos #19, #22, #23, #24.

22) Facing down slope (Picture taken at the same spot as previous pic) ~~~
- Rocky hill in the background is the large rocky hill on the right half of photo #20's lower pic.

23) Bress Peak summit comes into view ~~~
- 2 red arrows, left to right:
1 Bress Peak secondary summit ... to the east of the main summit
2 Bress Peak main summit

24) Volcanic rocks along Bress Peak slope ~~~
(2 pics below are taken at the same spot.)
- Upper pic: John
• Yellow arrow: Direction of walk
- Lower pic: Facing backwards at the same volcanic ridge as the upper pic
• Yellow arrow: Direction of walk
• Cyan arrows: Spirey River
• 4 red arrows, left to right:
1 Mt Donn
2 Mt Bregon
3 Unnamed hill approx 670 meters; east of Fans Horizon lookout in Map #1 or Map #3
Pincham Carpark where we started our walk is behind and below this hill.
4 Junction Mountain

Bress Peak secondary summit
Bress Peak has a secondary summit.
We reach it first before proceeding to the main summit.
I saw an old article naming the secondary summit as Bridget peak.
The secondary summit is a dome composed of dolerite which is uncommon in this part of the park. Whereas the main summit is composed entirely of trachyte (a different rock) which has been altered by hot volcanic steam.
25) At Bress Peak secondary summit, facing the main summit ~~~
- Upper pic:
• 2 red arrow, left to right: Bluff Mountain, Bress Peak main summit
- Lower pic: We are heading towards the main summit.
• Red arrow: The main Summit
• Yellow arrows: Route to summit

Bress Peak main summit
26) The main summit is behind the cliff top ~~~
John marvelling at the impressive cliffs.
From here, the way to the summit is first go to the right.

27) In both pics below, Bress Peak main summit is just behind the cliff top.
- Lower pic, yellow arrow: The way to the summit (Then climb up just behind the ridge.)

28) Arrive at Bress Peak main summit ~~~
- Upper pic: John
• 2 red arrows, left to right: Crater Bluff, Balor Peak
- Lower pic: Zooming to John at the centre of the upper pic
• White oval: Summit cairn ... Refer to photo #29.
• Red arrow: Balor Peak

29) Cairn at Bress Peak main summit ~~~
Looks like no one has been here for ages.
- 2 red arrows, left to right: Point Wilderness, Mt Exmouth

30) John & Paul at Bress Peak main summit

Scenery from Bress Peak main summit
31) Bluff Mountain ... south-west ~~~
- White oval: John
- This pic and photos #32, #33 form a 360-degree panorama.

32) (Continuation from the right of previous pic)
- 2 red arrows, left to right: Point Wilderness, Mt Exmouth
- Continuation to the right of this pic is photo #33.

33) Panorama from Bress Peak summit ~~~
- Upper pic: (Continuation from the right of previous pic)
• 12 red arrows, left to right:
1 Bullaway Mountain
2 Jeffs Mountain (flattish)
3 Mt Aranon
4 Belougery Split Rock
5 Unnamed 734-meter peak
2nd arrow from left in photo #6's upper pic.
2nd arrow from top in the map in photo #6's lower pic.
6 Mt Donn
7 Fans Horizon lookout in Map #1 or Map #3
8 Black Mountain
9 Mt Bregon ... north
10 Unnamed hill approx 670 meters; east of Fans Horizon lookout
Pincham Carpark where we started our walk is behind and below this hill.
11 Junction Mountain
12 Round Hill
• Cyan arrow & dotted line: Spirey Creek
- Middle pic: (Continuation from the right of the upper pic)
• 14 red arrows, left to right:
1 Mt Scabilon ... north-east
2 Febar Tor
3 Mt Woorut
4 Siding Spring Observatory
5 ?
6 Mopra Rock
7 ? (Well in front of Westons Mountain)
8 Macha Tor
9 Westons Mountain (faraway, much further back)
10 Echo Mountain
11 Eaglehawk Peak
12 Figtree Spring Mountain ... east
13 Burrumbuckle Mountain
14 Mt Caraghnan
- Lower pic: (Continuation from the right of the middle pic)
• White oval: Breadknife
• 8 red arrows, left to right:
1 Mt Caraghnan
2 Needle Mountain and its communication tower ... south-south-east
3 Roana Peak
4 Sreng Boss
5 Belougery Spire
6 Grand High Tops
7 Crater Bluff
8 Balor Peak
• Photo #34 zooms into the middle part of this pic.
- Continuation to the right of the lower pic is photo #31, completing a 360-degree panorama.

34) Zooming into the middle part of previous pic ~~~
- White oval: Breadknife
- 7 red arrows, left to right:
1 Needle Mountain and its communication tower ... south-south-east
2 Roana Peak
3 Sreng Boss
4 Belougery Spire
5 Grand High Tops
6 Crater Bluff
7 Balor Peak

Returning to Bress Peak secondary summit
35) Returning to secondary summit of Bress Peak ~~~
- Cyan arrow: secondary summit
- Yellow arrows: Route to main summit
- 11 red arrows, left to right:
1 Mt Scabilon ... north-east
2 Febar Tor
3 Mt Woorut
4 Siding Spring Observatory
5 ?
6 Mopra Rock
7 ? (Well in front of Westons Mountain)
8 Macha Tor
9 Westons Mountain (faraway, much further back)
10 Echo Mountain
11 Eaglehawk Peak

Climbing down Bress Peak
36) Climbing down the slope of Bress Peak ... along the same ridge of volcanic rocks that we climbed up ~~~
- White arrow: John
- Cyan arrows: Spirey Creek
- 6 red arrows, left to right:
1 Mt Donn
2 Unnamed hill approx 670 meters; east of Fans Horizon lookout in Map #1 or Map #3
Pincham Carpark where we started our walk is behind and below this hill.
3 Mt Bregon
4 Mumbedah Gap ... due north
5 Junction Mountain
6 It is the right-most red arrow in photo #20's lower pic.
Location is near top blue arrow in the map insert there.

37) Amazing small caves, GR 8986 3371, on the slope of Bress Peak ~~~
It is worth a trip to come here just to see them !
- Upper pic, white oval: The middle pic zooms into this area.
- Middle pic, cyan oval: It is the cave in the lower pic.

Back on Pincham Trail after climbing down Bress Peak
38) Back on Pincham Trail ... at a bridge over Spirey Creek ~~~
It is a warm day. Temperature is around 28 degrees Celsius.
We've all drank a lot. So we go down to Spirey Creek to replenish our water.
I gulp down almost a litre of water there.
- Upper pic: John reorganizing his freshly filled water bottles.
- Bottom pic: (Continuation from the right of the upper pic)
• White oval: Footbridge of the upper pic
• Yellow circle: Where we replenished our water

Spirey View
We make a detour to Spirey View. It is a lookout on some rocky platforms.
39) Well maintained foot track to Spirey View

40) Spirey View lookout ~~~
- Upper pic:
• 3 red arrows, left to right:
1 Balor Peak
2 Bluff Mountain
3 Bress Peak
- Lower pic: View to the left of the upper pic, from one of the rocky platforms
• 6 red arrows, left to right:
1 Belougery Spire
2 Grand High Tops
3 4 Breadknife ... We are going there next.
5 Unnamed
6 Balor Peak

To Breadknife
41) Another footbridge on Pincham Trail ~~~
- Yellow arrow: Direction of walk

42) Pincham Trail ... We are heading to Breadknife.

43) On the stairs to Breadknife ~~~
- Red arrow: Balor Peak

44) On the stairs to Breadknife, red arrow

45) Cliffs ... we are close to Breadknife

46) More stairs to Breadknife

47) Walking along the base of Breadknife ~~~
- Lower pic, yellow arrow at bottom-left corner: Foot track

48) View from around the base of Breadknife ~~~
- Upper pic: Centred towards south-east
• 2 red arrows, left to right:
1 Belougery Spire
2 Razor-blade-like rocky ridge of photos #62, #65
Grand High Tops is just behind it and can't be seen from here.
- Middle pic: Zooming into left-half of the upper pic
- Lower pic: Zooming into the right-half of the upper pic

To a gap in Breadknife
49) We make a detour to a gap in Breadknife ~~~
- Yellow arrows in both pics below: Direction of the detour
- Upper pic: John
• Breadknife is the cliff on the right
- Lower pic: Looking back at where we left the main foot track
• Blue route: Main foot track to Grand High Tops lookout
• Breadknife is the cliff on the left

50) A bird's eye view of Breadknife ~~~
- White oval: After Breadknife, we'll be at this razor-blade-like rocky ridge ... photos #62, #65.
- 2 red arrows, left to right: Crater Bluff, Grand High Tops lookout
- Yellow dot: The gap in Breadknife ... photo #51
- Yellow route: We walked along this route to the gap ... Refer to previous pic.

Gap in Breadknife
51) Arrived at the gap in Breadknife via the yellow arrows in photos #49, #50 ~~~
- John at the gap ... He'll be on the other side in photos #53 and #54.
- Yellow arrow: The way to here.

52) Breadknife ... facing north ~~~
- Left pic:
• Yellow arrow: The route to here.
• White oval: The gap where John was in the previous pic
• 2 white arrows, left to right: John's and my backpacks

53) Breadknife ... facing north ~~~
- John has crossed the gap of previous pic ~~~
- Cyan arrow: Spirey Creek
- White oval: Interesting unnamed rocks just beyond the north end of Breadknife
- 5 red arrows, left to right:
1 Mt Donn
2 Unnamed hill approx 670 meters; east of Fans Horizon lookout in Map #1 or Map #3
Pincham Carpark where we started our walk is behind and below this hill.
3 Mt Bregon
4 Mumbedah Gap
5 Junction Mountain

54) Breadknife ... identical scene as previous pic ~~~
- Cyan arrow: Spirey Creek
- White oval: Interesting unnamed rocks just beyond the north end of Breadknife
- 10 red arrows, left to right:
1 Bress Peak main summit
2 Mt Aranon
3 Belougery Split Rock
4 Bress Peak secondary summit
5 Mt Donn
6 Black Mountain
7 Unnamed hill approx 670 meters; east of Fans Horizon lookout in Map #1 or Map #3
Pincham Carpark where we started our walk is behind and below this hill.
8 Mt Bregon
9 Mumbedah Gap
10 Junction Mountain

55) Breadknife ... photographed from the gap of photo #51, facing south ~~~
- Blue arrow: Same top-of-the-rock feature as in photo #56
- Red arrow: A boot-like rock there ... Refer to photo #57.

56) John tries to do some climbing on the Breadknife ~~~
- Red arrow: This is as high as John is willing to climb up :-)
- White ovals in both pics: They circle the same feature.
- Blue arrows in both pics: They point to the same feature.
The blue arrow in photo #55 also points to the same feature.

57) A boot-like rock ~~~
- Photograph taken by John from the red arrow in the previous pic
- In photo #55, it is the red arrow.

58) Bird's eye view of the south section of Breadknife, photos #55 to #57 ~~~
- Red arrow: Boot-like rock of previous pic
- The gap of photo #51 is just beyond the right edge.

59) Panorama, from west to north-north-east ~~~
Photograph taken from the gap of photo #51.
- Upper pic:
• Red bar: Bluff Mountain
• 3 red arrows, left to right: Dows Lookout, Mt Exmouth, Unnamed
- Lower pic: (Continuation from the right of the upper pic)
• Cyan arrows: Spirey Creek
• White oval: Interesting unnamed rocks just beyond the north end of Breadknife
• 15 red arrows, left to right:
1 Point Wilderness
2 Balor Peak
3 Bullaway Mountain
4 Jeffs Mountain (flattish)
5 Bress Peak main summit
6 Mt Aranon
7 Belougery Split Rock
8 Bress Peak secondary summit
9 Mt Donn
10 Black Mountain
11 Unnamed hill approx 670 meters; east of Fans Horizon lookout in Map #1 or Map #3
Pincham Carpark where we started our walk is behind and below this hill.
12 Mt Bregon
13 Mumbedah Gap
14 Febar Tor
15 Junction Mountain

60) In the opposite direction is the razor-blade-like rocky ridge of photos #62 and #65 ~~~
- Upper pic:
• Red arrow: Grand High Tops ... south
• White arrow: A person is standing there. Soon, we'll be there too.
- Lower pic: (Continuation from the right of the upper pic)
• Red & white arrows: Refer to the upper pic.
• Right half of the pic: Cliffs of the Breadknife

To razor-blade-like rocky ridge
61) John leading to a razor-blade-like rocky ridge
Razor-blade-like rocky ridge
62) (This scene is also repeated in photo #65.)
Razor-blade-like rocky ridge is the main feature at centre of this pic ~~~
It is just south of Breadknife.
- 13 red arrows, left to right:
1 Breadknife
2 Mumbedah Gap
3 Febar Tor
4 Junction Mountain
5 Sreng Boss
6 Macha Tor
7 Mt Woorut
8 Siding Spring Observatory
9 10 ? ?
11 Mopra Rock
12 Westons Mountain
13 Belougery Spire
- This pic and photos #63 and #64 form a 360-degree panorama.

63) Panorama from razor-blade-like rocky ridge ~~~
- Upper pic: (Continuation from the right of previous pic)
• 3 red arrows, left to right:
1 Westons Mountain
2 Belougery Spire
3 Burrumbuckle Mountain
- Middle pic: (Continuation from the right of the upper pic)
• The large peak behind the trees is Grand High Tops lookout
- Lower pic: (Continuation from the right of the middle pic)
• 6 red arrows, left to right:
1 Bluff Pyramid
2 Bluff Mountain
3 Dows Lookout
4 Mt Exmouth
5 Unnamed
6 Point Wilderness
- Continuation to the right of the lower pic is photo #64.

64) (Continuation from the right of previous pic) ~~~
- Breadknife is the main feature at centre.
- Cyan arrow: Spirey Creek, direction of flow
- Yellow dot: The gap in photo #51
- 15 red arrows, left to right:
1 Balor Peak
2 Bullaway Mountain
3 Jeffs Mountain (flattish)
4 Bress Peak main summit
5 Mt Aranon
6 Belougery Split Rock
7 Bress Peak secondary summit
8 Boot-like rock on top of Breadknife ... photo #57
9 Unnamed hill approx 670 meters approx; east of Fans Horizon lookout in Map #1 or Map #3
Pincham Carpark where we started our walk is behind and below this hill.
10 Mt Bregon
11 Mumbedah Gap
12 Febar Tor
13 Junction Mountain
14 Sreng Boss
15 Macha Tor
- Continuation to the right of this pic is photo #62, completing a 360-degree panorama.

65) (Same scene as in photo #62.)
John tries to climb to the highest point on the sharp rocky ridge ~~~
He gives up after a few attempts ... too difficult.
- Upper pic:
• 8 red arrows, left to right:
1 Breadknife
2 Febar Tor
3 Junction Mountain
4 Sreng Boss
5 Macha Tor
6 Mt Scabilon
7 Siding Spring Observatory
8 Westons Mountain
- Lower pic:
• 4 red arrows, left to right:
1 Junction Mountain
2 Mt Woorut
3 Siding Spring Observatory
4 Mopra Rock

To Grand High Tops lookout
66) On our way to Grand High Tops lookout

67) To Grand High Tops lookout ~~~
- Yellow arrows in both pics below: Direction of walk
- Lower pic: The 2 rock pillars are like a gate to Grand High Tops lookout.

68) Very close to Grand High Tops lookout ~~~
- Yellow arrow: Direction of walk
Grand High Tops lookout
69) At Grand High Tops lookout ~~~
- Upper pic:
• 6 red arrows, left to right:
1 Mt Scabilon
2 Mt Woorut
3 Siding Spring Observatory
4 Mopra Rock
5 Belougery Spire
6 Burrumbuckle Mountain
• This pic and photo #70 form a 360-degree panorama.
- Lower pic: Direction plaque at top of the cairn

70) Panorama from Grand High Tops lookout ~~~
- Upper pic: (Continuation from the right of photo #69's upper pic)
• White rectangle: Photo #72 zooms into this area
• 5 red arrows, left to right:
1 Roana Peak
2 Hurleys Camp and Needle Mountain (with its communication tower) in the same line of sight.
Hurleys Camp is in front, blocking the view to Needle Mountain.
3 Rocky Mountain
4 Crater Bluff ... Refer to photo #72.
5 Tonduron Spire
- Middle pic: (Continuation from the right of the upper pic)
• Yellow arrow: We'll descend Grand High Tops lookout this way.
(It'll take us to Dagda Saddle, then return to car.)
• 3 red arrows, left to right:
1 Tonduron Spire
2 Bluff Pyramid
3 Bluff Mountain
- Lower pic: (Continuation from the right of the middle pic)
• White rectangle: Breadknife at the centre ... Refer to photo #71.
• 12 red arrows, left to right:
1 Dows Lookout
2 Mt Exmouth
3 Unnamed
4 Point Wilderness
5 Balor Peak
6 Bullaway Mountain
7 Bress Peak main summit
8 Belougery Split Rock
9 Bress Peak secondary summit
10 Mumbedah Gap
11 Junction Mountain
12 Mt Scabilon
- Continuation to the right of the lower pic is photo #69, completing a 360-degree panorama.

71) Zooming into the white rectangle of previous pic ~~~
- Cyan arrow & dots: Spirey Creek, direction of flow
- Yellow dot: Gap in Breadknife ... photo #51
- White square & arrow: Boot-like rock on top of Breadknife ... photo #57
- Yellow route: Our route to here at Grand High Tops lookout
- Pink route: Dadga Short Cut, our return route from Grand High Tops
- White oval: Razor-blade-like rocky ridge ... photos #62 to #65
- 15 red arrows, left to right:
1 Balor Peak
2 Bullaway Mountain
3 Jeffs Mountain (flattish)
4 Bress Peak main summit
5 Mt Aranon
6 Belougery Split Rock
7 Bress Peak secondary summit
8 Black Mountain
9 Unnamed hill approx 670 meters; east of Fans Horizon lookout in Map #1 or Map #3
Pincham Carpark where we started our walk is behind and below this hill.
10 Mt Bregon
11 Mumbedah Gap
12 Febar Tor
13 Junction Mountain
14 Sreng Boss
15 Macha Tor

Above picture is a good summary of where we have been:
- Start from Pincham Carpark, 9th arrow, just behind and below the hill.
- Walk up stream of Spirey Creek, reverse direction of cyan arrow.
- To Febar Tor, 12th arrow.
- To Macha Tor, 15th arrow.
- To Bress Peak, 4th arrow.
- To Breadknife, yellow dot.
- To razor-blade-like rocky ridge, white oval.
- Then to Grand High Tops lookout, where this photo is taken.
- Next, to Dagda Saddle/Gap (not shown in this pic).
- Follow pink route to return to the car.
72) Zooming to Crater Bluff in photo #70's upper pic ~~~
It is a classic trachyte volcanic plug approximately 250m tall.
- 3 red arrows, left to right;
1 ?
2 Rocky Mountain
3 Crater Bluff
4 Tonduron Spire
To Dadga Saddle/Gap
73) On our way to Dadga Saddle/Gap ~~~
- Yellow arrows in both pics below: Direction of walk
- Red arrow: Bluff Pyramid

74) From where the previous pic was taken, facing backwards at Grand High Tops lookout ~~~
- 4 red arrows, left to right:
1 Grand High Tops lookout
2 Roana Peak
3 Hurleys Camp
4 Needle Mountain with its communication tower

75) (Further along the way to Dadga Saddle/Gap)
John photographing Crater Bluff ... south-ish ~~~
- 4 red arrows, left to right:
1 Crater Bluff
2 Baldy Mountain blocked by Crater Bluff
3 Unnamed approx 990-meter peak west-south-west-ish of Baldy Mountain
4 Tonduron Spire

76) Left (southern) tip of the large rock wall in photo #73 ~~~
(It is also the yellow oval of photo #78.)
Picture taken near where the previous pic was taken.
The previous pic was facing south-ish. This pic is facing north-ish.

77) We are on a foot track to Dagda Saddle/Gap ~~~
- Yellow arrow: Direction of walk

78) Breadknife ... picture taken on the way to Dagda Saddle/Gap ~~~
- Red arrows: Boot-like rock of photo #57
- Larger yellow oval (on the left): Breadknife ... Also see photo #80.
(In photos #49, #51, #56, #57, we were on the other side.)
- Smaller yellow oval (on the right): Photo #76 is a picture of the tip.
79) At Dadga Saddle/Gap ~~~
We now take Dagda Short Cut trail to Balor Hut (then to Pincham Trail, then to Pincham Carpark).

Dagda Short Cut trail
80) Breadknife from Dadga Short Cut trail ~~~
(This scene is the larger yellow oval in photo #78.)
- Red arrow: Boot-like rock of photo #57
- Yellow arrow: The gap in photos #51
81) Dadga Short Cut trail ... Heading to Balor Hut now (then to Pincham Trail, then to Pincham Carpark) ~~~
- Red arrow: Balor Peak

Balor Hut
82) Balor Hut ... Front of the hut facing the north-west side of Dadga Short Cut trail ~~~
Booking is required to stay in the hut.
Otherwise, you can pitch a tent around the campground.
- Upper pic: Picture taken 5 and a half years ago, 2015 October
• White oval: Balor Peak ... west-north-west-ish
- Lower pic: Picture taken today, 2021 April

83) Back of Balor Hut ... Picture taken 5 and a half years ago, 2015 October ~~~
- Yellow arrows: Dagda Short Cut trail to Pincham Carpark
- White oval: Portable toilet
Now replaced by a permanent toilet ... Refer to photo #84.

84) Fireplace & toilet at the back of Balor Hut ~~~
- White oval: Compared to the previous pic, it is a more permanent toilet now.

85) Back of Balor Hut (continuation from the right of previous pic)

Stairs (to and from Breadknife)
86) Then it is on the stairs which connects Pincham Carpark to the Breadknife ~~~
We are in the same area as photo #43.
- Yellow arrows in both pics below: Direction of walk

Flora
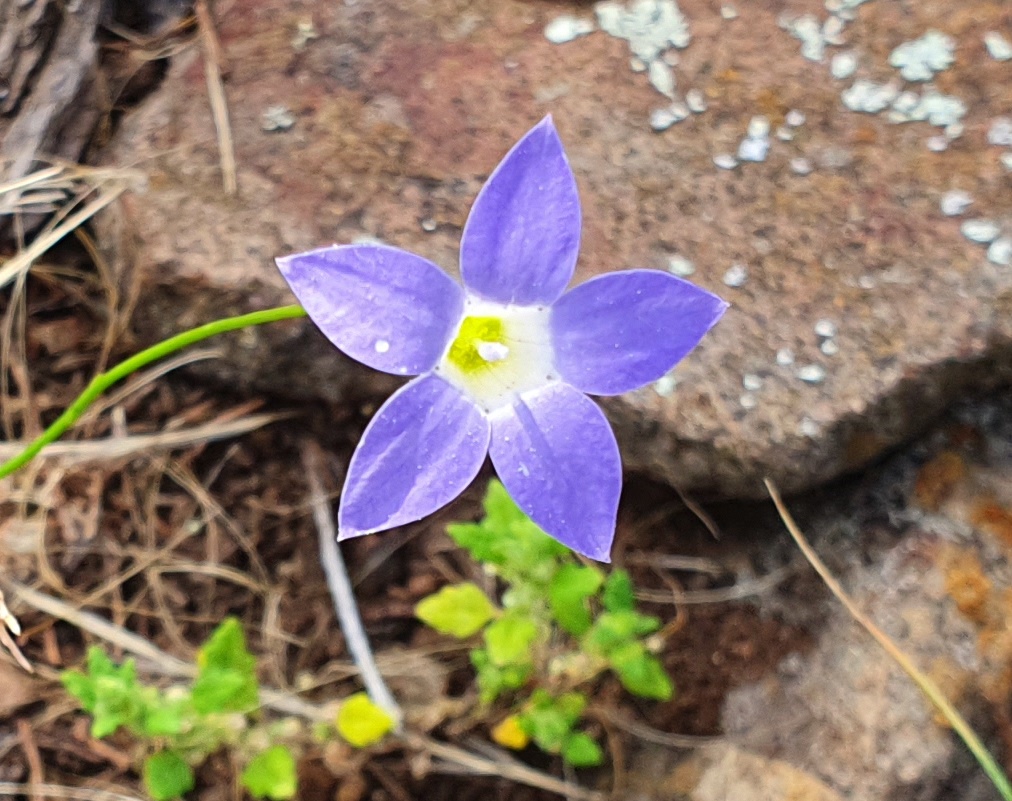
87) Wahlenbergia graniticola (Granite Bluebell) ... maybe ~~~
Found on Bress Peak secondary summit
88) Cynoglossum australe (Australian Forget-me-not, Austral Hound's Tongue)

89) Geranium solanderi (native geranium) ~~~

90) Pelargonium australe (Native Storksbill, Wild Geranium) ~~~
Found near Grand High tops lookout

91) Trachymene incisa (wild parsnip) ~~~
Found near Grand High tops lookout

92) Hawkweed ... a weed

Skinks
93) Lovely skinks found on razor-blade-like rocky ridge, photos #62, #65 ~~~
- Upper pic: Egernia mcpheei (Eastern Crevice Skink)
- Lower pic: Liopholis whitii (White's Skink)

Post Script - Mt Exmouth & Bluff Mountain
Trip report to Mt Exmouth & Bluff Mountain are in this link:
http://mntviews.blogspot.com.au/2015/10/mt-exmouth-bluff-mtn-warrumbungle-np.html
No comments:
Post a Comment