2020 December
Day-trip:
Crayfish Creek
Crayfish Creek Canyon
short canyon in a Crayfish Creek's east side tributary
Hanging Rock
Blue Mountains, NSW, Australia
Preview
Crayfish Creek Canyon:
- Less than 200 meters in length.
- Water is less than knee deep.
- No abseil.
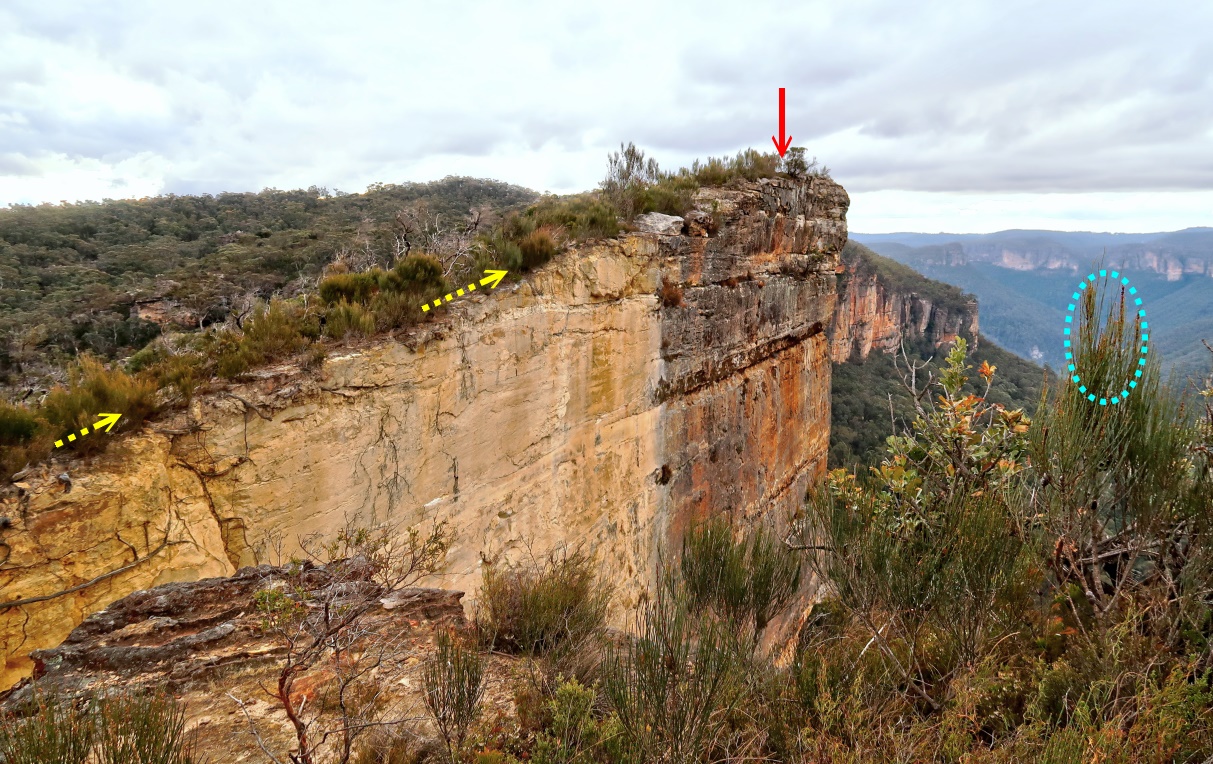
Hanging Rock and its infamous fissure.

Jumping over the fissure to Hanging Rock ... not for the faint-hearted !

A quick preview of the other photos is in this link :
https://drive.google.com/file/d/1mkRa_QiflNCkxLY0_P0z10B1gTxW11k_/view?usp=sharing
Prolog
Too many people take the boring Burramoko Trail to Hanging Rock.
No way I'm going to do that ! 😊
So instead, today I take 7 others:
Alan, Dan, Kelly (WHY), Lily, Lisa, Stanley, Zach
to seek out an adventurous route to Hanging Rock ...
via Crayfish Creek Canyon !
Another interesting way to Hanging Rock is :
- First to Burra Korain Head
- Then climb down to Crayfish Creek
- Then climb up to Hanging Rock
I "pioneered" such a trip with Yus and Alan about 2 years ago in 2018 September ... Refer to this link:
http://mntviews.blogspot.com/2018/09/burra-korain-head-to-hanging-rock.html
("Pioneered" - No record on the internet prior to mine.)
Crayfish Creek and its canyons
- Plenty of crayfish in them !
- Crayfish Creek Canyon is less than 200 meters in length.
- GR 4978 7984 to GR 4982 7985.
- No abseil.
- Water is less than knee deep.
- Crayfish Creek can be chest deep downstream of the canyon.
- Actually one short section is neck deep ...
You can avoid it by walking on its west bank.
- A short canyon in a east side tributary of Crayfish Creek is about 50 meters in length.
- GR 5028 8040 to GR 5032 8035.
- Water in the tributary and its canyon is about ankle deep.
- The canyon is blocked at its east end by unscalable cliffs.
- But near the blocked end, you can scramble up and out of the canyon ... Steep, but no rope is required for us.
Maps
LPI 1:25,000 scaled 8930-1N Mount Wilson
Ozultimate has a map in this link:
https://ozultimate.com/canyoning/maps/middle_grose_canyons.pdf
There, Crayfish Creek Canyon and the short canyon in Crayfish Creek's east side tributary are coloured in blue.
Map 1) The relevant part of the 1:25,000 topographic map

GPS tracklog file & route
The GPX tracklog file can be downloaded from:
https://drive.google.com/file/d/1QIqtntE95-8TuW9qNMCwpU8Ry3D-LLVy/view
Map 2) GPS tracklog in red is in the following 1:25,000 topographic map:
- 6 blue arrows, top to bottom:
1 Hanging Rock
2 Baltzer Lookout
3 short canyon in a east side tributary of Crayfish Creek
4 GR 4982 7985 Downstream end of Crayfish Creek Canyon
5 GR 4978 7984 Upstream end of Crayfish Creek Canyon
6 (Bottom of the map) GR 4846 7653 Carpark at end of Ridgewell Road, Blackheath
It is also the start and end of the walk.
- Black arrows: One can climb out the cliffs that way.
Yus, Alan and I did just that about 2 years ago in 2018 September ... Refer to this link:
http://mntviews.blogspot.com/2018/09/burra-korain-head-to-hanging-rock.html

Map 3) Satellite image

In summary:
- Park cars at GR 4846 7653, a carpark at end of Ridgewell Road, Blackheath.
- Walk northward along Burramoko Trail.
- Before reaching Burramoko Hill, turn west, go off-track at GR 5071 8040.
- Bushbash down to Crayfish Creek.
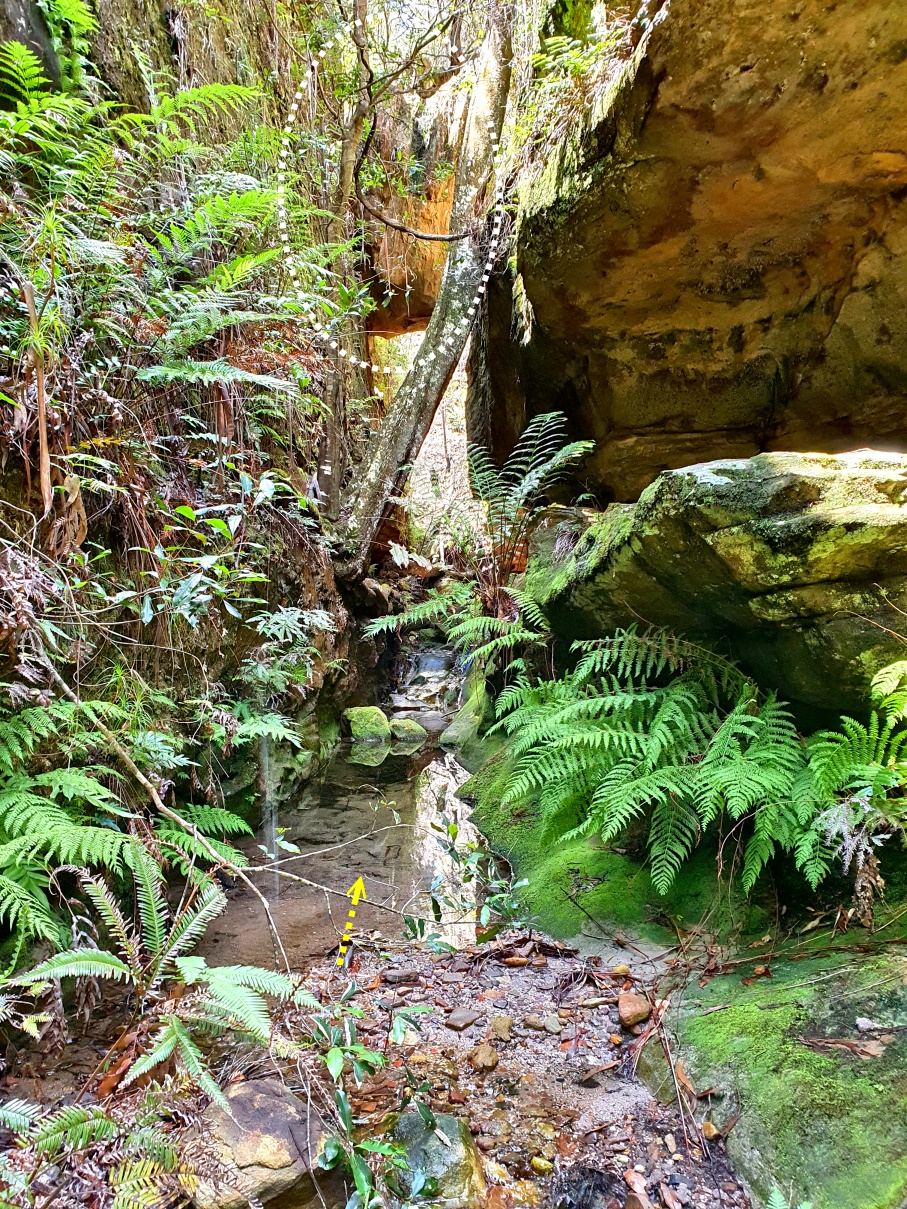
- Wade through Crayfish Creek and Crayfish Creek Canyon.
- At GR 5019 8044, go into a tributary on the east side of Crayfish Creek.
- Soon, the tributary becomes a short canyon and comes to a dead end surrounded by unclimbable cliffs.
- Find a way to climb up the cliff near the dead end.
- Once up the cliff, keep climbing towards Burramoko Trail.
- Then to Hanging Rock.
- Return to car via Burramoko Trail.
Timeline and Distance
Park Alan & Zach's car at a carpark, GR 4846 7653.
The carpark is as far as one can drive on Ridgewell Road, Blackheath.
08:08 0.0 km Start walking from carpark.
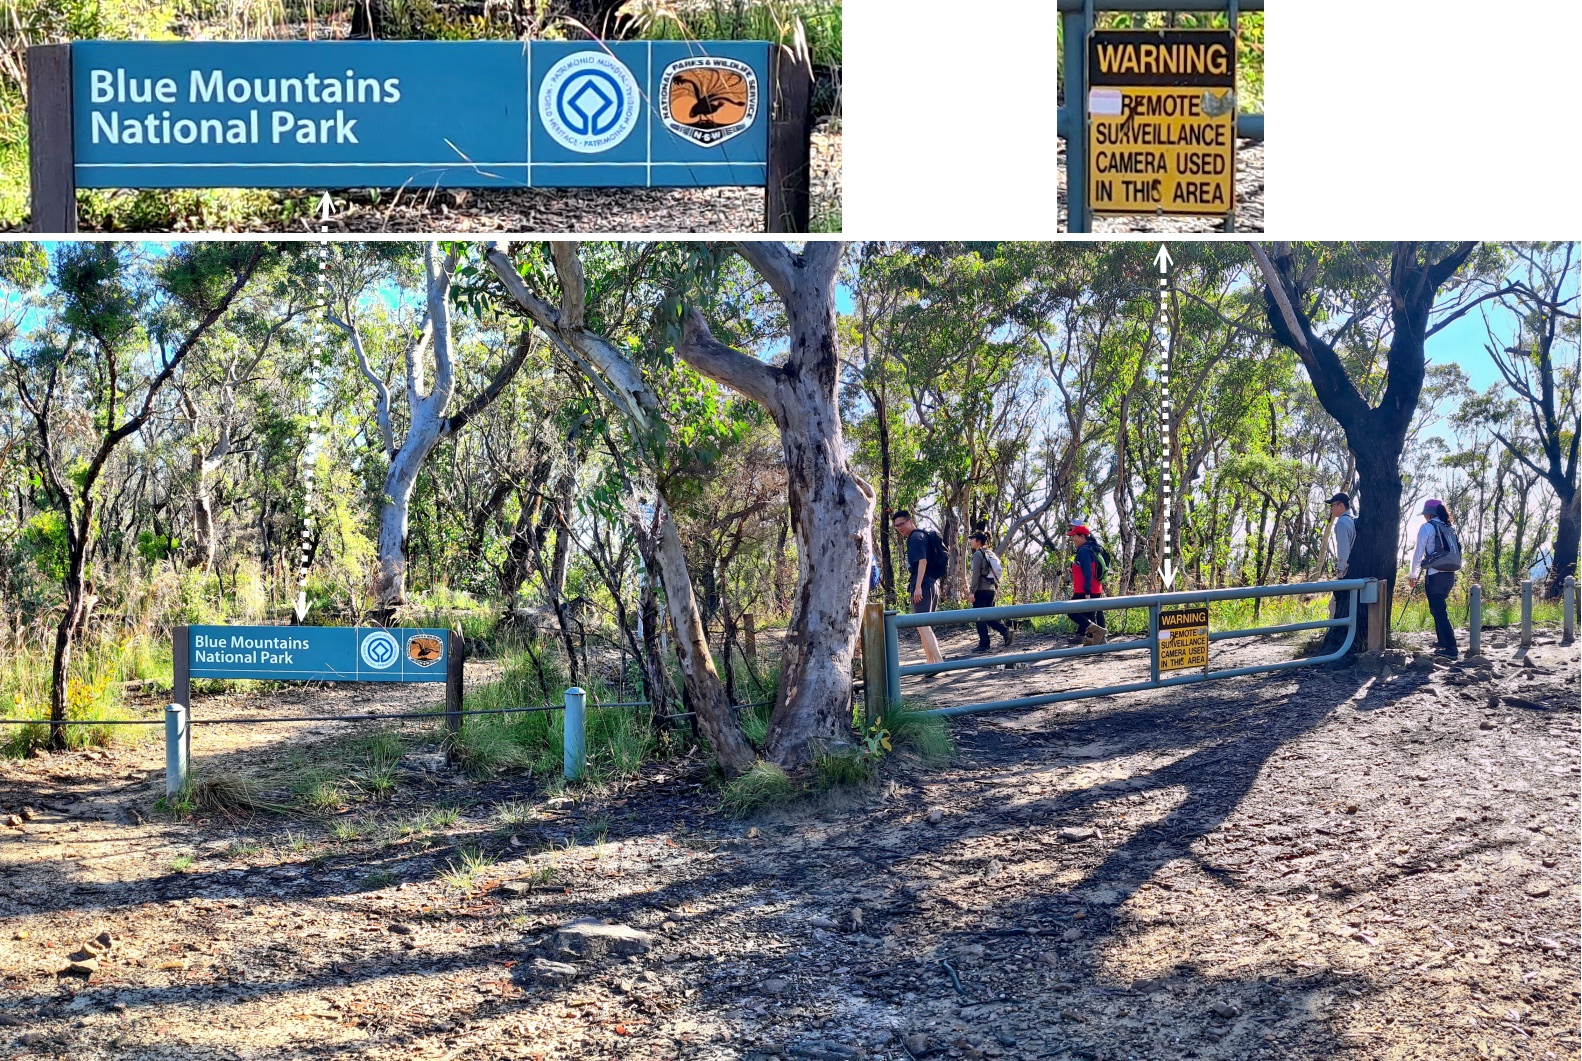
08:27 1.58km At a locked gate, GR 4926 7782, boundary of Blue Mountains Nat Pk.
08:28 1.58km Resume walking.
08:52 3.62km Leave Burramoko Trail. Turn left (west). Start bushbashing towards Crayfish Creek.
09:12 4.4 km At Crayfish Creek ... Start walking downstream.
09:34 4.8 km Near start of Crayfish Creek Canyon.
Rest
09:40 4.82km At GR 4978 7984, Into Crayfish Creek Canyon.
10:01 5.0 km At GR 4982 7985, end of the canyon.
Drain water out of our shoes. Wring water out of our socks.
I don't know why we bother, because soon, we'll resume walking in the creek :-)
10:10 5.0 km Resume walking.
11:09 5.6 km At start of 1st deep pool.
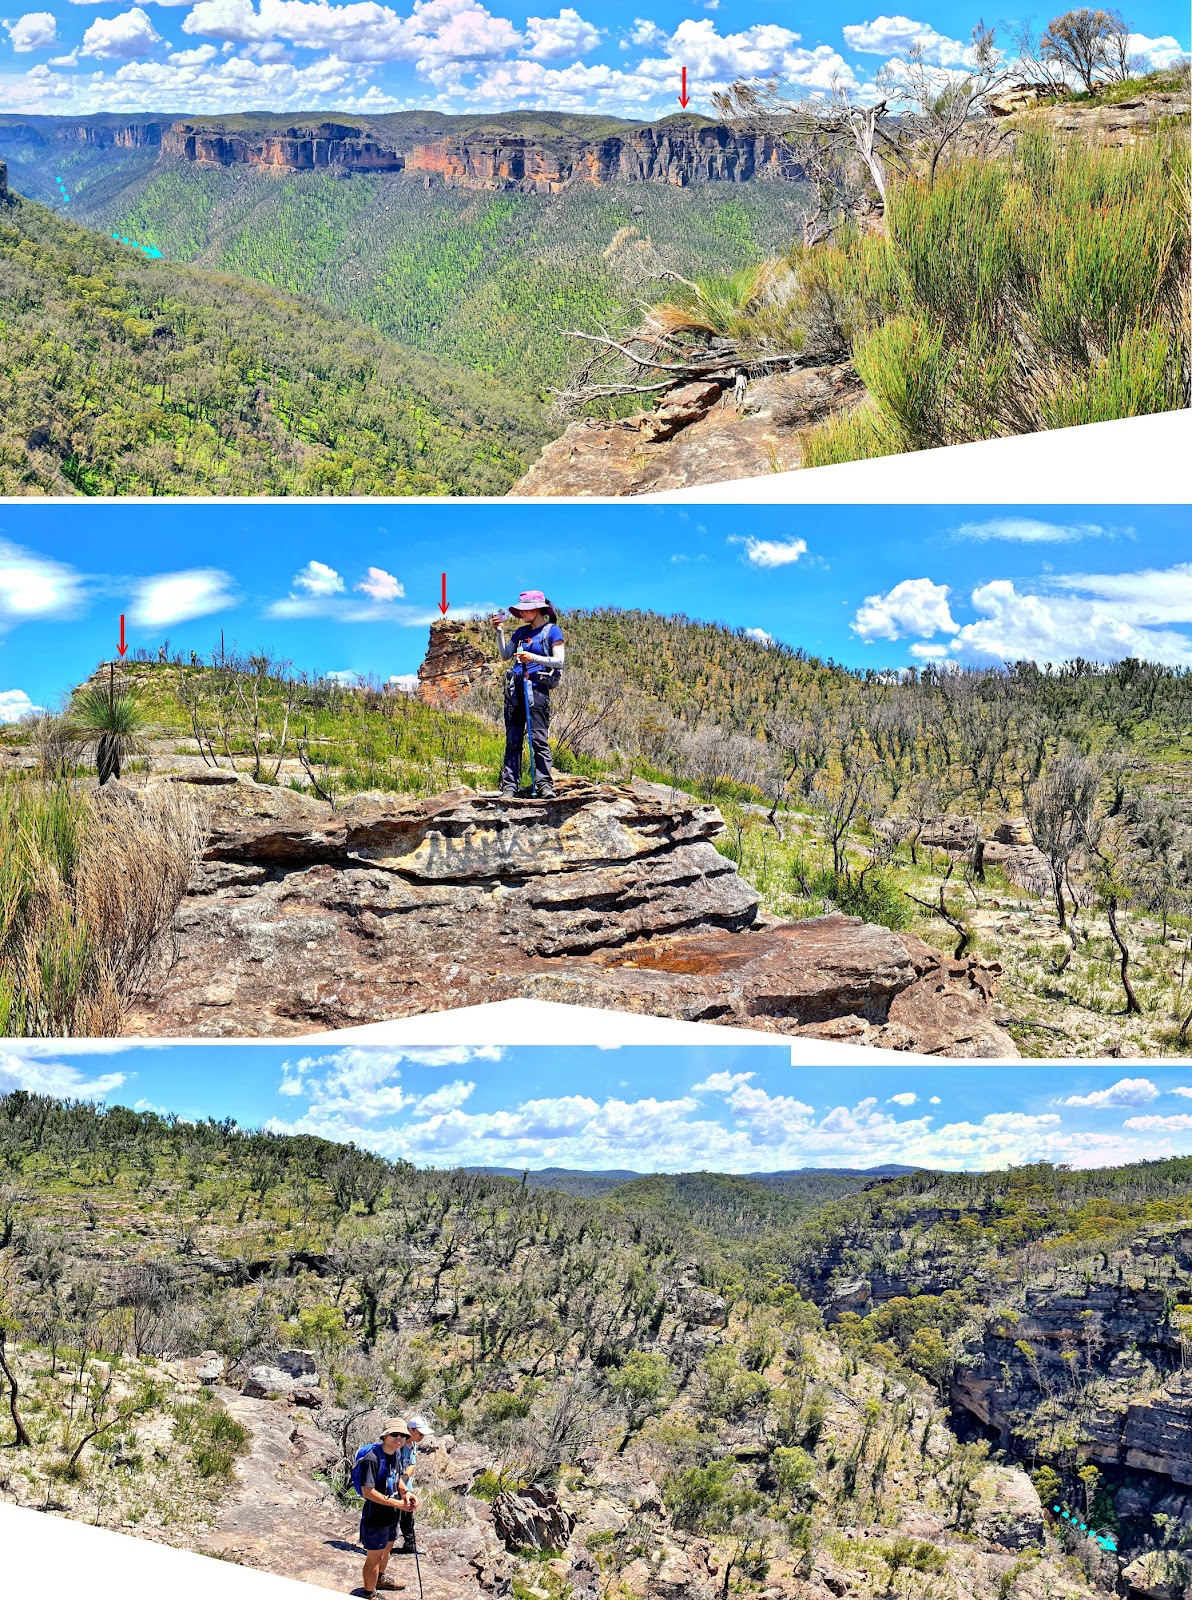
Only Kelly wade through the pool.
Water is up to her neck.
The rest of us walk halfway up the rocks lining the left bank of the creek.
11:14 5.62km At end of 1st deep pool.
11:33 5.85km At start of 2nd deep pool.
Water is chest deep.
Unlike the 1st deep pool, there is no way to avoid wading through this pool.
Alan managed to avoid getting his boots wet by hanging on the walls with his fingers. He succeeded only because I stood in the water holding up his bum :-)
11:39 5.88km At end of 2nd deep pool.
Wait for others to wade across.
11:42 5.88km Resume walking.
11:49 6.05km Close to junction of Crayfish Creek with one of its unnamed east side tributaries.
Rest.
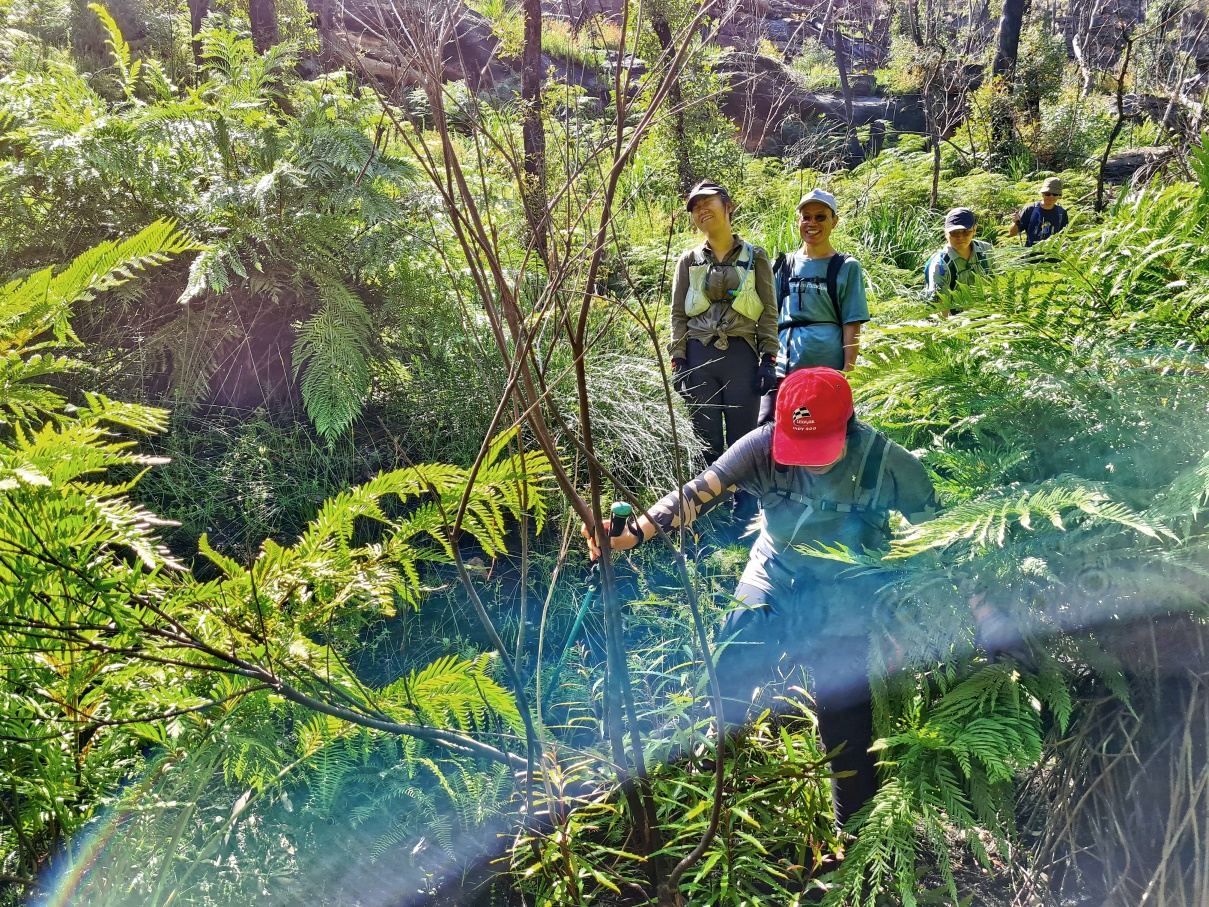
12:02 6.08km Resume walking by entering into the east side tributary.
12:09 6.25km At GR 5028 8040, start of a short canyon in the east side tributary.
12:14 7.32km At GR 5032 8035, end of the short canyon which is blocked by cliffs.
Wait for others to climb up a cliff just to the right of the blocked end of the canyon.
12:26 7.32km My turn to climb up the cliffs.
13:00 6.38km At a rocky area on a slope above where we climbed out of the short canyon
Lunch; and wait for Alan and Dan to climb up, because they are taking a different and more difficult/steep/exposed route up the cliff.
13:31 6.42km Resume walking.
(First, go south, upstream of a creek. Then turn east to cross the creek.
The creek is upstream of the tributary with the short canyon.)
13:39 6.58km Cross creek.
13:56 7.07km At Burramoko Trail.
13:58 7.07km Resume walking (to Hanging Rock).
14:18 7.65km Cross fissure to Hanging Rock.
14:34 7.75km Cross fissure from Hanging Rock back to the main cliff.
14:47 7.98km At as far as we can go along the cliffs north-west of Hanging Rock.
14:55 8.0 km Retrace steps (return to car now).
15:00 8.18km At the Hanging Rock fissure.
15:07 8.4 km Stop for a rest near Baltzer Lookout.
Rest
15.15 8.4 km Resume walking.
16:01 12.0 km At locked gate, GR 4926 7782, boundary of Blue Mountains Nat Pk, same spot as at 08:27.
16:21 13.57km Back at carpark.
===============================================
Total: 8 hrs 13 mins
13.57 km Distance is from Google Earth.
Carkpark on Ridgewell Road, Blackheath
GR 4846 7653, on Ridgewell Road, Blackheath.
The carpark is as far as one can drive on Ridgewell Road.
1) Carkpark ~~~
- Upper pic: Group photo (Photographer: Dan)
• Left to right: Lisa, Kelly, Lily, Stanley, Paul, Alan, Zach
- Lower pic, the girls and I: Lily, Paul, Kelly, Lisa

Boundary of Blue Mountains National Park
2) At a locked gate, GR 4926 7782, which marks the boundary of Blue Mountains National Park ~~~
- Why is there a warning sign on remote surveillance camera ?
Surveillance on what ?
- 5 people, left to right: Dan, Lily, Lisa, Zach, Kelly
Burramoko Trail
3) Initially, on Burramoko Trail ~~~
Burramoko Trail will lead to Hanging Rock. But we won't there just yet. We'll detour to there via Crayfish Creek.
- Front, left to right: Alan, Kelly, Stanley
- Back: Dan, Zach, Lisa

Off-track to Crayfish Creek
At GR 5037 7923, go off-track towards Crayfish Creek.
4) Off-track scenery to Crayfish Creek ~~~
- Lower pic, left to right: Zach, Kelly

5) Arrive at the east side of Crayfish Creek ~~~
- Upper pics: (Photographer: Alan)
• Left to right: Dan, Paul, Lily, Stanley, Kelly, Zach
• Red arrow: Cairn ... Refer to the lower pic.
• Cyan arrows: Crayfish Creek
- Lower pic: Zooming into the cairn of the upper pic
• Cyan arrow: Crayfish Creek

Crayfish Creek
Now walking along Crayfish Creek ... downstream.
6) Spiders ... plenty of them today

7) Facing backwards ... upstream of Crayfish Creek ~~~
- Blue arrow: Crayfish Creek
- Yellow arrow: Our route ... east bank here
We don't stick to one particular side of the creek.
We switch from one side to the other, depending on the terrain.

8) Cliff on the east bank of Crayfish Creek ~~~
Rainbow colour is caused by internal refraction of sunlight inside my phone's lens. It is not a natural rainbow :-)

9) All 4 pic below are facing forward ... downstream ~~~
- Upper pic, 7 people left to right:
1 Zach, 2 Alan, 3 Kelly, 4 Stanley, 5 Lily, 6 Dan, 7 Paul (Photographer: Lisa)
- Lower right pic, left to right: Kelly, Paul (Photographer: Dan)

10) Facing backwards ... upstream ~~~
- Yellow arrows: Direction of walk
- Right pic: Alan is in front. Behind him is Dan. Behind him is Lisa & Zach.

11) Facing backwards ... upstream ~~~
- Upper pic: Left to right: Lisa, Dan, Kelly

12) Crayfish Creek comes to a bend ~~~
Turn right and there is Crayfish Creek Canyon ... Refer to photo #13.
- Blue arrows: Direction of walk
- Left to right: Lily, Stanley

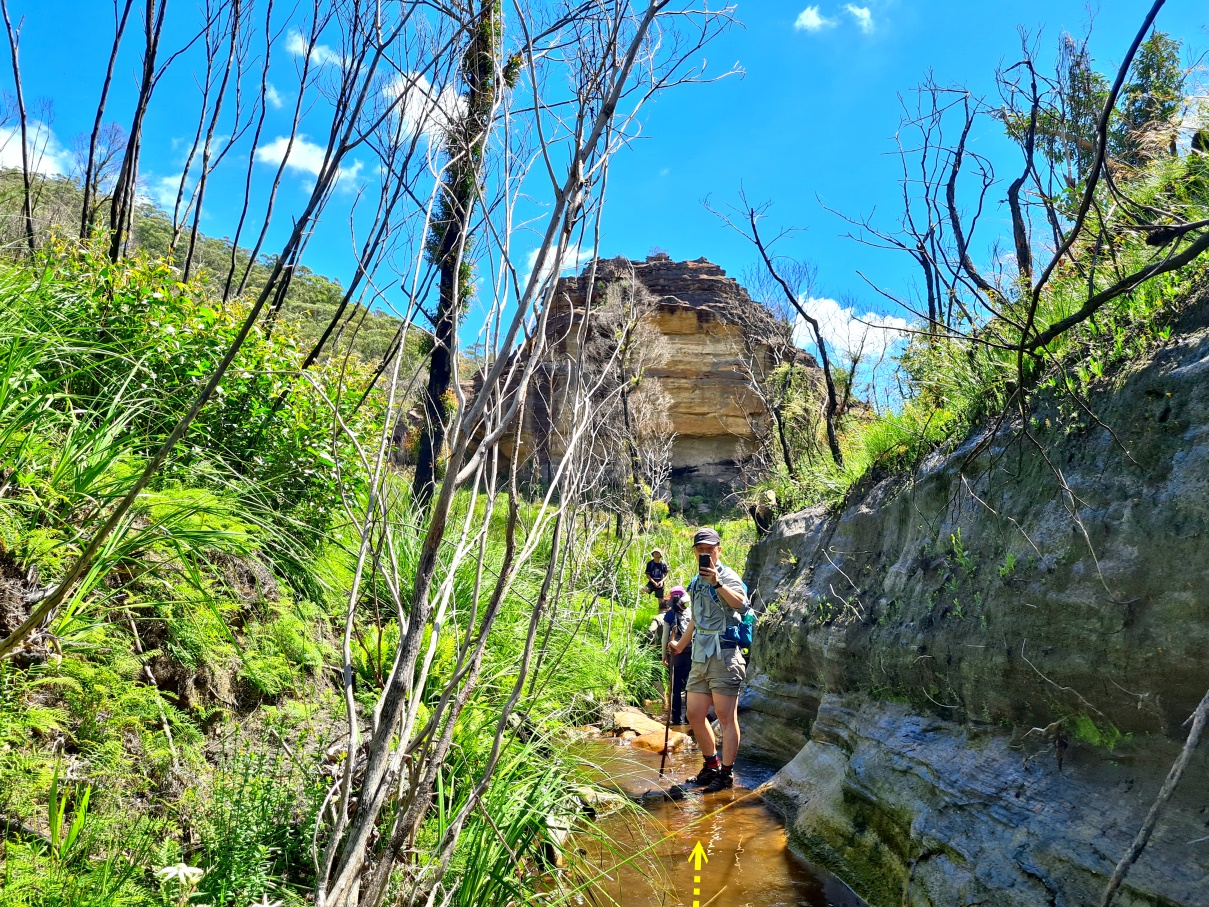
Entering Crayfish Creek Canyon
13) Entering Crayfish Creek Canyon ~~~
- Left to right: Lisa, Kelly

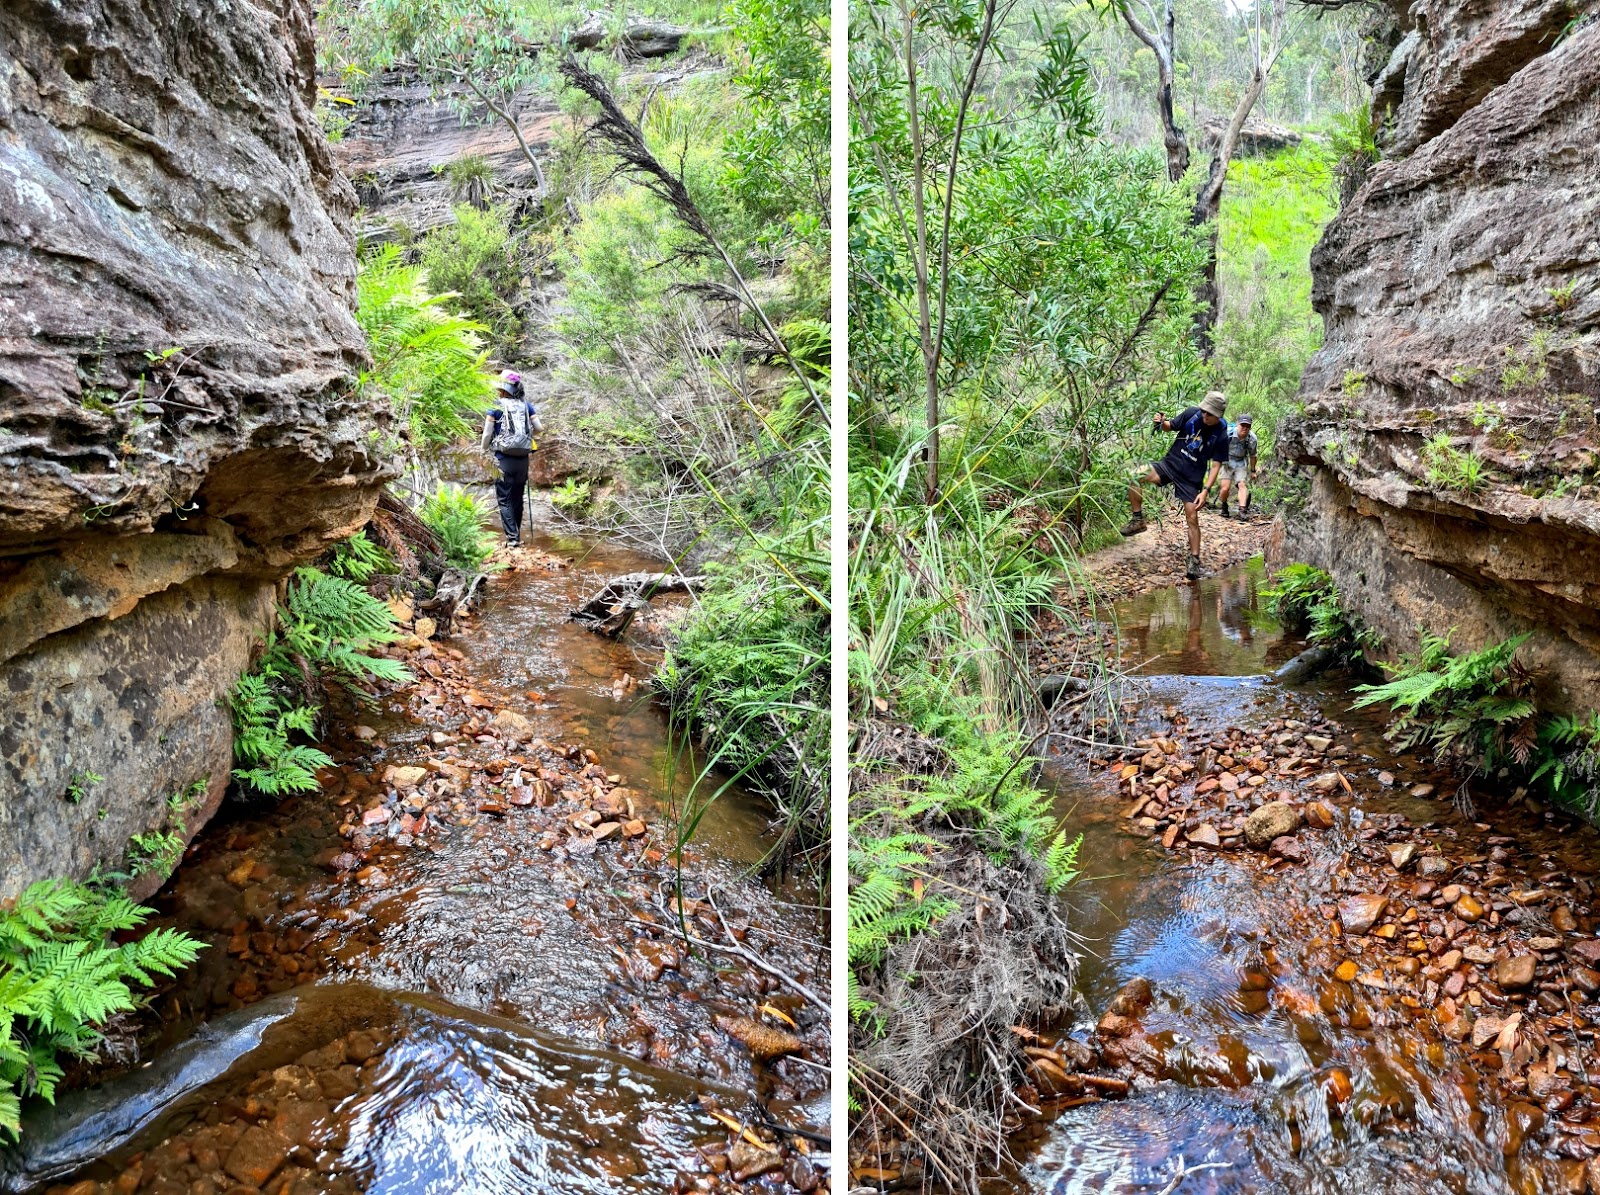
Crayfish Creek Canyon
14) Facing forward ... downstream of Crayfish Creek Canyon ~~~
The 2 pics below are of the same scene.
- Yellow arrows: Direction of walk
- Left pic: Lisa
- Right pic: Dan

15) Looking back at Crayfish Creek Canyon entrance ... upstream ~~~
The 2 pics below are of the same scene.
- Yellow arrows: Direction of walk
- Lower pic, left to right: Stanley, Lily

16) Facing forward ... downstream ~~~
- Yellow arrow: Direction of walk
- Lisa

17) Facing forward ... downstream ... a few steps forward compared to previous pic ~~~
- Yellow arrow: Direction of walk
- Left to right: Kelly, Lisa

18) Facing forward ... downstream ... a few steps forward compared to previous pic ~~~
- Yellow arrow: Direction of walk
- Left to right: Dan, Kelly

19) Facing backwards ... upstream ~~~
The 2 pics below are of the same scene.
- Yellow arrows: Direction of walk
- Left pic: Stanley photographing Alan
- Right pic, left to right: Lily, Zach, Alan (having fun)

20) Facing backwards ... upstream ~~~
The 2 pics below are of the same scene.
- Yellow arrows: Direction of walk
- Upper pic, left to right: Stanley, Lily, Alan ... testing your eyesight :-)
- Lower pic, left to right: Lily, Zach

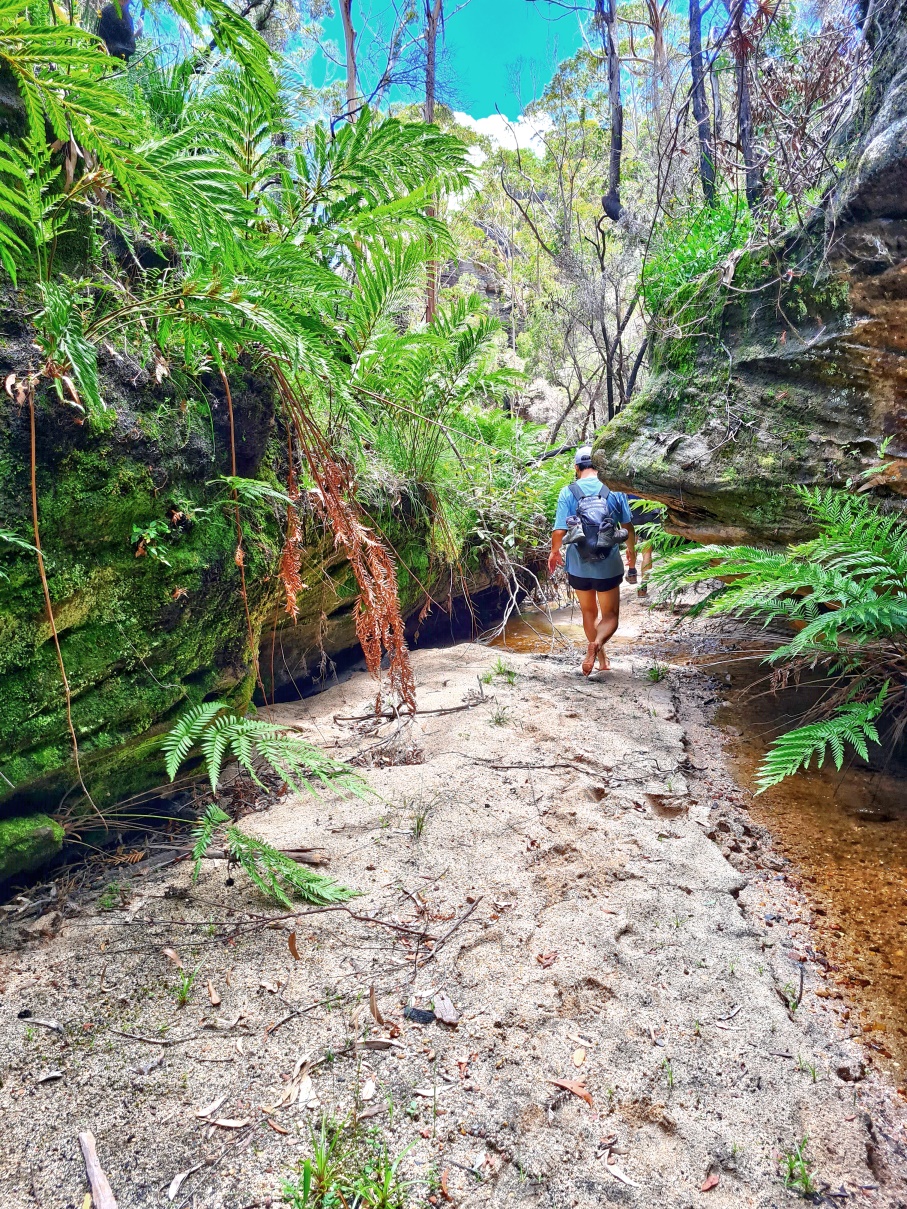
21) Facing forward ... downstream ~~~
- Yellow arrow: Direction of walk
- Left to right: Dan, Lisa

22) Facing forward ... downstream ~~~
The 2 pics below are of similar scene.
- Yellow arrows: Direction of walk
- Upper pic, left to right: Lily, Lisa
- Lower pic: A few steps forward compared to the upper pic ... Stanley

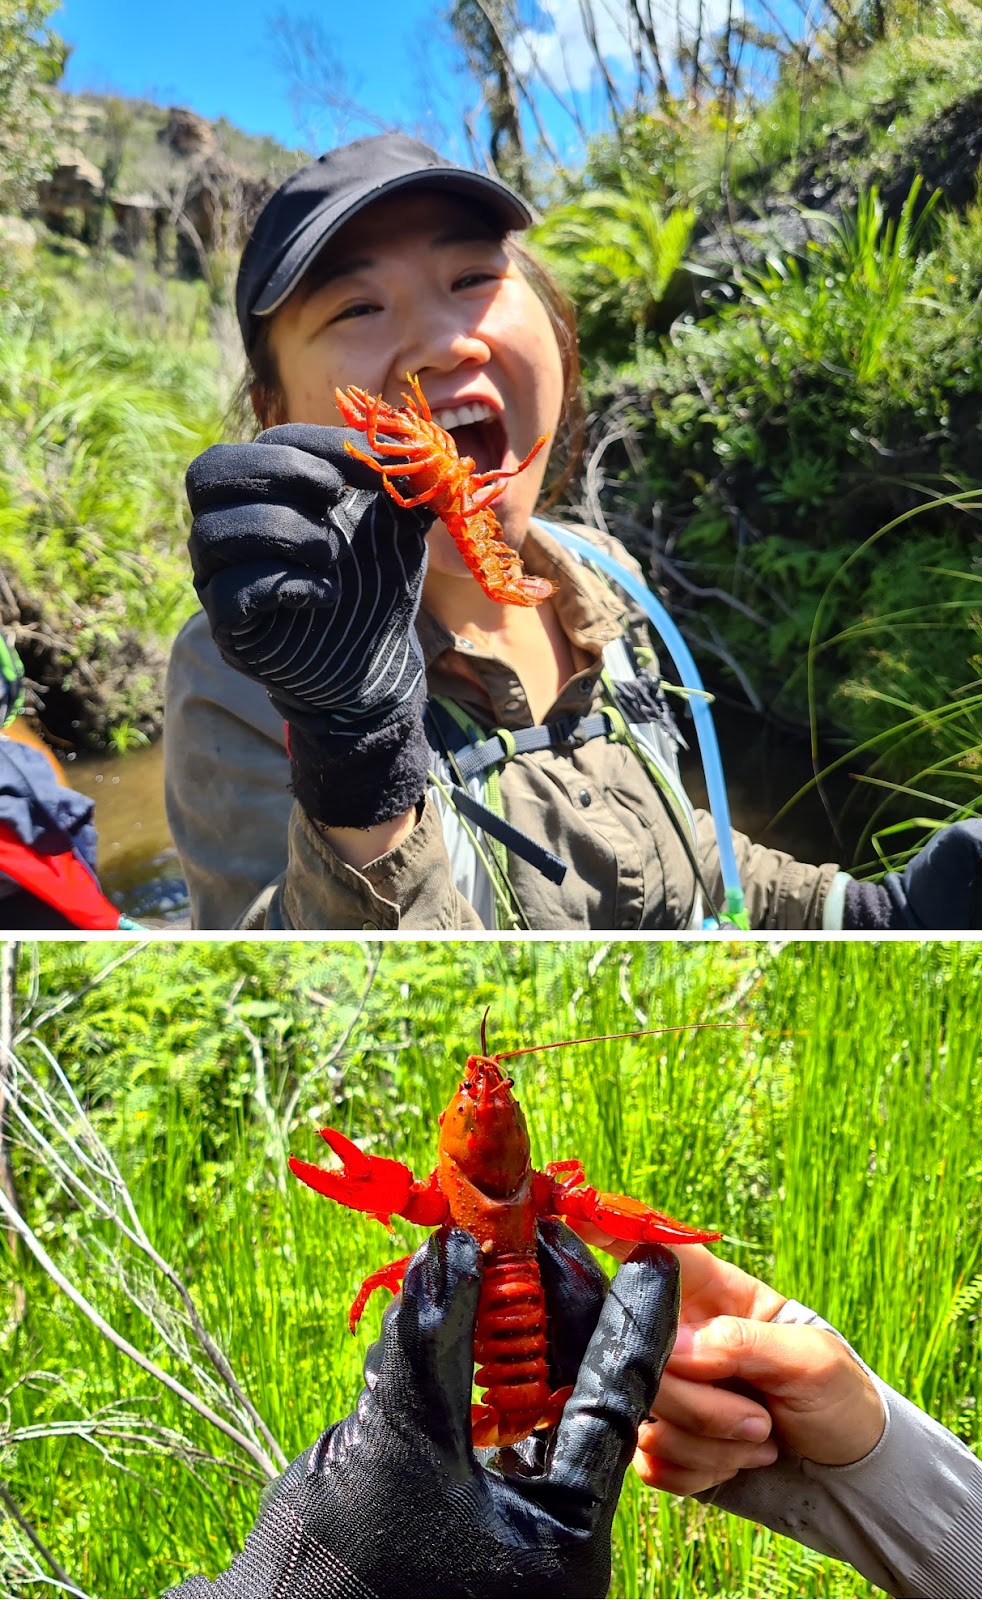
23) Plenty of Euastacus australasiensis (Sydney Spiny Crayfish) in Crayfish Creek Canyon ~~~
Sincerest apologies to animal lovers and to National Park authorities:
We shouldn't have touched any creatures / plants in a national park.
And to all bushwalkers reading this post ... please do not disturb the crayfish !
- Upper pic: Zach

24) Facing backwards ... upstream at Alan ~~~
The 2 pics below are of similar scene.
- Yellow arrows: Direction of walk
- Lower pic: A few steps away compared to the upper pic

25) Facing backwards ... upstream at Alan ~~~
- Few more steps away compared to the previous pic
- Yellow arrow: Direction of walk

26) A bend in Crayfish Creek Canyon ~~~
2 pics below are of the same bend, from opposite directions.
- Yellow arrows: Direction of walk
- Left pic: Facing forward ... downstream
- Right pic: After passing the bend ... facing backwards ... upstream at Zach

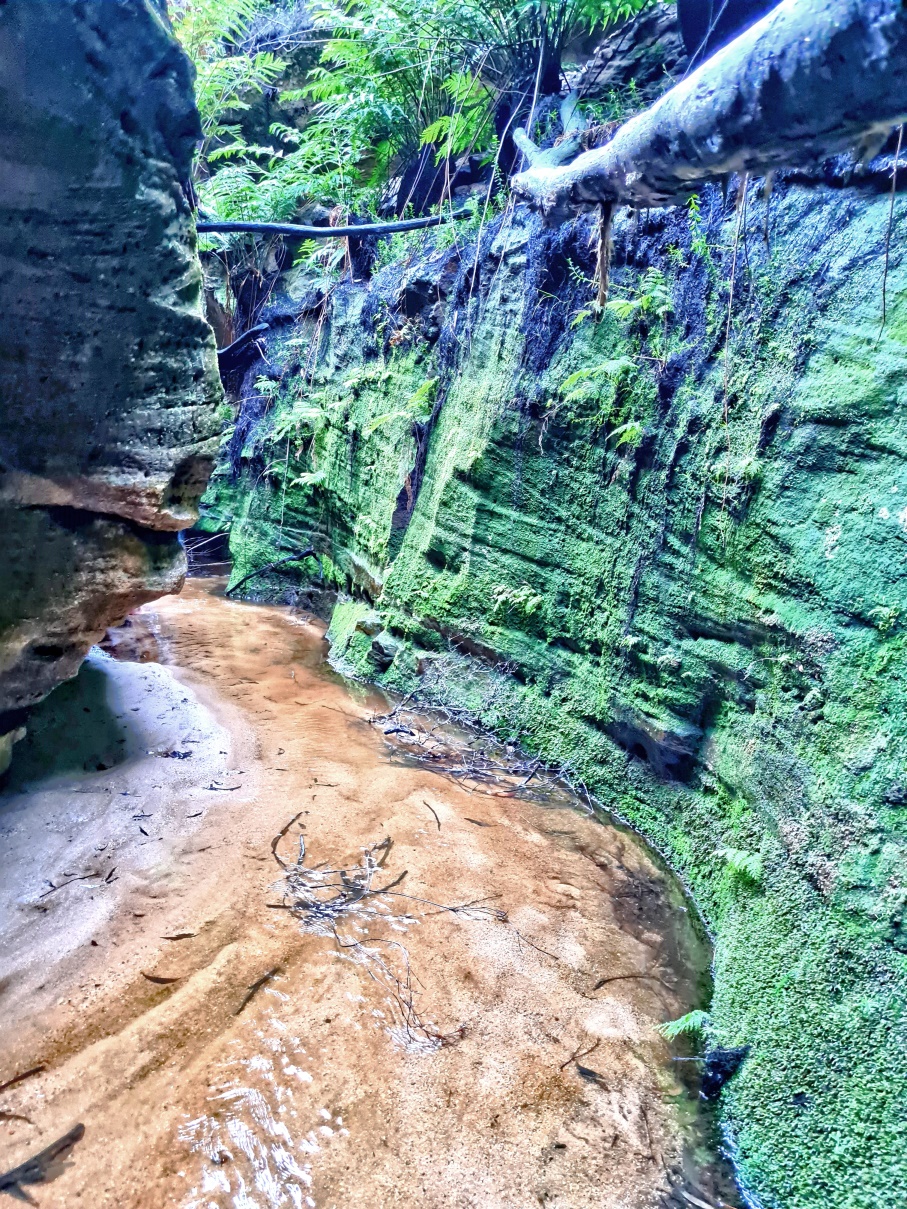
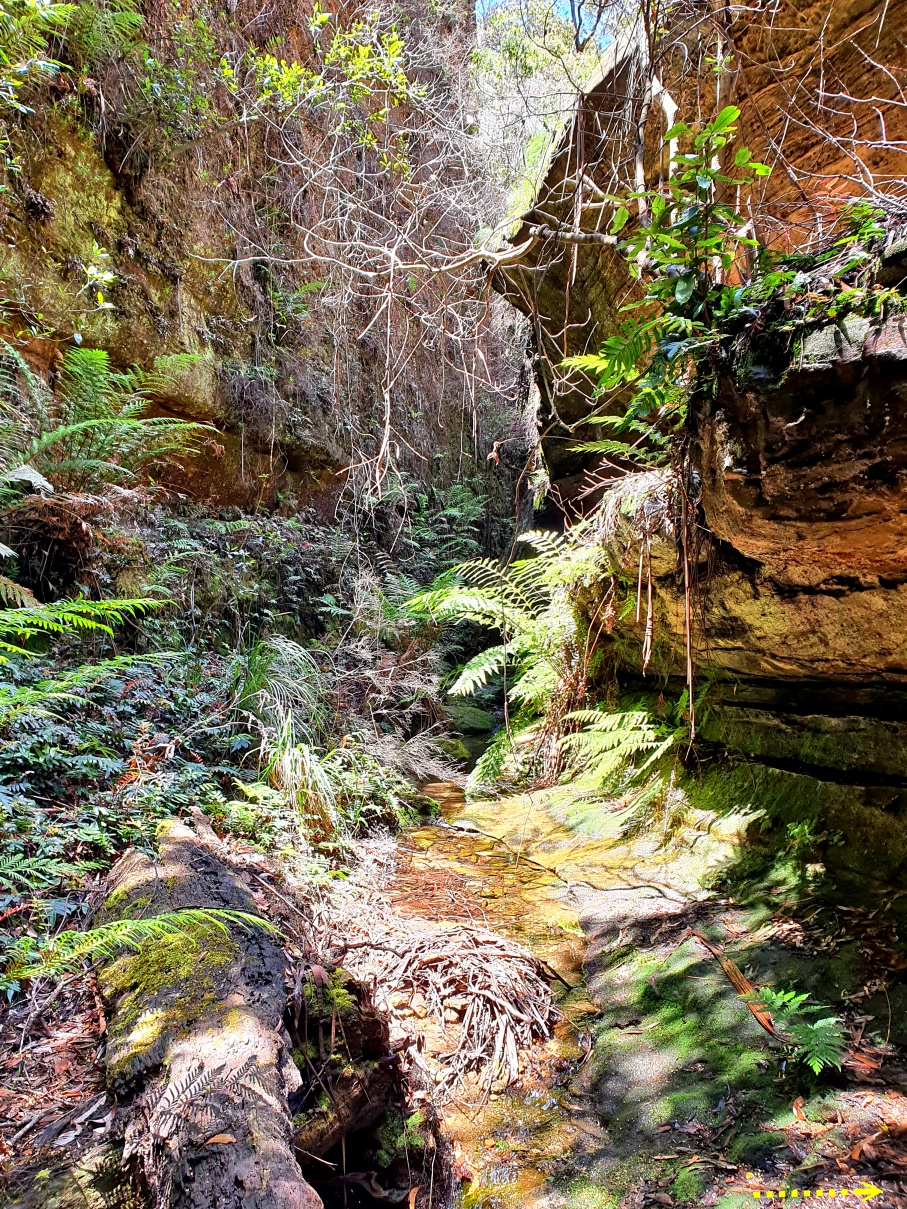
27) A green wall of vegetation ~~~
Why do plants grow on this section of the wall and not on others ?
- Yellow arrow: Direction of walk

28) Crayfish Creek Canyon blocked by a large fallen tree trunk ~~~
Fortunately there is a hole that can be crawled through.
- Upper left: Stanley photographing Lisa
- Upper right: Lisa
- Lower left: Lily (Photographer: Lisa)
- Lower right: Zach (Photographer: Lisa)

29) At the other side of the blockage (Photographer: Zach) ~~~
- Alan crawling through
- Yellow arrow: Direction of walk

30) Lisa photographing Stanley ~~~
- Yellow arrow: Direction of walk

31) Facing forward ... downstream ~~~
The 2 pics below are of similar scene.
- Yellow arrows: Direction of walk
- Upper pic, left to right: Stanley, Lisa
- Lower pic: A few steps forward compared to the upper pic ... Lisa

32) Facing backwards ... upstream at Zach ~~~
- Yellow arrow: Direction of walk

33) Almost at the downstream end of Crayfish Creek Canyon ~~~
- Yellow arrows: Direction of walk
- Upper pic: Facing forward ... downstream
• Lisa is in front. Ahead of her are Stanley & Lily.
- Lower pic: Facing backwards ... upstream
• Left to right: Alan, Zach

Downstream end of Crayfish Creek Canyon
We are now at the downstream end of Crayfish Creek Canyon.
34) Taking a rest here ~~~
- Stanley and Lily having fun while drying their feet :-)

35) Rest is over, time to leave ~~~
- Left to right: Dan, Lisa
- Yellow arrow: Direction of walk
- Cyan arrow: Crayfish Creek

Down to Crayfish Creek
36) Crayfish Creek ... cyan arrows in both pics below ... We are going down towards it ~~~
- Lower pic: (Continuation from the right of the upper pic)

37) Cicada shell (Photographer: Zach)

38) Down to Crayfish Creek ~~~
- Lisa is in front. Behind her are Lily, Stanley, Zach, Alan.
- Lily is groaning because she is about to get her feet wet again wading into Crayfish Creek. (Recall she dried her feet in photo #34.)
Crayfish Creek
39) Crayfish Creek, Facing forward ... downstream ~~~
Even though it is just a creek, it is quite interesting and pleasant to wade through.
- Yellow arrows: Direction of walk
- Upper pic: Lisa

40) At an overhang of Crayfish Creek ~~~
- Yellow arrows: Direction of walk
- Upper pic: Facing backwards ... upstream
• Left to right: Lily, Stanley
- Lower pic: Facing forward ... downstream
• Lisa is in front. The small figure in front of her is Dan.

41) Keep walking downstream ~~~
- Left to right: Kelly, Zach, Lisa

42) Diphlebia lestoides (Whitewater Rockmaster) ... a species of Australian damselfly in the family Lestoideidae
(Photographer: Zach)

43) The 2 pics below are of the same area ~~~
- Yellow arrows: Direction of walk
- White ovals: They circle the same tree.
- Upper pic: Facing forward ... downstream
• Stanley is at rear. In front of him is Lily. In front of her is Lisa, then Kelly & Zach.
- Lower pic: Facing backwards ... upstream
• Left to right: Lily, Stanley

44) Plenty of Euastacus australasiensis (Sydney Spiny Crayfish) in Crayfish Creek ~~~
Sincerest apologies to animal lovers and to National Park authorities:
We shouldn't have touched any creatures / plants in a national park.
And to all bushwalkers reading this post ... please do not disturb the crayfish !
- Upper pic: Lily wants one for lunch :-)
45) Plenty of tadpoles too (Photographer: Lisa)

46) Continuing along Crayfish Creek ~~~
- Upper pic: Pagoda-like rock formation on west (left) side of Crayfish Creek
- Lower pic: (Continuation from the right of the upper pic)
• Dan is leading.
• Behind him are Lily (mostly blocked by Stanley), Stanley, Lisa.

47) Facing backwards ... upstream ~~~
- Yellow arrow: Direction of walk
- Left to right: Zach, Kelly

48) Rock formation on west side of Crayfish Creek.

49) (Panning from the right of previous pic)
- Yellow arrow: Direction of walk
- Left to right: Alan, Lisa, Kelly, Zach
50) Facing backwards ... upstream ~~~
- Upper pic: Zooming into the centre of the lower pic
• Left to right: Stanley, Lisa, Lily, Kelly
- Lower pic: Zooming out from the upper pic
• Yellow arrow: Direction of walk
• Left to right: Kelly, Lisa, Stanley, Lily

51) Continuing along Crayfish Creek ~~~
- Upper pic: The rock formation here is the one in photo #49.
- Middle pic: (Continuation from the right of the upper pic)
• Left to right: Lisa, Kelly
- Lower pic: (Continuation from the right of the middle pic)
• Yellow arrow: Direction of walk

52) Facing backwards ... upstream ~~~
- Left to right: Zach, Lily, Stanley

A mini-canyon
53) At a section of Crayfish Creek which is like a mini-canyon ~~~
- Yellow arrows: Direction of walk
- 2 yellow circles: They circle the same dead branches.
- Left pic, left to right: Kelly, Lisa, Dan
- Right pic, left to right:
1 Stanley wanting to keep his feet dry :-)
2 Zach

54) A recess in the cliffs lining Crayfish Creek ~~~
- Left pic:
• Yellow arrow: Direction of walk
• White oval: Recess in the cliffs
• Left to right: Lisa, Kelly, Dan
- Right pic: A small cascade in the recess
• Lisa

Deep water
55) Water is very deeeeep here ~~~
Only Kelly is willing to wade through it ... not a problem to her.
She puts us all to shame, as we all opt to walk on the bank instead.
- Yellow arrows: Direction of walk
- Upper pic, top to bottom: Alan, Stanley, Kelly (Photographer: Dan)
- Lower pic: Same area as the upper pic, viewed from opposite direction (Photographer: Alan)
• 7 people left to right:
1 Zach, 2 Lily ... About to climb up the bank
3 Lisa, 4 Dan, 5 Paul, 6 Stanley ... On the bank
7 The adventurous Kelly

56) Same area as previous pic ~~~
- Yellow arrow: Direction of walk
- 3 people, left to right:
1 Stanley avoiding the deep water section
2 Kelly out of deep water
3 Alan having his lunch while waiting for us.
Previous pic was taken by Alan at where he is now.
In previous bushwalks I had been with Alan when he was the leader, he liked to walk fast, then munched on his lunch while waiting for the rest of the group. When the rest caught up with him, he would get going again. If you wanted lunch, you had call out to him. Else he would just keep walking because he had his lunch already !

57) Same area as previous pic ~~~
- Upper pic: Alan
• Yellow arrow: Direction of walk
- Lower pic: (Continuation from the right of the upper pic)
• Left to right: Lisa, Dan

58) Us avoiding the deep water section ~~~
- Left to right: Zach, Lily, Lisa, Dan, Paul
- (Photographer: Alan, taken from where he was in photos #56 and #57)

Shallow water
59) At a shallow water section of Crayfish Creek ~~~
- Left pic: Facing forward
• Kelly
- Right pic: Facing backwards
• Left to right: Alan, Zach
Another deep water
We come to another deeper water section of Crayfish Creek.
60) Crayfish Creek, facing downstream ~~~
- 4 people, top to bottom:
1 Alan, top left corner ... he tries to avoid getting his feet wet.
Lucky Alan isn't the leader today.
Else he may lead us to walk on the firetrail parallel to Crayfish Creek,
defeating the purpose of this trip which is a creek walk.
2 Lisa, 3 Dan, 4 Kelly

61) Crayfish Creek, facing upstream ~~~
- Upper pic: Lily is not happy. The water is too deep for her :-) But ...
- Lower pic: ... But she soon enjoys the thrill of wading through deep water ... I think :-)

62) Facing forward ... Water is about to get much deeper ~~~
Just behind the big rock on the left (where Alan is on top), there is a deep pool to wade across.
- Top to bottom: Alan, Lisa, Dan

63) Facing backwards ... This is the deep pool mentioned in the previous pic ~~~
The water will be chest deep ... Refer to photo #64.
- Yellow oval: In the previous pic, Lisa & Dan (and also I) went through this gap.
- Stanley (on top of a rock) is at where Alan was in the previous pic.
- 3 people below Stanley, left to right: Lisa, Zach, Dan

64) Facing backwards ... Lisa in the same deep pool as previous pic ~~~
- Yellow oval: In photo #62, Lisa & Dan (and also I) went through this gap.
- My brand new Samsung phone was accidentally immersed in water while wading through here. It survived the baptism ! I am impressed ! Samsung's phone must be good :-) Else you won’t be seeing these photographs :-)

65) Alan tries not to get his feet wet ... by walking on his hands ~~~
- Yellow arrows: Direction of walk
- Upper pic: Alan (Photographer: Dan)
- Lower pic, left to right: Lily, Alan

Out of deep water
66) Immediately after the deep pool of previous pic ~~~
- Stanley leading
Junction of Crayfish Creek and tributary on its east
Enough excitement wading through Crayfish Creek !
67) Time for a rest near junction of Crayfish Creek and a tributary on its east ~~~
- Upper pic: Lisa
- Lower pic:
• Left to right: Zach (left edge), Stanley, Kelly, Lily
• Continuation to the right of this pic is photo #68.
In fact, this pic and the 3 pics in photo #68 form a 360-degree panorama.

68) Panorama near junction of Crayfish Creek and the tributary on its east ~~~
As you can see, we are like at the bottom of a bowl, with unscalable cliffs on all sides.
- Upper pic: (Continuation from the right of previous pic)
- Middle pic: (Continuation from the right of the upper pic)
- Lower pic: (Continuation from the right of the middle pic)
• Continuation to the right of this pic is photo #67, completing a 360-degree panorama.

69) Rest is over, time to go into the tributary on the east side of Crayfish Creek ~~~
- While we were having a rest in photo #67, Alan was having fun climbing up to the white oval level. He is now climbing down.

Short Canyon in Crayfish Creek's east side tributary
From the rest area in photo #67, we turn into a east side tributary of Crayfish Creek. The tributary is a short canyon ... up to photo #74 where we can't go any further.
70) Immediately after turning east, there is this side gully heading north ~~~
In 2018 September, about 2 years ago, Yus, Alan and I did a bushwalk from Burra Korain Head to Hanging Rock by crossing Crayfish Creek. At this same spot, we went into this gully.
The 2018 trip was very interesting. Trip report is here:
http://mntviews.blogspot.com/2018/09/burra-korain-head-to-hanging-rock.html
- Yellow arrow (bottom right corner): Direction of walk for today as we are not going into the side gully.
71) Crayfish Creek's east side tributary ~~~
It has a short canyon, GR 5028 8040 to GR 5032 8035.
In 2018 September, about 2 years ago, we didn't go into here. At the time, it was dry. Today it is wet.
- Yellow arrow: Direction of walk
- White oval: A large chockstone ... Refer to photo #73.
72) Further into the short canyon and facing backwards ~~~
- Yellow arrow: Direction of walk
- White arrow: Same tree trunk the white arrow in photo #73
- Dan is in front. Behind him is Zach, then Kelly.

73) Further into the short canyon and facing backwards ~~~
- Yellow arrow: Direction of walk
- White arrow: Same tree trunk as the one in photo #72
- Large chockstone: Same as the one in photo #71
- Left to right: Zach, Lily, Alan, Stanley

End of short canyon
74) The short canyon ends here. We can't climb over the cliffs to proceed further :-(
- Dan

Climb out of short canyon
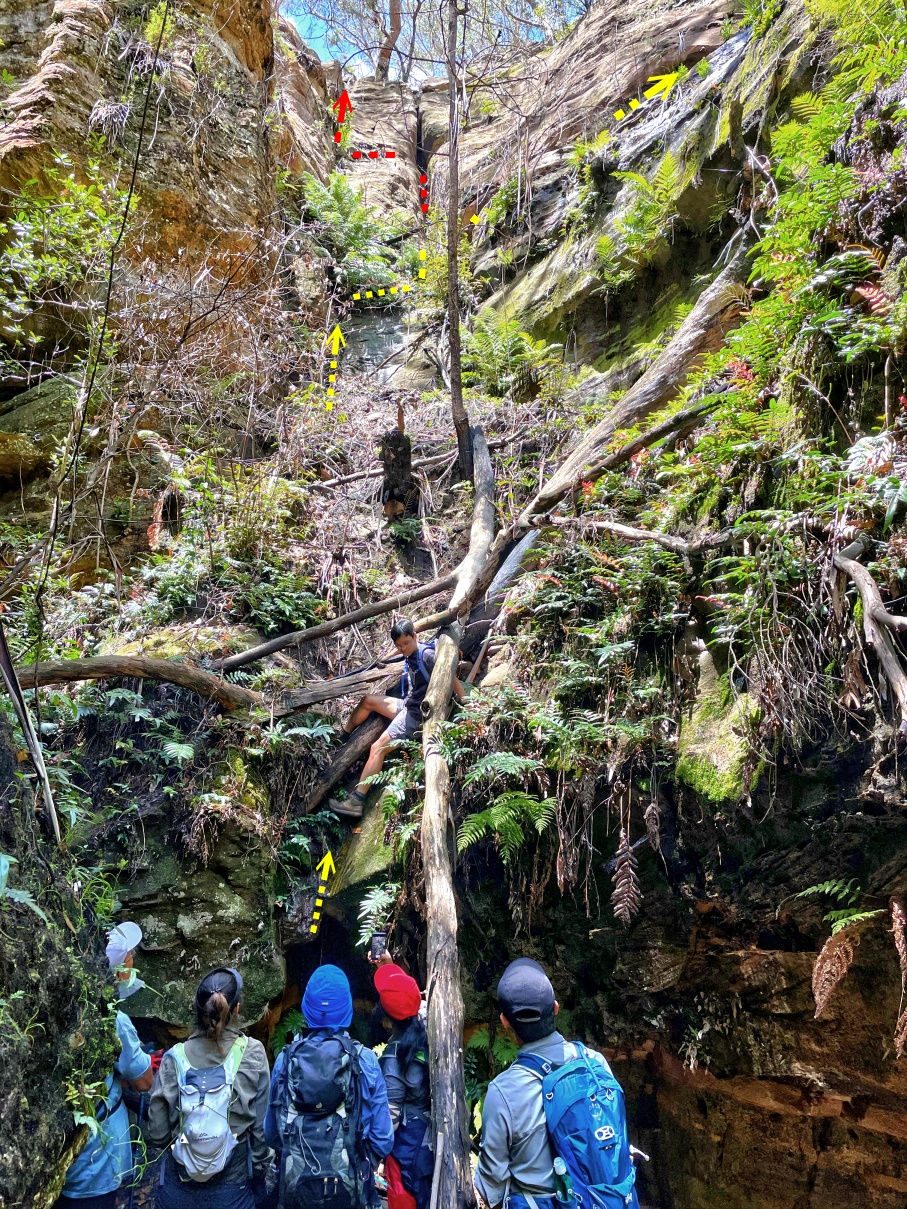
75) From the dead end of previous pic, back track just a weeny little bit. There is this obvious slope that allows us to climb up the cliffs ... steep, but climbable ~~~
- Alan leading the charge

76) Same cliff as previous pic (Photographer: Dan) ~~~
- Red route: Alan and Dan will climb up the difficult way. (Alan calls it the non-human route.)
- Yellow route: Route taken by the rest of us mortals
- Alan has climbed up a bit.
- Watching him, left to right: Stanley, Lily, Paul, Lisa, Zach
77) We've climb up to a bit above where Alan was in the previous pic (Photographer: Dan) ~~~
- Red route: Alan and Dan will climb up the difficult way. (Alan calls it the non-human route.)
- Yellow route: Route taken by the rest of us mortals
- Upper pic:
• 3 guys at the bottom, left to right: Zach, Paul, Alan
• Above them is Kelly.
• Above Kelly is Stanley.
• To the right of Stanley is Lily.
- Bottom pic: Zooming out from the upper pic

78) Kelly climbing up the same cliff as previous pic ~~~
- Red route: Alan and Dan will climb up the difficult way. (Alan calls it the non-human route.)
- Yellow route: Route taken by the rest of us mortals

79) Alan climbing up ... at the same cliff as previous pic (Photographer: Zach) ~~~
- Red route: The difficult way up the cliff. (Alan calls it the non-human route.)
- Yellow arrow: Route taken by the rest of us mortals

80) Dan climbing up the non-human route ... at the same cliff as previous pic (Photographer: Alan) ~~~
- Red route: The difficult way up the cliff. (Alan calls it the non-human route.)
- Yellow arrow: Route taken by the rest of us mortals

81) Same cliff as previous pic ... from different angle ~~~
- Red route: The difficult way up the cliff. (Alan calls it the non-human route.)
- Yellow arrow: Route taken by the rest of us mortals
- 2 guys, top to bottom: Alan, Zach

82) (Photographer: Alan) ~~~
- Yellow route: Route taken by the mortals
- 2 guys, top to bottom: Paul, Zach

83) Same scene as previous pic (Photographer: Alan) ~~~
- Yellow route: Route taken by the mortals
- 3 white arrows, top to bottom: Stanley, Kelly, Zach
- White circle: Photo #85 will be taken at the white circle.

84) Same scene as previous pic ~~~
- Yellow route: Route taken by the mortals

85) (Photograph taken at the white circle of photo #83) ~~~
- White oval: This is the centre of photo #86.
- Red dot: Where Kelly was standing in photo #83 (middle white arrow there)
- Yellow oval: Where I've just climb up
- Zach's boot & leg is to the right of the yellow oval.

86) (Photograph taken further up the slope compared to the previous pic) ~~~
- Red route: The difficult way up the cliff. (Alan calls it the non-human route.)
- Yellow route: Route taken by the mortals
- 2 guys, top to bottom: Alan, Dan

87) All of us meet up here and have lunch. It is a rocky area further up the slope ~~~
- Upper pic: Lisa
- Lower pic: Lunch area (Photographer: Alan using Lisa's phone)
• Closest to the photographer: Kelly
• The rest, left to right: Dan, Paul, Stanley, Lily, Lisa, Zach

Cross Crayfish Creek's east side tributary
88) 200-degree panorama ... about to cross Crayfish Creek's east side tributary ~~~
The tributary is the upstream section of the canyon in photos #71 to #74.
- Upper pic: Facing downstream of the tributary
• Cyan arrow: The tributary
- Middle pic: (Continuation from the right of the upper pic)
• White oval: Same as the large pagoda-like rock on left side of photo #90
And same as the large pagoda in photo #92's lower pic
• Kelly is about to cross the tributary which is near the horizontal fallen grey log.
• Yellow arrows: Once we cross the tributary, follow the arrows to climb towards the ridge.
• Lower-left corner: Zach
- Lower pic: (Continuation from the right of the middle pic)
• Cyan arrows: Upstream side of the tributary

Climbing up Burramoko Ridge
89) We've just cross the tributary of previous pic, now climbing towards Burramoko Ridge ~~~
- Left to right: Zach, Kelly, Alan, Lily, Lisa

90) Further up the slope towards Burramoko Ridge ~~~
- Large pagoda-like rock on the left is the one in the white oval in photo #88's middle pic.
- Top to bottom: Dan, Lily, Lisa, Alan, Stanley, Kelly
- This pic and photos #91 and #92 form a 360-degree panorama

91) Panorama from the slope of Burramoko Ridge ~~~
- Upper pic: (Continuation from the right of previous pic)
- Lower pic: (Continuation from the right of the upper pic)
• Continuation to the right of this pic is photo #92.

92) Panorama from the slope of Burramoko Ridge ~~~
- Upper pic: (Continuation from the right of previous pic)
• Facing across the tributary
- Lower pic: (Continuation from the right of the upper pic)
• Same as the white oval in photo #88's middle pic
• Continuation to the right of this pic is photo #90, completing a 360-degree panorama.

Burramoko Ridge
93) Now walking on Burramoko Trail on top of Burramoko Ridge ~~~
- We are heading towards Hanging Rock.
- White circle in both pics below: It is the same rock.
- Upper pic:
• Left to right: Stanley, Lisa
- Lower pic: An interesting rock (a few steps forward compared to the upper pic)
• Left to right: Stanley, Dan

To Hanging Rock
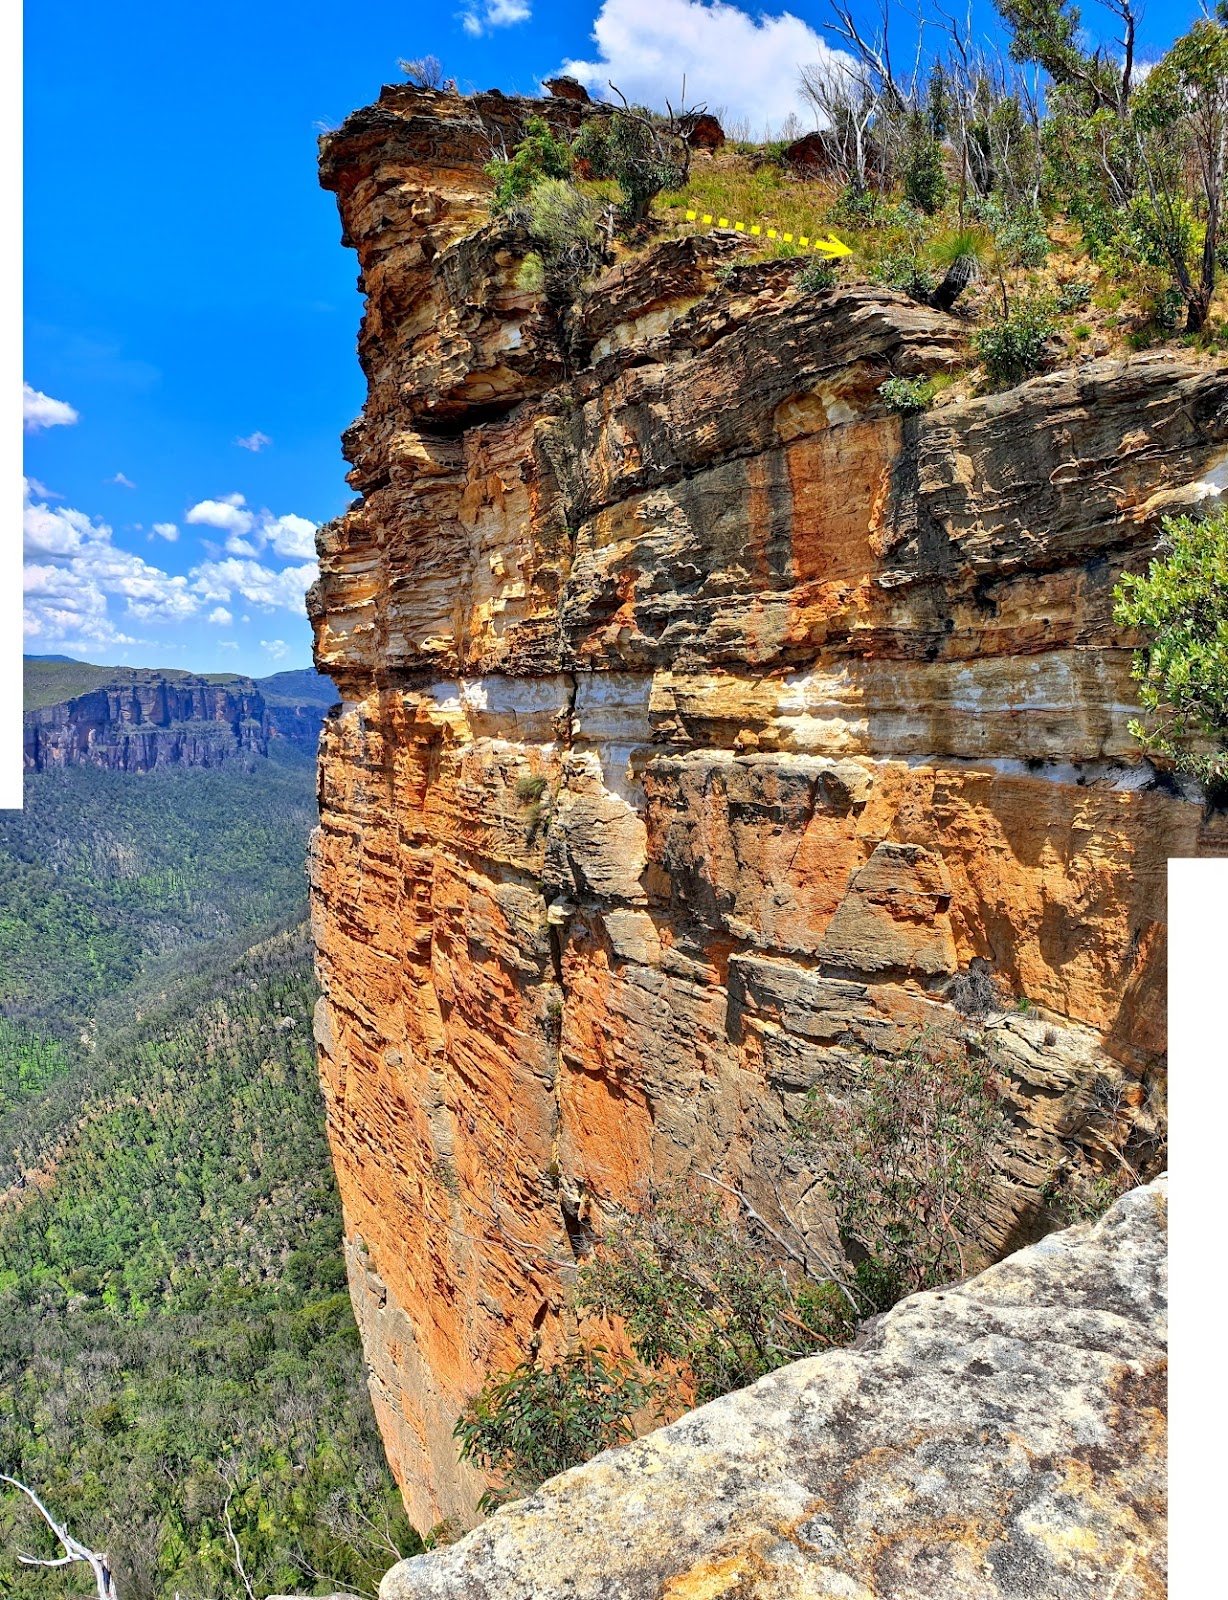
94) Wonderful scenery while on the way to Hanging Rock ~~~
- Upper pic:
• White oval: Birrabang Walls
• Red arrow: Liversidge Hill
• Yellow arrow: Route to Hanging Rock
• Yellow oval: Baltzer lookout (on the way Hanging Rock)
• Cyan arrow: Crayfish Creek flowing into Grose River
• Grose River flowing diagonally from top-left to bottom-right
- Lower pic: (Continuation from the right of the upper pic)
• 3 red arrows, left to right:
1 Rigby Hill ... east-north-east-ish
2 Mt Banks ... east-ish
3 Bald Head ... east-south-east-ish
• Cyan arrows: Pierces Creek
• Grose River flowing diagonally from bottom-left to top-right

95) Baltzer Lookout (yellow oval in photo #94) ~~~
The way to Hanging Rock is down a rough foot track down the cliff on the left side of the larger white oval.
- 2 people in this pic: Not our group
- Smaller white oval: Birrabang Walls
- Larger white oval: Yellow oval in photo #94

96) Hanging Rock comes into view ~~~
2 pics bellow are taken at where the 2 guys are in the previous pic.
- Upper pic:
• 2 red arrows, left to right: Odin Head, Burra Korain Head
• White dotted lines: Burra Korain Ridge
• Blue arrows: Route to Hanging Rock
• Upper yellow oval: North-west of Hanging Rock ... It is the area around the red arrow of photo #109.
We'll go there after visiting Hanging Rock.
• Lower yellow oval: Hanging Rock ... Note the fissure separating it from the main cliff !
- Lower pic: Zooming into Hanging Rock
• Blue arrows: Route to Hanging Rock

97) Hanging Rock and its signature fissure ~~~
- Upper pic:
• Blue arrow: Route to Hanging Rock
• White oval: Fissure separating Hanging Rock from the main cliff
• Cyan arrow: Crayfish Creek flowing into Grose River
• Yellow oval: North-west of Hanging Rock ... It is the area around the red arrow of photo #109.
- Lower pic: Zooming into Hanging Rock
• White arrow: Stanley is the first to race to there :-)
• Yellow oval: Same as the yellow oval in the upper pic
98) Rough foot track to Hanging Rock ~~~
- Blue arrow: Direction of walk

99) Looking back at Baltzer Lookout of photo #95
100) Hanging Rock again (Photographer: Alan) ~~~
- Upper pic: Tip of Hanging Rock
• Left to right: Dan, Zach, Lisa (blocked by Dan), Paul (taking off his blue cap)
- Lower pic:
• Yellow oval: Fissure separating Hanging Rock from the main cliff
• White oval: Birrabang Walls
• White rectangle: Tip of Hanging Rock
• Upper cyan arrow: Grose River
• Lower cyan arrow: Crayfish Creek flowing into Grose River

101) The 2 pics below and photos #102 #103 form a 200-degree panorama ~~~
- Upper pic: Hanging Rock
• Yellow arrow: Route to Hanging Rock
• Left yellow circle: Kelly & Lily
• Right yellow circle: Stanley
- Lower pic: (Continuation from the right of the upper pic)
• 3 red arrows, left to right:
1 Liversidge Hill
2 Rigby Hill
3 Mt Banks
• Cyan arrows: Grose River

102) (Continuation from the right of previous pic)
Facing the Baltzer Lookout of photo #95
- 2 red arrows, left to right: Mt Banks, Baltzer Lookout

103) (Continuation from the right of previous pic)
- Red arrow: Baltzer Lookout
- Yellow route: Route from the Baltzer Lookout to Hanging Rock

Fissure of Hanging Rock
We've arrived at Hanging Rock.
104) Stanley marvelling at the fissure of Hanging Rock ~~~
- Left to right: Alan, Dan, Stanley

105) Jumping across the fissure of Hanging Rock ~~~
- Upper pic, left to right: Lily, Kelly jumping, Stanley
- Lower pic: Lily jumping
• From this angle, the gap looks narrower.
But it is actually wider, and psychologically challenging for first-timers to jump over :-)
Lily had a few false starts before she makes this jump.

Tip of Hanging Rock
106) At tip of Hanging Rock ... Lily (upper pic), Kelly (lower pic)
- 3 red arrows, left to right:
1 Mt Banks ... east-ish
2 Bald Head ... east-south-east-ish
3 Baltzer Lookout of photo #95

107) Standing at tip of Hanging Rock ... Stanley (left), Lisa (right)
- Red arrows in both pic: Bald Head ... east-south-east-ish
- Baltzer Lookout is on the right side of both pics.

108) (Photograph taken from Hanging Rock)
- Yellow arrows: Route to Hanging Rock
- White arrow: Alan
For the record, only Alan didn't jump across the fissure to Hanging Rock.
In our trip in 2018-09, he also didn't jump across.

Highest point on cliff edge north-west of Hanging Rock
We are now going to the highest point on a cliff edge north-west of Hanging Rock ... not far away.
109) (Photograph taken near the Hanging Rock area in 2018-09)
Strange the colour of the cliff is split right down the middle ! (Lighter on the left side, darker on the right.)
- Red arrow: We are heading there now, the highest point.
- Yellow arrows: Route to the highest point (red arrow)
- Cyan oval: Grose River flows there.
110) Panorama from the highest point at the red arrow of previous pic ~~~
The 2 pics below and photo #111 form a 200-degree panorama.
- Upper pic: Kelly
• Red arrow: Burra Korain Head
• Yellow arrow: Heading to this rocky platform next
• Cyan arrow: Grose River
- Lower pic: (Continuation from the right of the upper pic)
• 2 red arrows, left to right: Liversidge Hill, Rigby Hill
• Gross River flows horizontally from left to right in the large valley.
- Continuation to the right of the lower pic is photo #111.

111) Panorama (Continuation from the right of previous pic) ~~~
- 5 Red arrows, left to right:
1 Mt Banks
2 Bennett Lookout
3 Bald Head
4 Hanging Rock
5 Baltzer Lookout
- Cyan arrow: Hat Hill Creek flowing down into Grose River

Rocky platform beyond the highest point
112) I'm on the rocky platform at the yellow arrow of photo #110's upper pic, taking photos #113, #114 ~~~
- Deep valley in front of me is Crayfish Creek.
- Across the deep valley is Burra Korain Ridge.
- (Photographer: Kelly)

113) Panorama from where I was in the previous pic ~~~
- Facing Burra Korain Ridge/Head
- Cyan arrow: Crayfish Creek
- This pic and the 3 pics in photo #114 form a 360-degree panorama.

114) Panorama from where I was in photo #112 ~~~
- Upper pic: (Continue from the right of previous pic)
• Red arrow: Liversidge Hill
• Cyan dots & arrow: Grose River
- Middle pic: (Continue from the right of the upper pic)
• Kelly
• 2 red arrows, left to right:
1 Same as the red arrow in photo #109
Photos #110 and #111 were taken from there.
2 Baltzer Lookout
- Lower pic: (Continuation from the right of the middle pic)
• Left to right: Alan, Stanley
• Cyan arrow: Crayfish Creek
- Continuation to the right of the lower pic is photo #113, completing a 360-degree panorama.
Return to car
115) Retrace steps back to Hanging Rock, then to Baltzer Lookout, then to our cars ~~~
- 3 red arrows, left to right: 1 Bald Head, 2 Hanging Rock, 3 Baltzer Lookout
- Yellow arrows: Route from Hanging Rock to the rocky platform in photo #112
ie the yellow arrow in photo #110's upper pic
- Left to right:
1 Lily (small figure near middle of the pic)
2 3 4 Alan, Lisa, Kelly (Stanley is there too. But he is blocked by Kelly.)

116) On Burramoko Trail back to the car ~~~
Tourists use this trail to walk to Hanging Rock.
But it is a boring 1 hour 15 minutes walk, oneway.
Easier is to ride a bike.

And so ends a most exciting bushwalk !
Flowers
The rest are flowers.
117) Actinotus helianthi (Flannel Flower) ~~~
Found by the side of Burramoko Trail.

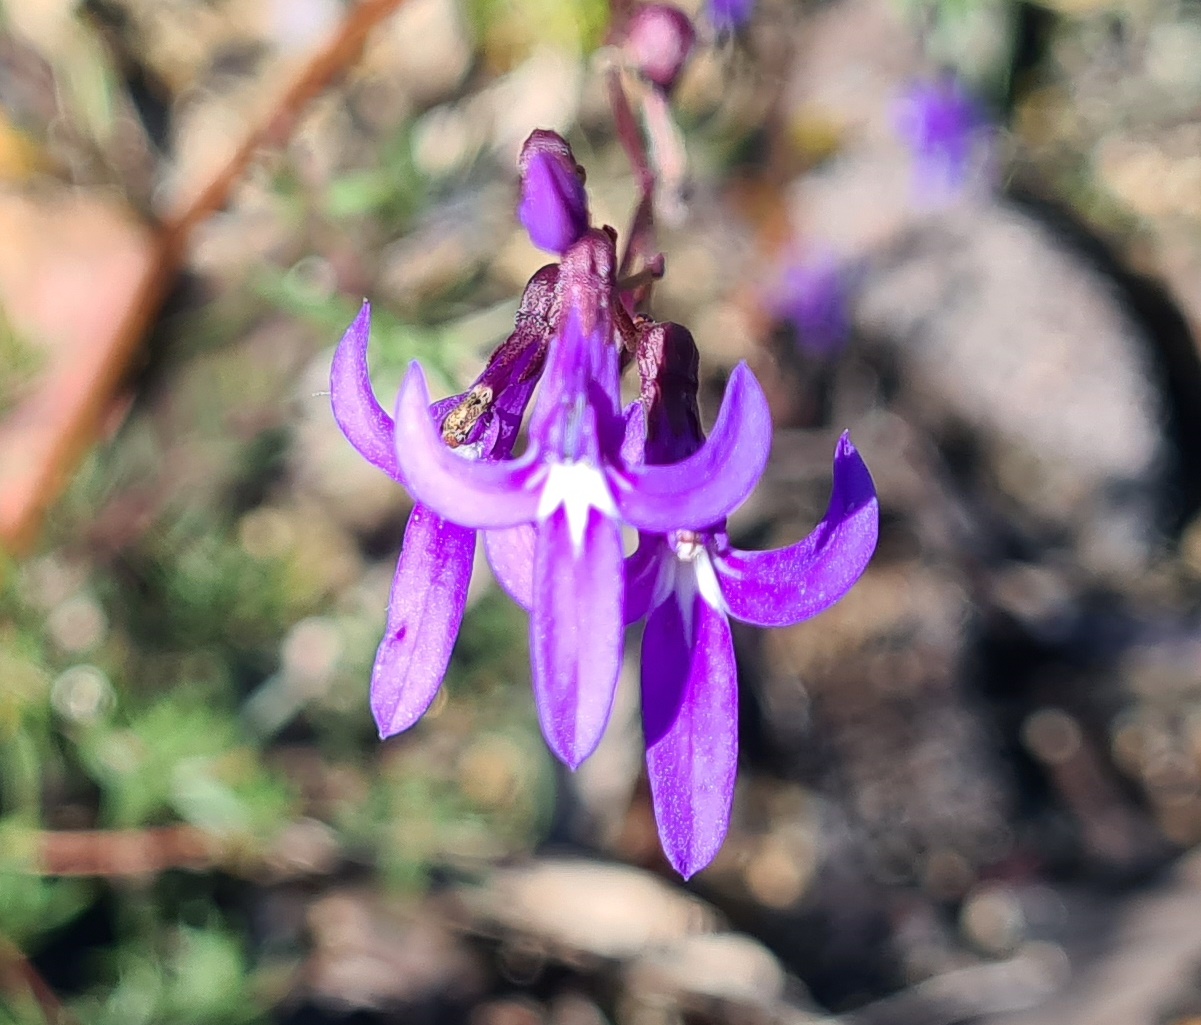
118) Lobelia gibbosa (Tall Lobelia) ~~~
Found on the slope above Crayfish Creek.
119) Drosera binata (Forked Sundew), a carnivorous plant ~~~
Found by the bank of Crayfish Creek.

120) The flowers below are all found by the bank of Crayfish Creek ~~~
- Upper left: Viola banksii (Native Violet)
- Lower left: Goodenia
- Right: Stylidium productum (Trigger Plant)

Another interesting way to Hanging Rock
Well, today's trip is far more exciting than walking on the boring Burramoko Trail to Hanging Rock.
Another interesting way to Hanging Rock is :
- First to Burra Korain Head
- Then climb down to Crayfish Creek
- Then climb up to Hanging Rock
I "pioneered" such a trip with Yus and Alan about 2 years ago in 2018 September ... Refer to this link:
https://mntviews.blogspot.com/2018/09/burra-korain-head-to-hanging-rock.html
("Pioneered" - No record on the internet prior to mine.)
Exciting indeed. The deep water canyon and non-human route scramble were the highlights.
ReplyDeleteHi,
ReplyDeleteVery interesting trip details and photos.
Many years ago, I did several trips into Crayfish Creek from the lookout end. After several attempts, I found Avery direct route into the creek about 100 metres up from the waterfall that drops into the valley.
I also came across a very interesting, and hidden, gully that consisted of several drops.
Always wanted to explore this gully further but didn’t eventuate.
If you would like to know more please email me at tefensom@live.com.au
Cheers
Trev
Hi Trev,
DeleteThanks for your comments.
I've replied to your email address