Day trip: Gardens of Stone National Park, NSW, Australia
2017 October
- Twin Arch Cave
- Pyramid Rocks
- Michelangelo Cave
- Rain Cave
- Weather Cave
2019 January
- Twin Arch Cave
- Pyramid Rocks ... highlight is to climb the Great Pyramid !
- Above Michelangelo Cave
Great Pyramid in Pyramid Rocks
Below are 2 pictures of the Great Pyramid, highest rock in the Pyramid Rocks area.
Once you have seen the rock, you should have a burning urge to want to climb to its top. If not, I don't know what will get you excited :-)

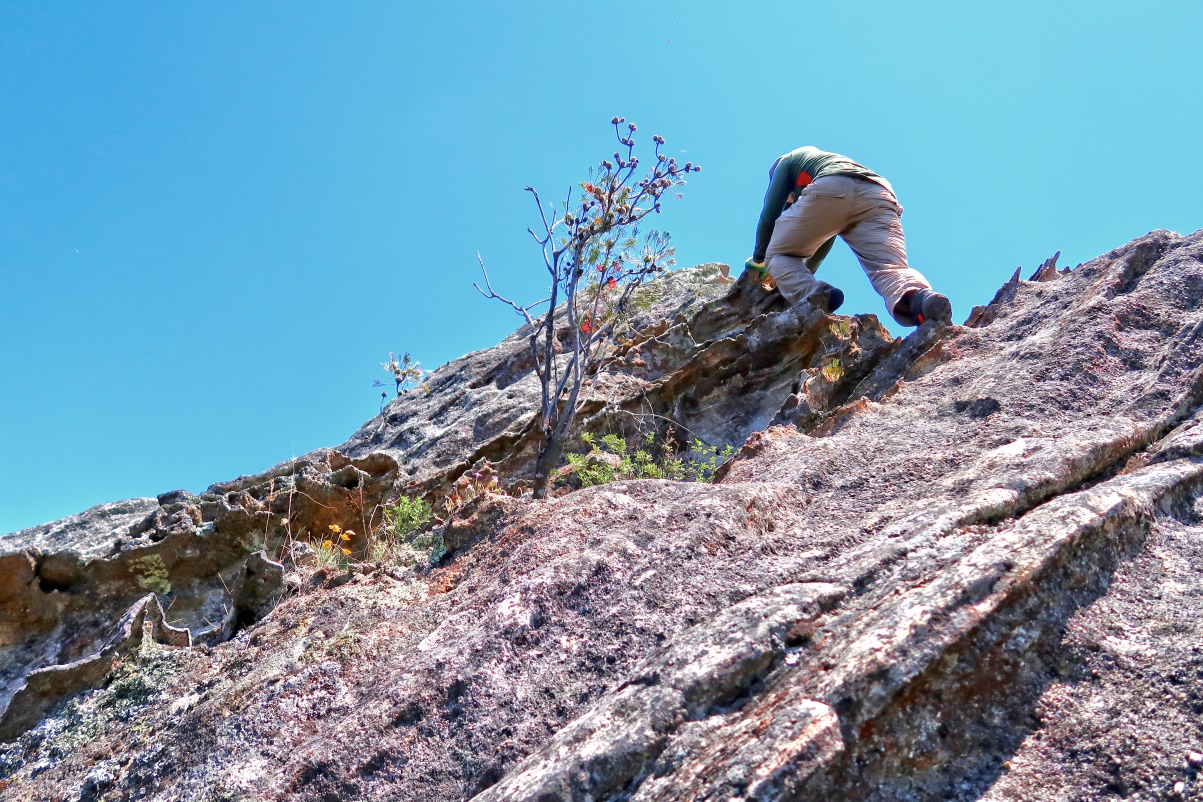
CB (red arrow) climbing the Great Pyramid ~~~
Route is the yellow arrows. To move further up from the yellow dot is the crux of the climb ... exciting and challenging !
If a not-so-good climber like me can do it, so can you :-)

Interested?
Then scroll forward to see more pictures :-)
Prolog
2017 October
The first trip was in 2017 October ... 4 of us, HT, CB, NC and me.
We went to the Pyramid Rocks area and the caves above Carne Creek (Michelangelo Cave, Rain Cave, Weather Cave).
But I didn't get to climb the Great Pyramid, highest rock in the Pyramids area. (Reason is given in the comments after photo #37.)
2019 January
And so, a return visit was called for ... in 2019 January, with YM.
And Hurray, both YM and I climbed to the top of the Great Pyramid !
However the weather was too hot, around 37 Celsius. I suffered numerous cramps in both calves. Although we went up the gully where the caves are located, but I was too tired to find them :-(
Moral of the story: It is silly to go walkabout in such a hot weather
Book, Internet
Book:
"The Gardens of Stone National Park and Beyond, Book 6" by Michael Keats & Brian Fox
Chapter 6.34 has a write up of an identical trip to Pyramid Rocks and the caves.
Internet:
On the internet, aside from some photographs, there is no description on how to reach Pyramid Rocks and the areas around it. What a surprise !
This is an interesting place, and should be high up on the to-do list of all serious bushwalkers. If people are going there, why then no one has posted any report on the internet ?
Not to worry, this trip report and the photographs below should fix up this glaring lack of information :-)
Maps
- 1:100,000 scaled 8931 Wallerawang
- 1:25,000 scaled 8931-3N Cullen Bullen
[Map 1] Below is the relevant part of the 1:25,000 scaled map
Note 1: Secret Crag Rd was previously known as Fire Trail No 7.
2: You would need a 4-wheel-drive car to negotiate the rough terrain of Secret Crag Road.

GPS tracklog file & route - 2017 October
The GPX tracklog file of our 2017 October walk can be downloaded from:
https://drive.google.com/open?id=1ODE5Rdj3DmO6N6ttZtSpP5pwT9tF8wot
The 2019 January route is mostly identical. Differences are pointed out in the maps below.
[Map 2] Below is the 1:25,000 scaled map with our 2017 Oct tracklog (in red) superimposed on it.
- Blue arrow pointing horizontally: Orange overhang, Grid Ref 414 128 ... Refer to photos #56 to #58.
- Blue arrow pointing down: Pagoda-like rock formation on cliff edge, GR 415 126 ... Refer to photos #2 to #4.
- 3 blue arrows pointing up, from left to right:
1: Top of Miracle Pass, GR 415 125
2: Twin Arch Cave, GR 416 125, also known as Double Arch Cave or Ronald McDonald Cave
3: Car is parked here at Secret Crag Rd (previously known as Fire Trail No 7).
GR 419 129, about 500 meters west of Glowworm Tunnel Rd
There is a small clearing, room for 2 to 3 cars.
- Black arrow: In 2019 Jan, due to cramps in my calves, I cut short the trip and head back to the car that way.

[Map 3] Satellite view of our 2017 Oct route
- Map 4 zooms into the caves area.
- Map 5 zooms into the Pyramid Rocks area.

[Map 4] Zooming into the caves area (upper part of above map) ~~~
- 4 yellow arrows from top to bottom:
1: Weather Cave, GR 416 131
2: Rain Cave, GR 416 130
3: The Governor pagoda, GR 415 129 ... Refer to photos #70 and #71.
4: Michelangelo Cave, GR 415 129, also known as Gemini Cave
- White dots: 2019 Jan only ... Route to above Michelangelo Cave after missing the turn to the cave earlier on.
- White arrows: In 2019 Jan, due to cramps in my calves, I cut short the trip and head back to the car that way.

[Map 5] Zooming into the Pyramid Rocks area (lower part of Map 3) ~~~
- Yellow oval: For the purpose of this report, I label the bunch of rocks here as Rock #1.
- 7 yellow arrows clockwise from the top-right:
1: Mark Anthony Slot, GR 411 120
2: Cleopatras Needle , GR 411 119
3: Rock #5, GR 412 118
4: Rock #4, GR 411 117
5: Top of the Great Pyramid, GR 410 118
6: Rock #3, boundary of GR 410 118 and GR 410 119 (2019 Jan trip only)
7: Rock #2, GR 409 119
- White / Cyan / Yellow dots: 2019 Jan trip only
• White dots: The way to climb to the top of Rock #3
• Cyan dots: The way to climb down the Great Pyramid
• Yellow dots: The way to the top of the Great Pyramid

In summary, the 2017 Oct route is:
- Park car at Secret Crag Rd, GR 419 129, about 500 meters west of Glowworm Tunnel Rd.
- To a pagoda on the cliff edge above Carne Creek
- To Twin Arch Cave
- Climb down cliff via Miracle Pass
- To Pyramids Rocks area
• To Rock #1
• To Rock #2 (2019 January - to Rock #3 instead)
• To Rock #4
• To the Great Pyramid
• To Rock #5
- To orange overhang (on a ledge ... cliffs above Carne Creek)
- To Michelangelo Cave
- To Rain Cave
- To Weather Cave
- Back to the car.
Timeline & Distance - 2017 October
Park CB & HT's cars at Secret Crag Rd, at GR 419 129, about 500 meters west of Glowworm Tunnel Rd.
There is a small clearing, room for 2 to 3 cars.
You would need a 4-wheel-drive car to negotiate the rough terrain of Secret Crag Road.
09:30 0.0 km Start walking
09:41 0.55km At top of a pagoda-like rock formation at the edge of cliff overlooking Carne Creek
09:46 0.55km Climb down pagoda
10:00 0.8 km At Twin Arch Cave
10:04 0.85km Resume walking
10:11 1.05km Start to climb down Miracle Pass
10:19 1.15km At bottom of the pass
10:32 1.35km Stop for morning tea
Morning tea
10:47 1.5 km Resume walking
11:11 2.2 km At Mark Anthony Slot
11:23 2.45km At a rock which I label as Rock #2 for the purpose of this report
Climb up the rock
11:26 2.45km Resume walking
11:44 2.85km At top of Rock #4, 2nd highest rock in the Pyramid Rocks area
Enjoy scenery
11:53 2.9 km Leave Rock #4
11:57 2.95km At base of the Great Pyramid
Watch CB climbing up the Great Pyramid from one side, then down the other.
12:17 3.15km Leave the Great Pyramid
12:40 3.65km At Cleopatras Needle
12:44 3.7 km Stop for lunch
Lunch
13:13 3.85km Resume walking
13:58 4.9 km At an orange overhang, photos #56 to #58
14:02 4.95km Resume walking
14:13 5.1 km At Michelangelo Cave
14:27 5.15km Leave Michelangelo Cave
14:46 5.4 km At Rain Cave
14:58 5.45km Leave Rain Cave
15:01 5.55km At Weather Cave
15:02 5.55km Leave Weather Cave
15:18 6.2 km Back at CB & HT's cars
==============================================
Total: 5 hrs 48 mins
6.2 km - Distance is from Google Earth
Pictures - 2017 October
Unless stated otherwise, the pictures and narratives below are for the 2017 October trip.
To cliffs above Carne Creek
1) First thing is to walk to a pagoda-like rock formation on the cliff edge overlooking Carne Creek.
- Upper pic: Along Secret Crag Rd (called Fire Trail No 7 on older maps).
• NC leading, followed by CB (left), then HT (right)
- Middle pic: 400 meters from where we started walking, we come to this barrier; and we walk straight through it.
• HT leading, followed by CB, then NC
- Lower pic: After the barrier, there is a foot track leading to the pagoda (red arrow).

Pagoda above Carne Creek
Grid Ref: Boundary of 415 126 and 415 127
2) Pagoda pointed by the red arrow in previous pic ~~~
- Lower pic, left to right: Me, NC (Photographer: CB)

3) I am at the top of the pagoda of the previous pic, facing the cliffs and Carne Creek. (Photographer: NC)
- Lower pic: (Continuation to the right of the upper pic)
• Left red oval: Miracle Pass, a steep slot ... We'll be going down the cliff there.
• Right red oval: Pyramid Rocks area ... Photo #5 zooms into this area.
• Carne Creek flows in the valley between Pyramid Rocks and the cliffs on the opposite side.

4) (Continuation to the right of previous pic ... To enlarge the image, click on it.)
Panorama from top of the pagoda ~~~
- NC is studying a map.
- Red oval: Pyramid Rocks area ... Photo #5 zooms into this area.
- Red bar: Mt Wolgan & Donkey Mountain
- Main valley in this pic: Where Carne Creek flows
- Clearing in front of Mt Wolgan & Donkey Mountain: Where Carne Creek flows into Wolgan River

5) Zooming into Pyramid Rocks ~~~
- Red arrow: There is a bunch of rocks around there. For the purpose of this report, I label them all as Rock #1.
Mark Anthony Slot & Cleopatras Needle are there.
- 5 yellow arrows from left to right:
1 Rock #5
2 Rock #4 ... 2nd highest point in the Pyramid Rocks area
3 Great Pyramid ... highest point
4 Rock #3
5 Rock #2

Twin Arch Cave
Grid Ref: 416 125 (almost at 416 126)
Also known as Double Arch Cave or Ronald McDonald Cave
Before heading to Miracle Pass, then to Pyramid Rocks, we first make a detour to Twin Arch Cave.
6) At the 1st chamber of Twin Arch Cave ~~~
- Upper pic: NC
- Lower pic: CB

7) At the 2nd chamber after passing through the hole connecting the two chambers ~~~
- To help you visualize the cave, in the 2 pics below, the 2 white arrows point to the same rock.
- Upper pic:
• CB is on the left edge.
• In the middle of the pic, NC is further away. HT is closer.
- Lower pic: Continuation to the right of the upper pic

8) Still at the 2nd chamber (Continuation to the right of previous pic) ~~~
- Left to right: HT, NC (sitting), me
(Photographer CB)

Miracle Pass
Miracle Pass is a steep narrow slot connecting the top of the cliff with its bottom.
Grid Ref at top of the Pass: 415 125
The pass was discovered only a few years ago in 2013-11-03 by Emanuel Conomos on a reconnaissance walk for the Blue Mountains Conservation Society. He thought it would be a miracle if the passage can go all the way to the bottom. But it did. Hence it was named Miracle Pass :-)
9) At the top of Miracle Pass watching CB catching up with us ~~~
- Red bar: Mt Wolgan & Donkey Mountain
- Clearing in front of Mt Wolgan & Donkey Mountain: Where Carne Creek flows into Wolgan River
- Red arrow: Pagoda we climbed in photos #2 and #3 ... towards north
- Yellow arrow: Miracle Pass ... We are going down to the bottom of the cliff now.

10) Now going down Miracle Pass ~~~
- Upper pic: I am at the top of the pass watching NC going down.
- Lower left: Same scene as the upper pic ... CB is going down.
- Lower right: Further down Miracle Pass
• CB is pausing at a flatter part of the slot before another steep descent.
• Large pile of dead branches: Same area as pointed by the white arrow in photo #11's upper left pic

11) All 4 pics blow are looking back and up at Miracle Pass ~~~
- Upper left: White arrow: Same area as the large pile of dead branches in photo #10's lower right pic
- Upper right: Further down the slot and looking up
- Lower left: Similar scene as the upper right pic
• Top to bottom: Me, CB, NC (Photographer: HT)
- Lower right: Photo taken near the bottom of the slot

12) At bottom of Miracle Pass ~~~
- Left pic: Looking back at the pass connecting the top of the cliff to here
- Right pic: Facing the opposite direction
• White oval: Same feature as the white oval in photo #13

13) Looking back at the magnificent cliffs ... we climbed down from there not long ago.
- Upper pic: White oval: Same feature as the white oval in the previous pic
- Middle pic: (Continuation to the right of the upper pic)
• Miracle Pass is somewhere there.
- Lower pic: (Continuation to the right of the middle pic)
• CB is in the middle of the pic.

To Pyramid Rocks
14) Forest scene while walking towards Pyramid Rocks ~~~
- The bush is quite open, easy to walk through.
- Left to right: CB, NC, HT

Rock #1 and Mark Anthony Slot
15) We come to a bunch of rocks. For the purpose of this report, I label all of them collectively as Rock #1.
- White ovals in both pics below: They circle the same rock.
- Upper pic: HT leading us to Mark Anthony Slot
- Lower pic: Photograph taken near where HT was in the upper pic
• Left to right: HT, NC
• Red arrows: Mark Anthony Slot entrance ... Refer to photo #16.

16) At Mark Anthony Slot, GR 411 120 ~~~
- It is possible to squeeze through the slot from one end to the other ... not today, some other day perhaps.
- Right pic: CB takes a look at the entrance.
- We'll pass Mark Anthony Slot again on the return leg. And so, another photograph of the slot is photo #53.

To Rock #2
17) After Mark Anthony Slot, we head for Rock #2 ~~~
- Upper pic:
• Large rock on left half of the pic: Rock #3
YM and I climb this one in 2019 Jan, from the back ... Refer to photos #20 to #22.
- Lower pic: (Continuation to the right of the upper pic)
• In the middle of the pic, CB is leading into the gap, followed by NC.
• Rock #2 is just behind the large rock to the left of the 2 guys and can't be seen from here.
• Red arrow: Same as the rock pointed by the red arrow in photo #18.

Rock #2
18) At Rock #2, GR 409 119 ~~~
- Upper pic:
• 2 red arrows from left to right:
1 Same as the rock pointed by the red arrow in #17
2 Rock #2 ... we are going to climb it.
- Lower pic: NC is at the top of Rock #2.

19) From the top of Rock #2, we can see the cliffs above Carne Creek, and in particular:
- Red oval: Miracle Pass
- Red arrow in the upper pic: The pagoda we climbed in photo #2
- Red arrow in the lower pic: Same as the rock pointed by the red arrow in photos #17 and #18
- Yellow arrows: The route to Pyramid Rocks
- Small yellow dot: Our return trip is via the gully there. That's where Michelangelo & Rain Caves are located.

2019 January - Rock #3
At boundary of GR 410 118 and GR 410 119
In 2019 January, instead of climbing Rock #2, YM and I climb up Rock #3, the large rock on the left half of photo #17's upper pic. (In that pic, we climb the rock from the back.)
20) I am at the top of Rock #3. (Photographer: YM)

21) From the top of Rock #3, we have a good view of the Great Pyramid. YM and I will climb to its top !

22) Still at Rock #3 ~~~
- Upper pic: YM climbing up to the top of the rock
- Lower pic: YM climbing down

To Rock #4
(Back to the narrative of the 2017 October trip.)
23) On the way to Rock #4, we'll pass by the side of the Great Pyramid, the rock in this pic.
- HT leading, following by NC

24) Passing the south-west face of the Great Pyramid

25) (Photograph taken in the 2019 Jan trip ... To enlarge the image, click on it.)
This view is a good summary of what we'll do for the next hour in both 2017 Oct and 2019 Jan:
- Even though YM is facing the other way, we are actually heading towards the yellow oval right now.
We'll go around the corner there.
- Then climb to the top of Rock #4 (red arrow on the right). We'll climb it from the back.
- Then walk along the top of the ridge to the base of the Great Pyramid. In 2019 Jan, we'll climb it (red arrow on the left).

26) We are at the yellow oval of the previous pic.
- Upper pic:
• Red arrow: Same as the rock pointed by the red arrow in photo #27
• The guy in red is NC.
- Lower pic: A little bit around the corner compared with the upper pic
• HT is leading, followed by NC and CB

27) (Photograph taken in the 2019 January trip) Still at the yellow oval of photo #25 ~~~
- Looking back at YM
- Red arrow: Same as the rock pointed by the red arrow in photo #26

28) Thelychiton speciosus, formerly Dendrobium speciosum, commonly known as Rock Orchids or Rock Lily ~~~
Plenty of them around the Pyramid Rocks area
(Photographer: CB)

29) Compared to photo #25, we are now on the other other side of Rock #4. (To enlarge the image, click on it.)
This pic is a good summary of what we are going to do next:
- Follow the yellow arrows to climb to the top of Rock #4 (red arrow).
- Then go to the Great Pyramid (red oval).

30) Advancing further compared with the previous pic ~~~
Although we are on our way to Rock #4, we have a perfect view here on how we'll climb the Great Pyramid.
- Upper pic:
• Red arrow: Top of the Great Pyramid
• Yellow arrows: Our route to Rock #4 which is just beyond the left edge of this pic.
• HT is the guy on the right edge.
- Lower pic:
• Red arrow: Top of the Great Pyramid
• Yellow arrows: 2017 Oct - CB is the only guy who climbs up the Great Pyramid. The arrows are his route (approx).
2019 Jan - Both YM and I follow CB's footsteps and climb the Great Pyramid this way too.
• Both ascending & descending routes are steep. But the descending route seems easier for climbing up.

Rock #4
GR 411 117
31) This is Rock #4, 2nd highest point in the Pyramid Rocks area.
The 2 red arrows point to the same area.
- Upper right pic:
• Left to right: CB, NC, HT
- Lower left pic: NC
- Lower right pic: At the top of Rock #4
• Left to right: CB, HT, NC

32) From top of Rock #4, facing downstream of Carne Creek ~~~
- Upper pic:
• This pic and the 3 pics in photo #33 form a 360-degree panorama.
• In the middle of the pic, behind the trees is the Great Pyramid. You can't see it, but ...
- Lower pic: ... but if you step slightly away from the top, you can see it better.

33) Panorama from top of Rock 4 ~~~
- Upper pic: (Continuation to the right of photo #32's upper pic)
• Small yellow dot: Our return trip is via the gully there. That's where Michelangelo & Rain Caves are located.
• Black square: Same as the black square in photo #19
We came from there. Pagoda in photo #2 and Miracle Pass are there.
• Yellow oval: Rock #5
2017 Oct - Our group check out its left (north) side only ... Refer to photo #49.
2019 Jan - YM and I circumnavigate the entire rock ... photos #49 to #51.
- Middle pic: (Continuation to the right of the upper pic)
• Facing upstream of Carne Creek ... south-ish
- Lower pic: (Continuation to the right of the middle pic)
• Cliffs on the west side of Carne Creek
- Continuation to the right of the lower pic is photo #32, thus completing a 360-degree panorama.

34) Near the top of Rock #4 is this huge Lace Monitor (Varanus varius). Including its long tail, it is taller than a person. It is not afraid of us, allowing us to take copious photographs.

To the Great Pyramid
35) Now on our way to the Great Pyramid ~~~
- Upper pic:
• Larger yellow circle: The Great Pyramid is behind the trees
• Smaller yellow circle: We'll go through a short tunnel there to the Great Pyramid ... Refer to the lower pic.
- Lower pic: NC has just passed through the tunnel.

2017 October - Climbing the Great Pyramid
36) At the base of the Great Pyramid ~~~
- Yellow arrows: The way to climb up the Great Pyramid.
- CB is at the bottom of the pic.
- NC is just above the middle yellow arrow. He is the first one to have a go at climbing up.
But he gives up later on ... Refer to the small yellow dot in photo #37.
- Cyan dot between the bottom 2 yellow arrows: In photo 38, YM is standing at this spot.

37) The Great Pyramid ~~~
- Yellow arrows: The way to climb up the Great Pyramid ... along a sloping ledge.
- Yellow dot: Where NC gives up the climb ... It is quite challenging to climb further up at that point ... Refer to photo #39.
- Red arrow: After NC gives up, CB has a go. He is successful. At where he is now, the rest of the climb is easy.
I like to climb up the Great Pyramid too. But I thought I let CB climb down first to give us some tips on the climb. Unfortunately, straight after CB climbs down, the group decides to leave straight away. And so I miss out on having a go.
Not to worry, as this Pyramid Rocks area is an interesting place, I know I will definitely return again ...
2019 January - Climbing the Great Pyramid
... And sure enough, 15 months later, in 2019 January, I am here again.
38) YM climbing up along the sloping ledge, the yellow arrows of the previous pic ~~~
- Left pic: Where YM is standing is the small cyan dot in photo #36.

39) YM is now at the small yellow dot of photo #37.
As you can see, it is quite challenging to climb up ... not for the faint hearted :-)
If you don't wish to climb up this way, an alternative easier route is the way we'll climb down later on. Refer to photos #30 (lower pic) and #46.

40) YM is now at roughly where CB was in photo #37. After the near-vertical climb of the previous pic, the rest is easy :-)
2019 January - Top of the Great Pyramid
GR 410 118
41) YM and I at the top of the Great Pyramid, highest point in the Pyramids Rocks area ... always an exhilarating moment after a steep and exposed climb like that in photo #39 :-)

Fantastic unobstructed 360-degree panorama from top of the Great Pyramid ... See photo #42 and the 3 pics in photo #43.
42) Cliffs above Carne Creek ... from the top of Great Pyramid ... towards north-east ~~~
- Upper pic: Zooming into the black square of the lower pic ... We came from there.
• Yellow dot on left edge: Return trip is via the gully there. That's where Michelangelo & Rain Caves are located.
• Red arrow: Pagoda we climbed in photo #2
• Yellow oval: Miracle Pass
- Lower pic: This pic and the 3 pics in photo #43 form a 360-degree panorama.
• Black square: Refer to upper pic.
• Yellow dot: Return trip is via the gully there. That's where Michelangelo & Rain Caves are located.
• Yellow arrows: The route to Pyramid Rocks
• Yellow oval: Rock #1 ... Mark Anthony Slot and Cleopatras Needle are there.

43) (Continuation to the right of previous pic)
- Upper pic: Facing upstream of Carne Creek
• Yellow circle: Rock #4 ... We just came from there.
- Middle pic: (Continuation to the right of the upper pic)
• Centred towards south-west ... cliffs on the west side of Carne Creek
- Lower pic: (Continuation to the right of the middle pic) Facing downstream of Carne Creek
• Red bar: Mt Wolgan & Donkey Mountain
• Clearing in front of Mt Wolgan & Donkey Mountain: Where Carne Creek flows into Wolgan River
• Yellow circle: Rock #3
2017 Oct - We didn't go there.
2019 Jan - YM and I climbed it ... Refer to photos #20 to #22.
- Continuation to the right of the lower pic is photo #42's lower pic, thus completing a 360-degree panorama.

Climbing down the Great Pyramid
In both 2017 October and 2019 January, the way down the Great Pyramid is different from the ascent route ... Refer to photo #30's lower pic.
44) YM climbing down the Great Pyramid ~~~
- Yellow arrows - The route to climb down
- White arrows in the 2 lower pics: They point to the same rock.
- Cyan arrows in the 2 right-side pics: They point to the same rock.

45) Further down the Great Pyramid ~~~
- Upper pic:
• White arrow: Same as the white arrows in photo #44
• Cyan arrow: Same as the cyan arrow in the lower pic and also in photo #44
- Lower pic:
• Red oval: We use the log there to help us down.
Though I suspect it maybe possible to climb up and down without its help.
• Cyan arrow: Same as the cyan arrow in the upper pic and also in photo #44.

46) (The 2 pics below are taken in 2017 Oct whereas photos #44 and #45 are taken in 2019 Jan.)
- CB is climbing down the cliff face (where YM and I climbed down in photo #45). HT is watching from below.
- The climb here looks scary. But it is actually not too hard ... easier than the climb in photo #39.
- Red oval: Same as the log in the red oval of previous pic
Is the log there naturally? Or did some bushwalkers purposely place it there?
- Cyan oval: Same area as in photo #44's lower right pic.

47) Near where the previous pic was taken, is this view of the Great Pyramid.

The Great Pyramid from a different angle
48) We now leave the Great Pyramid, heading to Rock #5.
While on the way, we look back at this rock. Believe or not, it is the Great Pyramid ! ... from a different angle.
You should be able to match some features on the rock face with the ones in photo #30.

Rock #5
GR 412 118
2017 October - We only go pass the north side of Rock #5.
2019 January - YM and I circumnavigate the rock.
49) North-west side of Rock #5

50) South-ish side of Rock #5

51) North-east side of Rock #5

It doesn't look like this rock can be climbed :-(
Rock #1 and Cleopatras Needle & Mark Anthony Slot
Cleopatras Needle: GR 411 119
Mark Anthony Slot: GR 411 120
We are now back at the bunch of rocks which I label collectively as Rock #1 ... Refer to photo #15.
52) The vertical thin blade of rock is named as Cleopatras Needle. (Mark Anthony Slot is just behind it ... Refer to photo #53.)
- Upper right pic, left to right: Me, NC, HT (Photographer: CB)
- Lower pic, left to right: NC, CB

53) Mark Anthony Slot ~~~
- Red arrow: The slit is Mark Anthony Slot ... Also refer to photo #16.
- The guy in both pics below is NC.

This is it for the Pyramids Area.
We now go to the caves. First, retrace the steps back to the bottom of the cliffs (near photo #13), then walk along a ledge there heading north.
To cliffs above Carne Creek
54) In 2019 January, before reaching the cliffs, I suffer numerous episodes of cramps in both calves. Each time requires around 15 minutes of rest to recover. Most probably it is caused by the temperature, about 37 Celsius.
Moral of the story: It is silly to go walkabout in such a hot weather !
(Photographer: YM)

Cliffs above Carne Creek
(Back to the narrative of the 2017 October trip.)
55) On the way to the caves, we walk along a ledge by the side of the cliffs above the eastern side of Carne Creek.
- Lower pic, left to right: HT, me (Photographer: NC)

56) We come to an overhang ... interesting formation and colour. Grid Ref is 414 128.
- Upper pic: Me (Photographer: CB)

57) After walking through the hole in the previous pic, I look back at CB.

58) Still in the same area as the previous pic ~~~
- Left to right: HT & NC are studying the impressive cliff face. Further back is CB.

59) (Continuation to the right of previous pic)
Carne Creek flows horizontally from left to right across this pic.
The clearing near the right edge is the confluence of Carne Creek and Wolgan River.

60) Further along the ledge ~~~
- 3 cyan arrows in the 3 pics below: They all point to the same rock.
- Upper right pic: NC
- Upper left pic: NC walking through a gap
- Lower pic: Inside the gap of the upper right pic
• NC & HT studying the impressive cliff face ... Someone had cut through it with a bread knife :-)

To Michelangelo Cave
The ledge of the previous few photographs leads us to a gully. Michelangelo and other caves are somewhere up the gully.
61) Heading towards Michelangelo Cave ~~~
- Upper pic:
• Red arrow: Ceiling of Michelangelo Cave
• Cyan arrows: Route to Michelangelo Cave
• Left to right: NC, CB
- Lower pic: (Continuation to the right of the upper pic)
• 2 red arrows from left to right
1 Ceiling of Michelangelo Cave
2 The towering cliff in photo #66

62) We can see Michelangelo Cave now.
- Lower pic:
• Red arrow: Michelangelo Cave
• Left to right: HT, CB, NC

Michelangelo Cave
Also known as Gemini Cave
GR 415 129
63) Arriving at Michelangelo Cave ... HT leading, followed by CB and NC.
- Lower pic: Note there is a smaller cave to the right of the main cave. Hence this cave is also called Gemini Cave.

64) This is a magnificent cave !
- Upper pic: NC
- Lower pic, left to right: NC and me, the small figure at the back of the cave (Photographer: CB)

65) From the back of Michelangelo Cave, ie where I am sitting in the previous pic, and looking down ~~~
- Left to right: CB, HT
- Blue arrow: The way we climbed up to the cave (photos #62 and #63) ... We'll climb down the cave that way too.

66) Exploring the right side of Michelangelo Cave ~~~
- Yellow arrow: The cave
- Red arrow: The same cliff as the red arrow in photo #61's lower pic

67) At where the previous pic was taken, and facing the other side ~~~
- Red oval: Same as the red oval in photo #68
- Yellow arrows at bottom right hand corner: We came up the gully there, along a ledge at the base of the cliffs.

2019 January - Above Michelangelo Cave
In the 2019 January trip, my navigation was a bit off. I missed the turn-off to Michelangelo Cave, and end up above the Cave.
Actually my navigation wasn't too bad. The top of the cave and the inside of the cave have the same coordinates. From GPS point of view, they are of identical locations ... and I was navigating by GPS :-)
If at first you don't succeed, blame the GPS :-)
68) This is the view from above the Cave. The red oval here is the same as the red oval in the previous pic.
As mentioned in photo #54, in the 2019 January trip, I have many episodes of cramps in my calves. So now I'm too tired to climb back down to the Cave :-) For consolation ...

69) ... For consolation, I experience the marvellous panorama below (and the previous pic). I would have missed these views had I not climb up here :-)
- Upper pic: (Continuation to the right of previous pic)
• Cyan arrow: Carne Creek flows there.
• Yellow arrow: We came up the gully that way, along a ledge at the base of the cliffs.
- Lower pic: (Continuation to the right of the upper pic)
• White arrow: Same as the large pagoda rock in the middle of photo #72

To Rain Cave
(Back to the narrative of the 2017 October trip.)
70) On our way to Rain Cave, HT leading, followed by NC ~~~
- Yellow arrows: Our route
- Red oval: "The Governor" pagoda
- In this pic, Michelangelo Cave is on the right and behind The Governor.
- Cyan arrow: My route in 2019 Jan ... I missed the turn-off to Michelangelo Cave, and end up above the cave.
The top of the cave is at the far side of The Governor. Photos #68 and #69 were taken from there.
- Continuation to the right of this pic is photo #71.

71) (Continuation to the right of previous pic)
- Looking back at CB climbing up.
- Red oval: The Governor pagoda

72) This view greets us when we we reach the tip of the upper yellow arrow in photo #70.
- Large pagoda rock in the middle of the pic: We can see this rock in photo #69 (white arrow there in the lower pic).
- Yellow dot: Rain Cave is somewhere there.
- Yellow arrow: Route to Rain Cave
- Cyan arrows: In 2019 Jan, with the cramp, I cut short the trip, head directly back to the car instead.

73) Walking towards Rain Cave ~~~
- Left to right: HT, NC, CB

74) HT leading us to Rain Cave, followed by NC ~~~
- Red arrow: Rain Cave is somewhere under the cliff there.

Rain Cave
75) Rain cave is in the yellow circle, GR 416 130.

76) At Rain Cave ~~~
- Lower pic, left to right: NC, HT

77) Inside Rain Cave ~~~
- Left to right: HT, NC
- Continuation to the right of this pic is photo #78.
- Continuation to the left is photo #79.

78) The right side of previous pic ~~~
- Left to right: NC, HT, me (Photographer: CB)

79) The left side of Rain Cave ~~~
- Continuation to the right of this pic is photo #77.

Weather Cave
GR 416 131
80) At weather Cave, about 750 meters north of Rain Cave ~~~
- Red oval: The hole here is the same as the hole in the red oval of photo #81.
- NC is the guy in red.

81) Ceiling and back wall of Weather Cave ~~~
- Red oval: The hole here is the same as the hole in the red oval of previous pic.

Then it is just a short walk back to the car.
Flowers
82) Flowers encountered during the walk (Photographer: CB) ~~~
- Upper left: Bossiaea rhombifolia, a species in the pea family
- Upper right: Gompholobium glabratum, Dainty Wedge Pea
- Middle left: Patersonia sericea, commonly known as Purple Flag, Native Iris, Silky Purple Flag, Native Flag
- Middle right: Prostanthera incana, Velvet Mint Bush
- Lower left: Leucochrysum graminifolium, Pagoda Rock Daisy, only grows on the rocks of pagodas
- Lower right: Podolobium ilicifolium, Prickly Shaggy Pea

Comments
1)
Aside Michael Fox & Brain Fox's book, out on the internet, there is no description on how to reach the Pyramid Rocks, and what is around that area.
This trip report and photographs should fix this glaring lack of information ... A hike to the Pyramid Rocks and a visit to the nearby caves should be a must for any serious bushwalkers.
2)
I had visited Michelangelo / Rain / Weather / Mist / Sand / Shovel Caves earlier in 2015 May.
Photographs and trip report are in my blog:
http://mntviews.blogspot.com.au/2015/05/michelangelo-other-caves-and-flying.html
Thanks for the Post. this is amazing, I'm going to check it out.
ReplyDeleteMichelangelo Cave looks very nice.
is there a way down yo the rain cave from the rtack that runs north from the secret crag fire trail ? we scouted round above it on Sunday last 7th Sept 25 . there were rock cairns leading to a high cliff drop. possibly an abseil point ... is it easier to access it from Michaelangelo cave ? ..please phone me Jeff Dorset 0429 042999
ReplyDeleteThe above Anonymous must be the same Jeff Dorset who wrote this racist rant on a photograph that I posted to Facebook !!!
ReplyDeleteThat photograph was clearly captioned that it wasn't even taken by me !!!
See this link:
https://blogger.googleusercontent.com/img/b/R29vZ2xl/AVvXsEgvA9o6ts15oaR7o3wam-Uk5s0Ux6lVzHFiFrsQK-Gf2y9ZojsupV2SI0wISghRNCve8SYguEyPOdKtpzQ0mhXtM82EhhaHW_27P_DMB940sf1SJcaayPHtsHltjkKed7VvbWWUcKteQNpE-UsADo-MtSrd1bpk6rBF5bMFbLu7Rvt57A/s1600/230419%20ScreenPrint,%20Kanangra-Boyd%20NP,%20by%20John%20Graham.jpg