2020 September
Day-trip from Mercurys Boot to Baal Bone Point
Ben Bullen State Forest & Gardens of Stone National Park, NSW, Australia
Some named features :
- Mercurys Boot https://www.bushexplorers.com.au/encyclopaedia/mercurys-boot
- Baal Submarine Pagoda Name waiting to be registered
- Baal Sphinx Rock https://www.bushexplorers.com.au/encyclopaedia/baal-sphinx-rock
- Jabba Hutt Pagoda Name waiting to be registered
Near Baal Bone Point :
- Nose Rock https://www.bushexplorers.com.au/encyclopaedia/nose-rock
- Nerve Test Rock https://www.bushexplorers.com.au/encyclopaedia/nerve-test-rock
Preview
A quick preview of the photos are in this link :
https://drive.google.com/file/d/1QQCVJZa3GPX1fv5rkR8xrDEO2PxB5JlS/view
Below are 3 of the memorable rocks :
Mercurys Boot

Baal Sphinx Rock Ha Ha Ha !

Nerve Test Rock ... Because Lisa is testing her nerves, and ours too, by standing at the tip of the rock !

Interested ?
Then read on :-)
Prolog
Taking Cathy, Grace, Lily, Lisa, Stanley, Yus, 清 to this fascinating Baal Bone area,
and it is the first time for all 8 of us.
Further trips in the future in the same area:
2021-03 Mercurys Boot to Baal Sphinx Rock and ridge to the west, Ben Bullen SF
Pictures only: https://drive.google.com/file/d/1_dV9zYyatuY3t7iUSqdJNczww13slTV7/view
2020-11 Pantoneys Crown via Baal Bone Point, Gardens of Stone NP
Detailed trip report: https://mntviews.blogspot.com/2020/11/pantoneys-crown-via-baal-bone-point.html
2020-10 Mercurys Boot to Baal Sphinx Rock to Poseidon Arena, Ben Bullen SF
Pictures only: https://drive.google.com/file/d/1ddJIJj_Rrhlk0AkqYOmfBvgHpL9pFyx0/view
Map
LPI 1:25,000 scaled 8931-4S Ben Bullen
Map 1) The relevant part of the 1:25,000 topographic map

GPS tracklog file & route
The GPX tracklog file of our walk can be downloaded from:
https://drive.google.com/file/d/1uFZu08j8icMgAUmw-enRLWOlTC2I4vk5/view?usp=sharing
Map 2) The same GPS tracklog is in the following 1:25,000 topographic map (in red):
- Purple dotted oval: Went the wrong way on the return trip ... I wasn't leading at the time :-)
- 11 dark brown arrows, top to bottom :
1 GR 2677 2180 Nose Rock
2 GR 2678 2178 Nerve Test Rock
3 GR 2738 2133 Where we climbed from a ledge to top of the ridge
4 GR 2739 2124 Jabba Hutt Pagoda
5 GR 2808 2055 Baal Sphinx Rock
6 GR 2823 2040 Baal Submarine Pagoda
7 GR 2893 1930 Pagoda 2
8 GR 2898 1892 Pagoda 1
9 GR 2903 1886 Mercurys Boot
10 Baal Bone Gap
11 Baal Bone Gap camping ground (near bottom right corner)

Map 3) Satellite image of previous map

In summary, the route for today is:
- Park cars at Baal Bone Gap camping ground.
- To Baal Bone Gap
- To Mercurys Boot.
- Then along a ridge, pass these named features :
• Baal Submarine Pagoda
• Baal Sphinx Rock
• Jabba Hutt Pagoda
- Arrive at Nose Rock & Nerve Test Rock, south-west of Baal Bone Point.
- Then to Baal Bone Point.
- Return to Baal Bone Gap camping ground.
Timeline and Distance
Park Stanley and 清's cars at Baal Bone Gap camping ground.
(We could have saved us a bit of walking by parking at Baal Bone Gap instead.)
09:24 0.0 km Start walking
09:36 0.9 km At Baal Bone Gap
09:38 0.95km Resume walking
09:56 1.42km At Mercurys Boot
Explore around
10:45 1.6 km Resume walking
10:54 1.82km On top of a pagoda ... for the purpose of this report, it is labelled as pagoda 1
10:57 1.82km Resume walking
11:10 2.27km On top of pagoda 2
11:14 2.27km Resume walking
11:27 2.75km At top of 1047-meter hill
11:30 2.75km Resume walking
12:07 4.2 km At Baal Sphinx Rock
Lunch
12:36 4.3 km Start walking towards Baal Bone Point ... and climb some pagodas along the way
13:42 6.35km At a junction ... North is to Baal Bone Point. West to Nose & Nerve Test Rocks.
Drop off backpacks here
13:44 6.38km Start walking towards Nose Rock and Nerve Test Rock
13:59 6.7 km At Nose Rock
Explore around.
Including climbing Nose Rock and inching to the tip of Nerve Test Rock.
14:38 6.9 km Leave Nose Rock. Start to retrace our steps.
14.48 7.18km At where we dropped our backpacks ... same spot as at 13:42
Take a sip of water
14:50 7.18km Start walking towards Baal Bone Point
15:01 7.5 km At Baal Bone Point
15:15 7.6 km Leave Baal Bone Point. Start to retrace our steps.
15:24 7.9 km At where we dropped our backpacks ... same spot as at 13:42 and 14:48
15:25 7.9 km Start to return to our cars
16:22 10.6 km At Baal Sphinx Rock
16:54 12.7 km At Mercury Boots
17:13 13.15km At Baal Bone Gap
17:14 13.17km Resume walking
17.26 14.15km Back at Baal Bone Gap camping ground
==============================================
Total: 8 hrs 2 mins
14.15 km Distance is from Google Earth
Baal Bone Gap camping ground
We park our cars at Baal Bone Gap camping ground.
Why not park at Baal Bone Gap ?
Because I thought on the return trip, we may have time for a detour to Poseidon Arena / Ridge.
In that case, the camping ground is just as good a place to park the cars.
As it turned out, our walk took longer than planned and ran out of time for the detour.
And so with hindsight, we should have parked the cars at Baal Bone Gap instead.
1) At Baal Bone Gap camping ground, facing Lower Hades Ridge
( so named in BushExplorers Encyclopaedia https://www.bushexplorers.com.au/encyclopaedia/hades-ridge )
- Upper pic:
• White oval: Lower Hades Ridge
• Blue arrows: Direction of walk ... heading towards Baal Bone Gap
Vertical arrow: The Bicentennial National Trail, connecting Wolgan Road to here.
Horizontal arrow: Unnamed road connecting Baal Bone Mine to here.
- Lower pic:
• Yellow arrow: Moffitt Trail ... We drove on that road to the camping ground this morning.

Baal Bone Gap
900 meters of walking and 12 minutes later, we are at Baal Bone Gap.
As mention earlier on, we could have parked our cars here.
2) At Baal Bone Gap ... 180-degree panorama ~~~
- Upper pic:
• White oval: What is this ??? Water pumping facility ??? Refer to photo #3.
• Red arrow: Unnamed 1047-meter hill north-ish of here
• Yellow arrows: Our approximate route to the unnamed 1047-meter hill
- Lower pic: (Continuation from the right of previous pic)
• Red horizontal bar: Pantoneys Crown
• Red arrow: Point Cameron
• White arrow: The sign says:
Baal Bone Gap Picnic Area
<-- Crown Creek Trail
<-- Bicentennial National Trail

3) What is this ??? Water pumping facility ???
- White oval in all 3 pics below: They circle the same grey cement block.
- Upper pic: Zooming into the left side of photo #2's upper pic
- Middle pic:
- Lower pic:
• Red arrow: Point Cameron
• Cathy is at the far side.

On the way to Mercurys Boot
4) Through a hole/tunnel to Mercurys Boot ~~~
- Yellow arrow in both pics below: Direction of walk
- Upper pic: Through the hole in front
- Lower pic: Looking back at the hole we just passed through
• Left to right: Cathy, Grace, Lily

5) Up this ramp

Mercurys Boot
Grid Ref: 2903 1886
Reference: https://www.bushexplorers.com.au/encyclopaedia/mercurys-boot
6) Arrive at Mercurys Boot ~~~
- Lower pic: We drop our backpacks here (GR 2902 1883) to climb the Boot.
• Red arrow: Point Cameron
• Left to right: 1 清, 2 Paul (me), 3 Yus, 4 Lily, 5 Cathy, 6 Stanley, 7 Grace
• Photographer: Lisa

7) Lisa

8) To climb Mercurys Boot: Go to the far side, then climb up via the toe of the boot.
It is also possible to climb up the way Lily is doing now (the yellow spider girl) ... not difficult :-)
- Top of the Boot, left to right: Grace, Stanley, Yus
9) Mercurys Boot (Photographer: Yus) ~~~
- Upper pic, the guys left to right: Paul (me), Stanley, 清
- Lower pic, the girls left to right: Lisa, Cathy, Lily

10) Both Grace (upper pic) & Yus (lower pic) are like the shoelace knot of Mercurys Boot :-)

11) View from top of Mercurys Boot ... towards where we are going next ~~~
- In both pics below, 2 red arrow, left to right:
1 We are going to climb to top of this pagoda, labelled as Pagoda 1.
2 Unnamed 1047-meter hill north-ish of here
- Yellow arrows: Route to climb the pagoda
- Lower pic:
• Red horizontal bar: Pantoneys Crown
• This pic and the 3 pics in photo #12 form a 360-degree panorama.

12) Panorama from top of Mercurys Boot ~~~
- Upper pic: (Continuation from the right of previous pic)
• 6 red arrows, left to right:
1 Point Cameron
2 The Pondage Canyon
3 Mt Davidson
4 Mt Jamison
5 Mt McLean
6 Unnamed hill
• Crown Creek flows in the large valley on the left side of the pic.
- Middle pic: (Continuation from the right of upper pic)
• White arrow: Baal Bone Gap ... Refer to photos #2 and #3.
• White oval: Where we dropped our backpacks to climb Mercurys Boot ... Refer to photo #6's lower pic.
Yus is in the white oval.
- Lower pic: (Continuation from the right of middle pic)
• 3 people in left half of the pic: Cathy, Lisa, Lily ... To and from the Boot is by walking along there.
- Continuation to the right of the lower pic is photo #11's lower pic, completing a 360-degree panorama.
Leaving Mercurys Boot
13) Leaving Mercurys Boot and looking back at it ~~~
- This view is the opposite side of photos #6 to #10.

Climb Pagoda 1
Grid Ref: 2898 1892
We climb to the top of a pagoda pointed by the left red arrow of photo #11.
(The pagoda is to the north of Mercurys Boot.)
For the purpose of this trip report, it is labelled as Pagoda 1.
14) From top of Pagoda 1, looking back at Baal Bone Gap and Mercurys Boot ~~~
- Yellow arrow: Mercurys Boot
- 2 red arrows, left to right: Mt McLean, unnamed hill
- White arrow:
• Baal Bone Gap
• Greyish green square thingie: Refer to photo #3 ... Seems to be some kind of water pumping facility.
- This pic and the 3 pics in photo #15 form a 360-degree panorama.

15) Panorama from top of the pagoda ~~~
- Upper pic: (Continuation from the right of previous pic)
- Middle pic: (Continuation from the right of the upper pic)
• Red arrow: Eurydice Pagoda
• Yellow arrow: Unnamed 1047-meter hill ... We are heading in that direction, north-ish.
- Lower pic: (Continuation from the right of the middle pic)
• Red horizontal bar: Pantoneys Crown
• 6 red arrows, left to right:
1 Orpheus Pagoda,
2 Pt Cameron, 3 The Pondage Canyon, 4 Mt Davidson, 5 Mt Jamison, 6 Mt McLean
• Crown Creek flows in the large valley between Pantoneys Crown & Point Cameron.
• 5 people, Left to right:
1 Grace ... dark
2 Stanley ... blue (taking photos)
3 Cathy ... white
4 清 ... dark
5 Lisa ... red
- Continuation to the right of the lower pic is photo #14, completing a 360-degree panorama.

16) Zooming into right side of photo #15's middle pic and left side of its lower pic ~~~
- Yellow arrow: Unnamed 1047-meter hill ... We are heading in that direction, north-ish.
- Red horizontal bar: Pantoneys Crown
- 2 red arrows, left to right: Eurydice & Orpheus Pagodas
( Eurydice & Orpheus Pagodas are named in BushExplorers Encyclopaedia :
https://www.bushexplorers.com.au/encyclopaedia/poseidon-arena )

Climb Pagoda 2
Grid Ref: 2893 1930
For the purpose of this trip report, the pagoda here is labelled as Pagoda 2.
17) We are going to climb it.

18) Top of Pagoda 2 ~~~
- Upper pic, left to right: Cathy, Lisa, Lily
- Lower pic, left to right: Lisa, Cathy in the air, Lily

19) Facing north from top of the pagoda in previous pic ~~~
- Red arrow: Unnamed 1047-meter hill
- Yellow arrows: Our route to the 1047-meter hill
- White arrow: We'll be there in photo #21.
- Grace is at bottom-left corner. She stays at the base of the pagoda to take photographs of us.
- This pic and the 3 pics in photo #20 form a 360-degree panorama.

20) Panorama from top of Pagoda 2 (photo #18) ~~~
- Upper pic: (Continuation from the right of previous pic)
• Red horizontal bar: Pantoneys Crown
• 4 red arrows, left to right:
1 Point Cameron
2 The Pondage Canyon
3 Mt Davidson
4 Mt Jamison
• Crown Creek flows in the large valley dominating this pic.
- Middle pic: (Continuation from the right of the upper pic)
• 2 red arrows, left to right: Mt McLean, unnamed hill
- Lower pic: (Continuation from the right of the middle pic)
• 4 white arrows: Our backpacks
- Continuation to the right of the lower pic is photo #19, completing a 360-degree panorama.

At a lookout
Grid Ref: 2891 1944
(We have been walking along a ridge.)
21) Here is one of the many wonderful lookouts towards Crown Creek valley, and Point Cameron to Mt McLean ridge.
- Upper pic:
• 4 red arrows, left to right:
1 Point Cameron
2 The Pondage Canyon
3 Mt Davidson
4 Mt Jamison
5 Mt McLean
• Crown Creek flows in the large valley dominating this pic.
- Lower pic: Lisa

Unnamed 1047-meter hill
22) Lisa leading us to a pile of rocks at the top of an unnamed 1047-meter hill

23) Lisa at the summit of the unnamed hill

24) From the summit of the unnamed hill, facing nearby rocks ~~~
- Upper pic: Zooming towards beautiful Lily !
- Lower pic: We are about to leave the summit.
• 3 figures (left part of the pic), left to right: Stanley, 清 (further away), Lily
• This pic and the 3 pics in photo #25 form a 360-degree panorama.

25) Panorama from summit of the unnamed 1047-meter hill ~~~
- Upper pic: (Continuation from the right of previous pic)
• 4 red arrows, left to right:
1 Mt Davidson
2 Mt Jamison
3 Mt McLean
4 unnamed hill
- Middle pic: (Continuation from the right of the upper pic)
• Towards Baal Bone Gap, where we came from, south-ish direction
- Lower pic: (Continuation from the right of the middle pic)
• 3 small figures (on the right side), left to right: Cathy (in white), Grace, Stanley
- Continuation to the right of the lower pic is photo #24's lower pic, completing a 360-degree panorama.

To another lookout
26) We are walking towards another lookout.
- 2 red arrow, left to right:
• The lookout ... Refer to photos #27 to #30.
• Baal Bone Point ... Our ultimate destination
- 2 guys, left to right: 清, Yus

At the lookout
Grid Ref: 2845 2029
27) This lookout is the one pointed by the left red arrow of previous pic.
- Flat-top mountain in the background: Pantoneys Crown
- Upper pic, left to right: 1 Grace (sitting), 2 清, 3 Cathy (sitting), 4 Stanley, 5 Lisa
- Lower pic: Lisa

28) Same lookout platform as previous pic ~~~
- Flat-top mountain in the background: Pantoneys Crown
- Left to right: 1 Stanley, 2 清 (standing), 3 Grace, 4 Cathy, 5 Lily (standing), 6 Yus

29) 200-degree panorama from the lookout ~~~
- Upper pic:
• Horizontal bar: Pantoneys Crown
- Middle pic: (Continuation from the right of the upper pic)
• 4 arrows, left to right:
1 Point Cameron
2 Mt Davidson
3 Mt Jamison
4 Mt McLean
- Lower pic: Zooming into our group on the right side of the middle pic
• Left to right: 1 Grace, 2 Lily, 3 Lisa (sitting), 4 Yus, 5 Cathy, 6 Stanley, 7 清

30) Zooming into Lisa in the previous pic (Photographer: Lily)

Baal Submarine Pagoda
We come to a pagoda that looks like a submarine.
Grid Ref: 2823 2040
An appropriate name for it would be "Baal Submarine Pagoda" !
Waiting for BushExplorers https://www.bushexplorers.com.au to add this name
to their Encyclopaedia : https://www.bushexplorers.com.au/encyclopaedia.htm
We won't be climbing it today, because Lily says it is too easy to climb :-)
And so, I'll climb it in 2 later trips instead :
6 weeks later - 2020 October, and
6 months later - 2021 March
31) Baal Submarine Pagoda ~~~
- Upper pic: Not so easy to climb it as there is a gap (red oval) surrounding its entire base.
- Lower pic: Same pagoda from a different angle

Baal Sphinx Rock
Grid Ref: 2808 2055
Reference: https://www.bushexplorers.com.au/encyclopaedia/baal-sphinx-rock
32) Arrive at Baal Sphinx Rock (red arrow).
- Upper pic, left to right: 清, Lisa

33) I use the left pic (me) to register the name Baal Sphinx Rock in BushExplorers Encyclopaedia :
https://www.bushexplorers.com.au/encyclopaedia/baal-sphinx-rock
It could be worse. I could have used the right pic (FM from a later trip in 2020-10).
It looks like a human body part :-)
34) Lily on top of a pagoda to the right Baal Sphinx Rock ... Refer to photo #32.
- Both upper & lower pics are of the same pagoda.
- Upper pic: Photographed from down below
- Lower pic: Photographed from top of Baal Sphinx Rock

Panorama around Jabba Hutt Pagoda
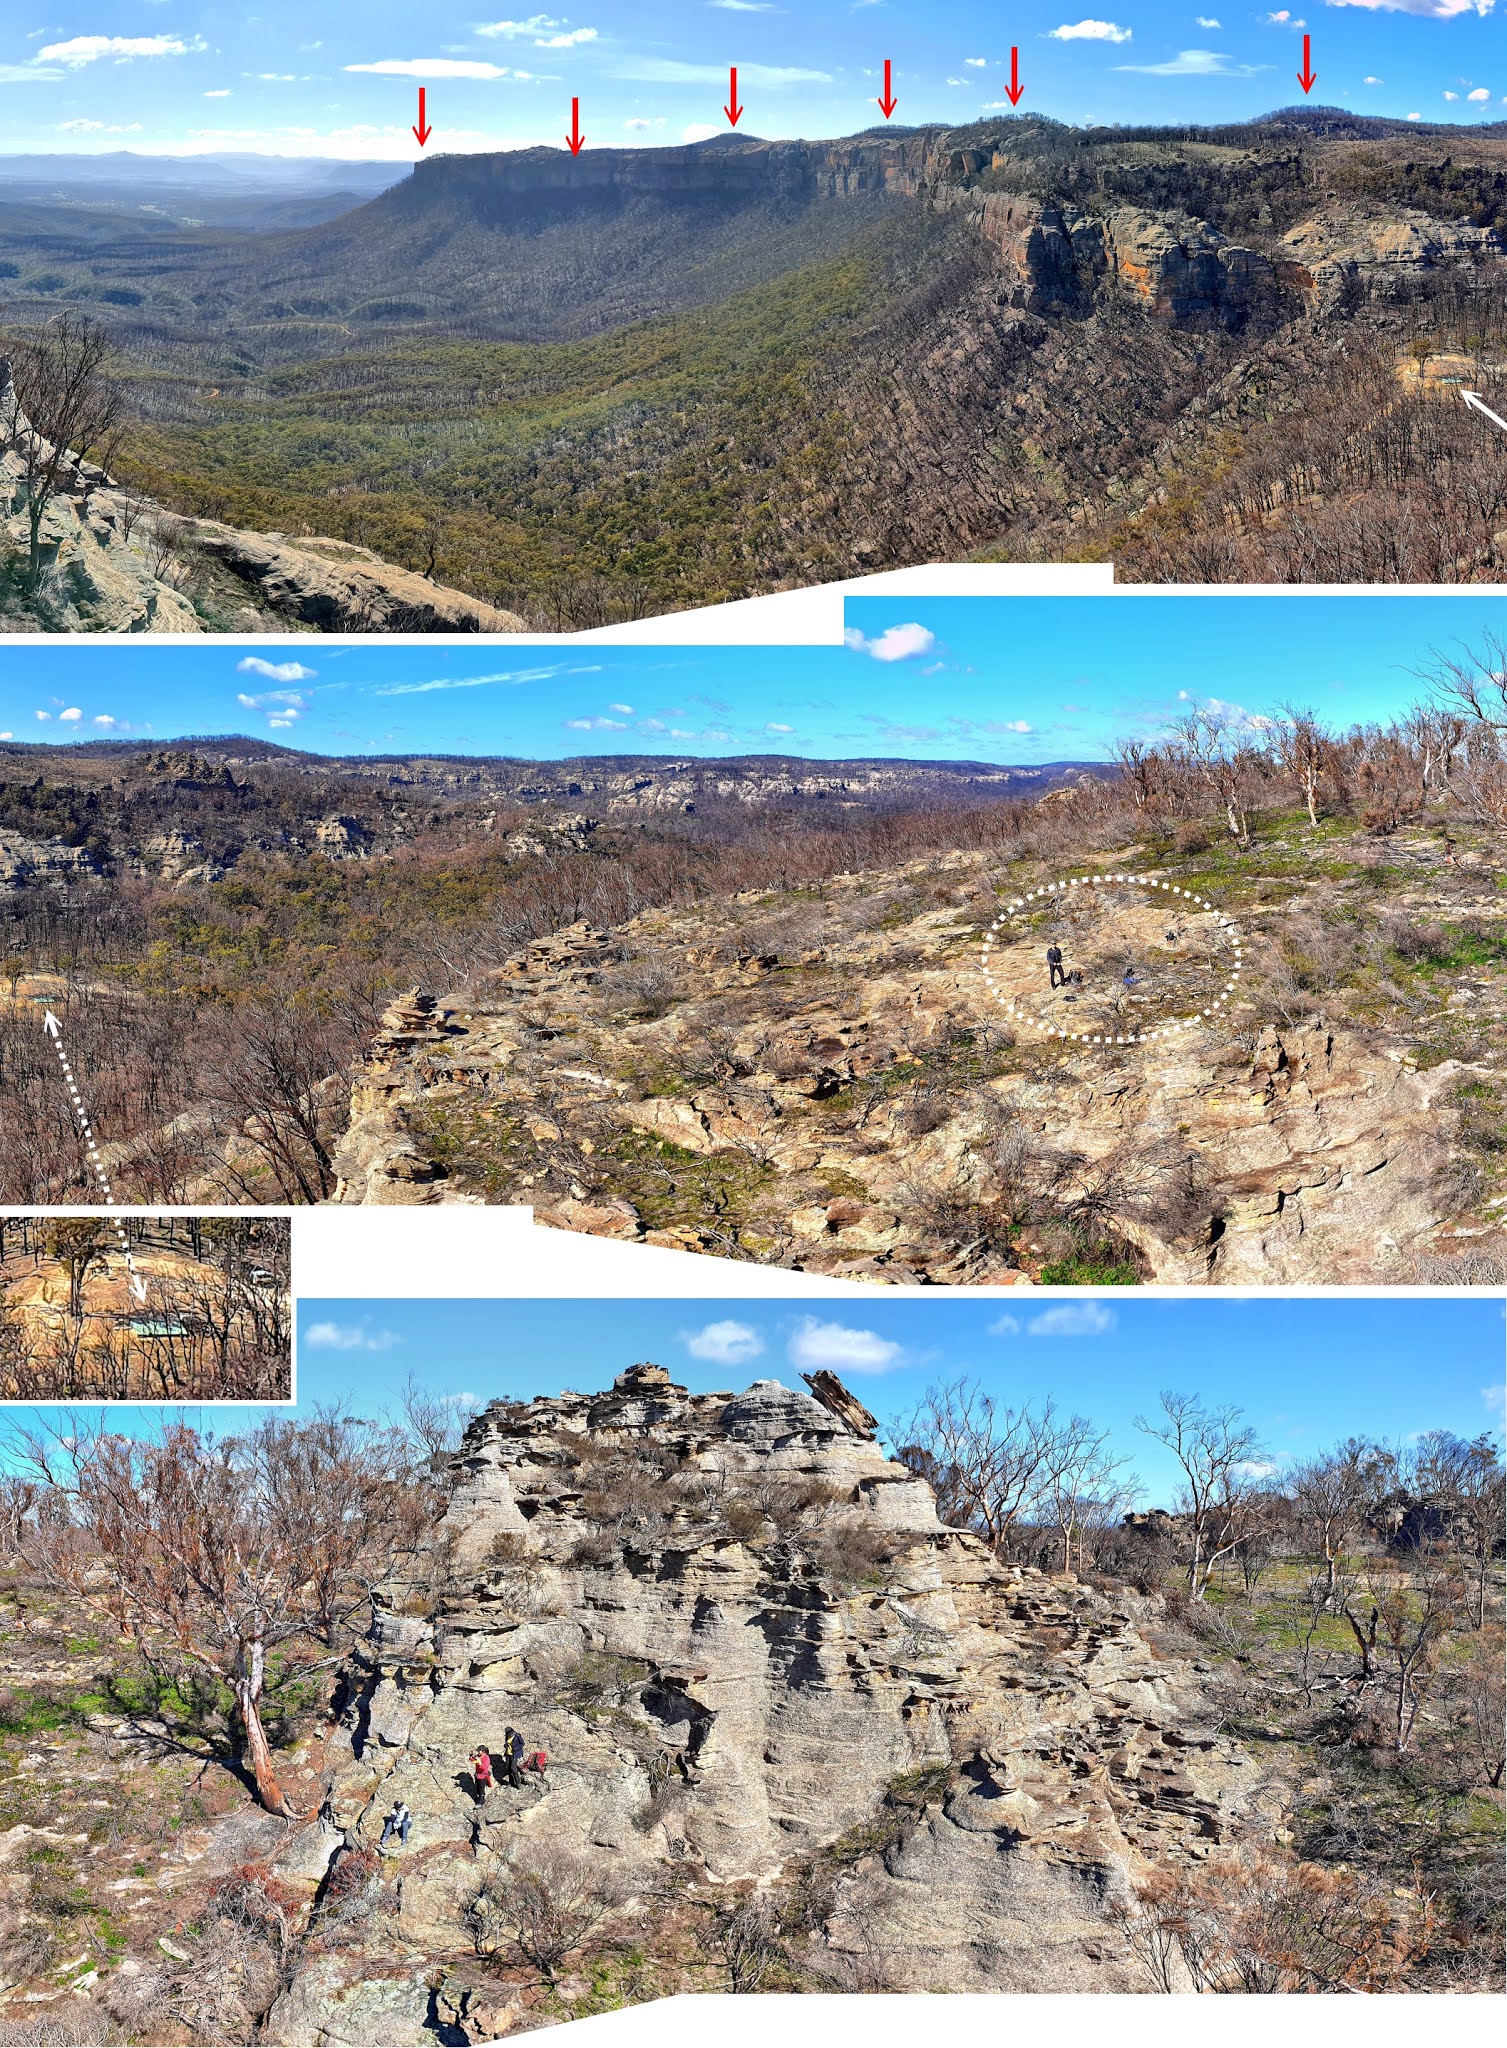
We come to another interesting pagoda, Jabba Hutt Pagoda ... Refer to photo #36's middle pic.
But first, a panorama ...
35) The 3 pics below and photo #36 form a 360-degree panorama.
- Upper pic:
• Red arrow: Pantoneys Crown ... north-north-east
- Middle pic: (Continuation from the right of the upper pic)
• 4 arrows, left to right:
1 Point Cameron
2 Mt Davidson
3 Mt Jamison
4 Mt McLean ... south-east
• White oval: We climbed over this pagoda to where we are now.
- Lower pic: (Continuation from the right of the middle pic)
• Red bar: Moffitts Pagodas ... west-south-west-ish
• Coco Creek flows in the yellow-green valley to the left and below Moffitts Pagodas.
- Continuation to the right of the lower pic is photo #36.

Jabba Hutt Pagoda
Named after Jabba the Hutt, a Star Wars movie character
Grid Reference: 2739 2124
Waiting for BushExplorers https://www.bushexplorers.com.au
to add "Jabba Hutt Pagoda" to their Encyclopaedia :
https://www.bushexplorers.com.au/encyclopaedia.htm
36) Jabba Hutt Pagoda ~~~
- Upper pic: (Continuation from the right of previous pic)
• 3 red arrows, left to right:
1 Blackmans Crown (the black hill) ... north-west-ish
2 Nerve Test Rock ... Refer to photos #55 to #59.
3 Nose Rock ... Refer to photos #49 to #54.
• White circle: Jabba Hutt Pagoda
• Continuation to the right of this pic is photo #35's upper pic, completing a 360-degree panorama.
- Middle pic: (Photographer: Jing ... from 2020-11 trip to Pantoneys Crown)
- Lower pic: Lisa (Photographer: Yus)

37) Jabba Hutt Pagoda ~~~
- Yellow circle & yellow square: Nerve Test Rock & Nose Rock, south-west of Baal Bone Point
- 3 red arrows, left to right:
1 Blackmans Crown (the black hill) ... north-west-ish
2 Nerve Test Rock ... Refer to photos #55 to #59.
3 Nose Rock ... Refer to photos #49 to #54.
- Upper pic: Lisa
- Lower pic: Stanley having fun :-)

Walking along Baal Bone ridge
We keep going along a ridge top towards Baal Bone Point.
The ridge top is a series of pagodas, one after another.
38) Here, we are climbing up one of the pagodas.
- 清 on the left
- In the middle, top to bottom: Lily, Lisa, Cathy
- The other side of this pagoda is photo #42.
- Photos #39, #40, #41 will be taken from top of this pagoda.)

39) Looking back at the pagodas we had climbed over ~~~
(I am standing on top of the pagoda of previous pic. More precisely, I am now at the right red arrow of photo #42.)
- White arrow: Jabba Hutt Pagoda ... Refer tp photos #36 and #37.
- This pic together with photos #40 and #41 form a 240-degree panorama.

40) Panorama ~~~
- Upper pic: (Continuation from the right of previous pic)
• Red bar: Moffitts Pagodas
• Coco Creek flows in the yellow-green valley to the left and below Moffitts Pagodas.
- Lower pic: (Continuation from the right of the upper pic)
• Yellow rectangle: South-west of Baal Bone Point
• 3 red arrows, left to right:
1 Blackmans Crown (the black hill)
2 Nerve Test Rock ... Refer to photo #55 to #59.
3 Nose Rock ... Refer to photo #49 to #54.
• White oval: We are walking along the ridge towards Baal Bone Point

41) (Continuation from the right of previous pic)
- Pantoneys Crown is at the centre of the pic ... north-north-east-ish.
- Lisa is taking photographs of Lily.
- When taking this picture, I am at the right red arrow of photo #42. Lisa & Lily are at the left red arrow.

42) The other side of the pagoda in photo #38 ~~~
- Left red arrow: Where Lisa & Lily were standing in the previous pic
- Right red arrow: Where I was standing when taking photos #39, #40, #41
- Lower pic: (Photographer: Lisa)
• Top to bottom: 1 Paul (me), 2 Grace, 3 Lily, 4 Stanley, 5 Yus, 6 Cathy

43) Scene along the ridge to Baal Bone Point ... The 2 pics below are taken from the same spot.
- Upper pic: Facing forward
• Red arrow: Genowlan trig, 1040 meters (south-west-ish of Airly Turret)
• Left to right: 1 清, 2 Lily, 3 Cathy, 4 Yus
- Lower pic: Facing backwards
• 2 red arrows, left to right: Mt Jamison, Mt McLean
• White oval: A series of pagodas along the ridge ... Photos #35 to #42 were taken from there.
• Yellow arrow: We walked along top of the ridge not too long ago.
• White arrow: On the return trip, for a short while, we'll walk along a ledge there (photos #75 and #76).
Near the tip of the arrow, we'll climb back up to top of the ridge (photo #77).

44) Climbing up another pagoda ~~~
- Upper pic:
• Red arrow: Genowlan trig, 1040 meters (south-west-ish of Airly Turret)
• Left to right: Yus, Paul (me)
- Lower pic: Stanley pointing to Pantoneys Crown, red arrow (Photographer: Lisa)

45) We come to another rock.
Stanley and Lily's motto, "Leave no rock unclimbed, no tree unclimbed" :-)
- Upper right pic: Same rock, view from the right side compared to the other 2 pics (Photographer: Lisa)
• 2 white arrows, top to bottom: Stanley & Lily

46) (Continuation from the right of previous pic ... Photograph is taken at the same spot as previous pic.)
- Lisa

At a junction
(north to Baal Bone Point, west to Nose & Nerve Test Rocks)
47) The rocks in the 2 pics below mark a junction.
We drop our backpacks here to explore 2 ridges:
- Ridge to the west is to Nose Rock & Nerve Test Rock ... We are going there now.
- Ridge to the north is to Baal Bone Point ... We'll go there later.

To Nose Rock
We are on our way to Nose Rock and the nearby Nerve Test Rock.
48) Lisa pointing at Baal Bone Point and Pantoneys Crown

Nose Rock
GR 2677 2180
About 600 meters (as a crow flies) south-west-ish of Baal Bone Point
I have registered the name Nose Rock in BushExplorers Encyclopaedia :
https://www.bushexplorers.com.au/encyclopaedia/nose-rock
49) Stanley approaching Nose Rock

50) Nose Rock ~~~
- Lower pic: Lisa steadies Nose Rock, so Stanley & Yus can climb it with peace of mind :-)

51) Climbing Nose Rock ~~~
- Left to right: Stanley, Lily, Yus
It is a difficult rock to climb. Only Yus and Stanley manage to climb up.

52) Only Yus and Stanley are able to climb up.
Here is Stanley ! He is happy. (Photographer: Lisa)

53) Yus is the first person to climb up.
- This is the opposite face of the rock compared to photo #50.

54) Nose Rock again ... its opposite face compared to photo #50 ~~~
- This pic and photos #55 and #56 form a 360-degree panorama.

Nerve Test Rock
GR 2678 2178
About 30 meters south-west of Nose Rock
It is a narrow vertical slice of rock, like a razorblade, jutting out from the main cliff.
I have registered the name Nerve Test Rock in BushExplorers Encyclopaedia :
https://www.bushexplorers.com.au/encyclopaedia/nerve-test-rock
55) It is named Nerve Test Rock because Lisa is testing her nerves, and ours too, by standing at the tip of the razorblade !
- Upper pic: (Continuation from the right of photo #54)
- Lower pic, red arrow: Gardiners Hill & Platform Rock ... south-south-west
- Continuation to the right is photo #56.

56) Panorama ... photographs taken midway between Nerve Test Rock & Nose Rock ~~~
- Upper pic: (Continuation from the right of photo #55)
• 3 red arrows, left to right:
1 Nerve Test Rock
2 Gardiners Hill & Platform Rock ... south-south-west
3 Moffitts Pagodas ... south-west-ish
• Cyan arrows: Coco Creek
- Lower pic:
• 3 red arrows, left to right:
1 Blackmans Crown
2 Genowlan trig, 1040 meters ... towards north (south-west-ish of Airly Turret)
3 Nose Rock
• Cyan arrow: Coco Creek
- Continuation to the right of the lower pic is photo #54, completing a 360-degree panorama.

57) Lisa deserves another picture on Nerve Test Rock !
- Red arrow: Gardiners Hill & Platform Rock ... south-south-west

58) Nerve Test Rock again, left to right: 1 Yus, 2 Lisa, 3 Lily, 4 Stanley, 5 Paul (me)
(Photographer: 清, using Stanley's phone)
- Cathy & Grace stay back at the junction in photo #47 ... No idea why they stay back there :-(

59) From top of Nose Rock, looking down at Paul (me) on Nerve Test Rock (Photographer: Yus) ~~~
I am not daring enough to stand right at the tip !
- Red arrow: Gardiners Hill & Platform Rock ... south-south-west
- Coco Creek flows in the large yellow-green valley to the right of Gardiners Hill.

60) By the way, there is a deep gap between Nerve Test Rock and the main cliff.
Not wide, and shouldn't be a problem to anyone wishing to jump over.
- Red arrow in both pics below: Nerve Test Rock
- Upper pic: Paul (me) (Photographer: Lisa)
- Lower pic: Lisa

To Baal Bone Point
After Nose Rock & Nerve Test Rock, we retrace steps back to the rocks in photo #47, then head for Baal Bone Point.
61) On our way to Baal Bone Point ~~~
- 2 red arrows, left to right:
1 Big rock at the tip of Baal Bone Point
2 Tayan Pic ... I climbed it in 2019-03.
- Red horizontal bar: Pantoneys Crown
- Small red dot: Yus (at centre of pic) and us, are heading there first before going to Baal Bone Point.

62) Scene here is the small red dot of previous pic ~~~
- Upper pic: Paul (me) (Photographer: Lisa)
- Lower left: Paul (me) (Photographer: Lisa)
- Lower right: Yus (Photographer: Stanley)

63) The 2 pics below are taken at where I am standing in the previous pic.
- Looking back at Lisa

64) Facing Baal Bone Point ~~~
- Red arrows in both pics below: They point to the same rock.
They are also the same rock as the blue arrows in photo #65.
- Upper pic: Lisa
- Lower pic: (Continuation from the right of the upper pic)
• Large rock at the centre: The tip of Baal Bone Point
• Flat-top mountain on the right: Pantoneys Crown

Baal Bone Point
65) At Baal Bone Point ~~~
- Blue arrows in both pics below: They point to the same rock.
They are also the same rock as the red arrows in photo #64.
- Upper pic: Stanley
- Lower pic: Lisa

66) The large rock dominating the entire pic, as well as photo #67, is the tip of Baal Bone Point.
- Lily

67) Lisa ~~~
This pic plus photos #68 and #69 form a 360-degree panorama.

68) There is a deeeeep gap between the vertical rock (tip of Baal Bone Point) and the main cliff.
- Upper pic
• Left to right: Lily, Stanley
• Continuation to the right of this pic is photo #69.
- Lower pics: Stanley reckons he can cross the gap then climb up the rock. He gives up the idea after this unsuccessful attempt at crossing the gap :-)

69) Panorama from Baal Bone Point ~~~
- Upper pic: (Continuation from the right of photo #68's upper pic)
• 4 red arrows, left to right:
1 Mt Davidson
2 Mt Jamison
3 Mt McLean
4 Baal Sphinx Rock is roughly there.
- Middle pic: (Continuation from the right of the upper pic)
• Red arrow: 清 & Grace ... They stay there while the rest of us are exploring Baal Bone Point.
(Photo #73 zooms into them.)
• Lily is at the right edge.
- Lower pic: (Continuation from the right of the middle pic)
• 2 red arrows, left to right:
1 Blackmans Crown
2 Genowlan trig, 1040 meters ... towards north (south-west-ish of Airly Turret)
• Cyan arrows: Coco Creek
- Continuation to the right of the lower pic is photo #67, completing a 360-degree panorama.

70) On the east side of Baal Bone Point, there is a steep slot descending down the cliff.
If you wish to continue on to Pantoneys Crown, this is where you go down.
- Lisa investigating ... The tree is as far down as she goes. The passages goes further down. A rope is usually anchored to the tree to help the descent.

71) (Continuation from the right of previous pic)
- Lisa climbing back up the steep slot
- Red oval: My shadow

72) We are returning now to where 清 & Grace are in photo #68's middle pic.
- Lily on top of a rock
- Red arrow: Grace ... We are heading in her direction ... Refer to photo #73.

73) Returning to where 清 & Grace are staying while we were exploring Baal Bone Point ~~~
(The scene here is photo #69's middle pic.)

74) Our group ... They are at where 清 & Grace were in the previous pic.
- Back row, left to right: 1 Cathy (in white), 2 Stanley, 3 清, 4 Yus, 5 Grace
- Front row: Lisa (in red), Lily

Return to Baal Bone Gap camping ground
75) A small part of the return leg is along a ledge.
Here, we are along the white arrow in photo #43's lower pic.
(When on our way to Baal Bone Point, we were on top of the cliff above this ledge ... photos #43 to #46.)
- Upper pic, left to right: Yus, Grace, Cathy (Photographer: Lisa)
- Lower pic, white oval: The upper pic zooms into this area.

76) Along the ledge ~~~
- Left pic, left to right: 1 Yus (very faint), 2 Grace, 3 Cathy (in white), 4 Lisa (in red), 5 Lily, 6 Stanley, 7 清

77) Climbing up from the ledge to top of the ridge ~~~
- Left pic, left to right: Lisa, Yus
- Right pic: Grace

78) Almost immediately after climbing up to top of the ridge, we come to this pagoda which is the same as the one in photo #42.
- Stanley is leading; followed by Cathy, Lily, Lisa; then 清 at rear.

79) Towards Baal Bone Gap ~~~
- Upper pic, white arc: My shadow
- Lower pic: Lily is directly in front of me.

80) Near Baal Bone Gap now ~~~
- Upper pic, left to right: Grace, Stanley, 清
- Lower pics: Grace is all smiles after sliding down on her bum :-)

81) Near Baal Bone Gap now ~~~
Grace & Stanley have just come down along the yellow arrow.

Comment
And so ends a fascinating trip far away from Sydney.
And I manage to register
Baal Sphinx Rock
Nose Rock
Nerve Test Rock
with BushExplorers Encyclopaedia https://www.bushexplorers.com.au/encyclopaedia.htm !
Here is my theory : The further away a place is from Sydney, the more interesting it is :-)
Driving back to Sydney
On the way back to Sydney, 清's car was bogged on Moffitt Trail, a dirt road connecting the main highway at Ben Bullen with Baal Bone Gap.
Fortunately Stanley has a rope and his car is able to tow 清's car out of the mud.
Moffitt Trail is notoriously bad. I was on it 3 more times in the next half-year :
- 2020-10, 6 weeks later ... The road is still boggy, fortunately no incident.
- 2020-11, 2 months later ... Again no incident.
- 2021-03, 6 months later ... This time, the car is bogged 3 times ! Fortunately, each time it is able to self-winch itself out of the mud !
I don't think I want to try my luck again on Moffitt Trail until some improvement is made to the road.
Post Script: Nearby trips
This area is so fascinating, it would be criminally negligent if you don't do more walks here.
To help you plot your ideas, here are the nearby trips I have done :
- Baal Bone area :
2021-03 Mercurys Boot to Baal Sphinx Rock and ridge to the west, Ben Bullen SF
Pictures only: https://drive.google.com/file/d/1_dV9zYyatuY3t7iUSqdJNczww13slTV7/view
2020-11 Pantoneys Crown via Baal Bone Point, Gardens of Stone NP
Detailed trip report: https://mntviews.blogspot.com/2020/11/pantoneys-crown-via-baal-bone-point.html
2020-10 Mercurys Boot to Baal Sphinx Rock to Poseidon Arena, Ben Bullen SF
Pictures only: https://drive.google.com/file/d/1ddJIJj_Rrhlk0AkqYOmfBvgHpL9pFyx0/view
- McLeans Pass - Point Cameron areas :
2022-12 Stargate Tunnel to Point Cameron, Gardens of Stone NP
Pictures only: https://drive.google.com/file/d/1iWAHjVWb0g1oOzqIY5LGHr0CyPwcUOyv/view
2020-11 Stargate Tunnel to The Nipple rock, Gardens of Stone NP
Pictures only: https://drive.google.com/file/d/1SKwTenqaaKCZeoTBc0OAyw2LGWfaKxzL/view
2019-09 Stargate Tunnel to Hecates Cauldron, Ben Bullen SF
Under construction
Book
I have published a book on the Baal Bone area:
Photo Walks in the Baal Bone Area NSW Australia
Published by Amazon:
Australian site: https://www.amazon.com.au/dp/B09GJPWX7M
or
Rest of the world: https://www.amazon.com/dp/B09GJPWX7M
(If not available, you'll have to get it from the Australian site.)
More details on the book is in this link:
https://mntviews.blogspot.com/p/pauls-published-books.html
No comments:
Post a Comment