2017 January
Day trip from Carr Villa:
- Cross Plains of Heaven
- Climb Legges Tor ... 1572 meters, 2nd highest mountain in Tasmania
- Climb Giblin Peak ... 1569 meters
- Descend Jacobs Ladder
in Ben Lomond National Park, Tasmania, Australia
Prolog
I have been to Legges Tor 2 years ago, in November 2014.
( That was a short walk, starting from near Ben Lomond Ski Resort.
Trip report is in: http://mntviews.blogspot.com.au/2014/11/legges-tor-tas-australia.html )
This time, it is a longer walk, from Carr Villa.
Map
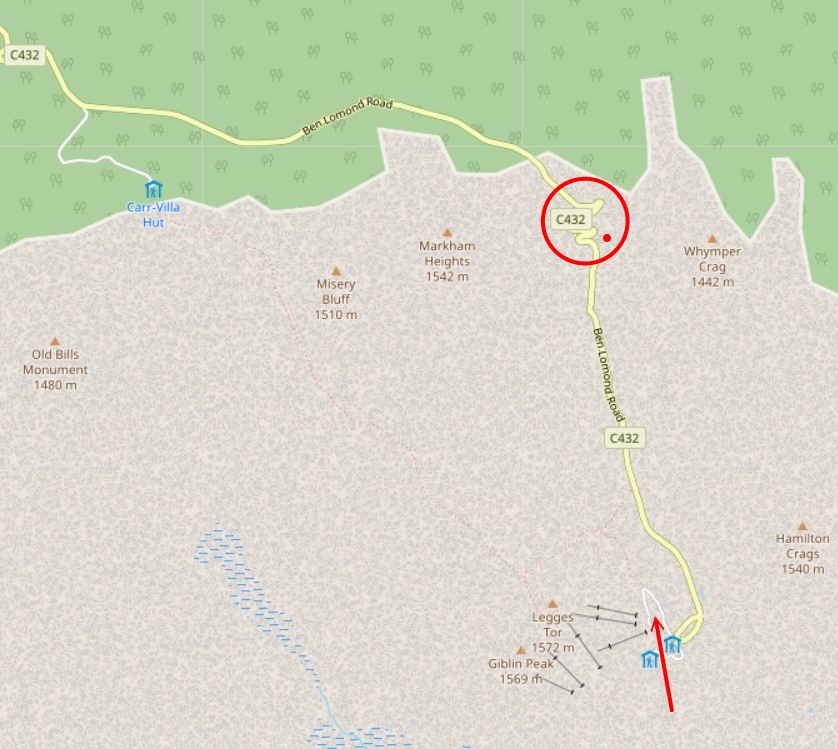
From OpenSteetMap:
- Red circle: Jacobs Ladder
- Red dot: Watchtower Lookout over Jacobs Ladder
- Red arrow: Centre of Ben Lomond Ski Resort ... 2 years ago, it was called a "ski village", now upgraded to "Resort". Sounds better even though nothing much has changed :-)
Map of Ben Lomond Ski Resort

GPS tracklog file & route
The GPX tracklog file of this trip can be downloaded from:
https://drive.google.com/file/d/10oAQHEiioFvDpTy3qBgbg4HfeXyrKxAa/view?usp=sharing
Below is the same tracklog, brown colour, anti-clockwise direction, superimposed on OpenStreetMap:
- Upper red arrow: Watchtower Lookout over Jacobs Ladder
- Lower red arrow: Centre of Ben Lomond Ski Resort

Satellite image of the anti-clockwise tracklog:
- The 3 yellow arrows, anti-clockwise from upper left:
1 Carr Villa ... start and end point of the walk
2 Legges Tor summit
3 Watchtower Lookout over Jacobs Ladder
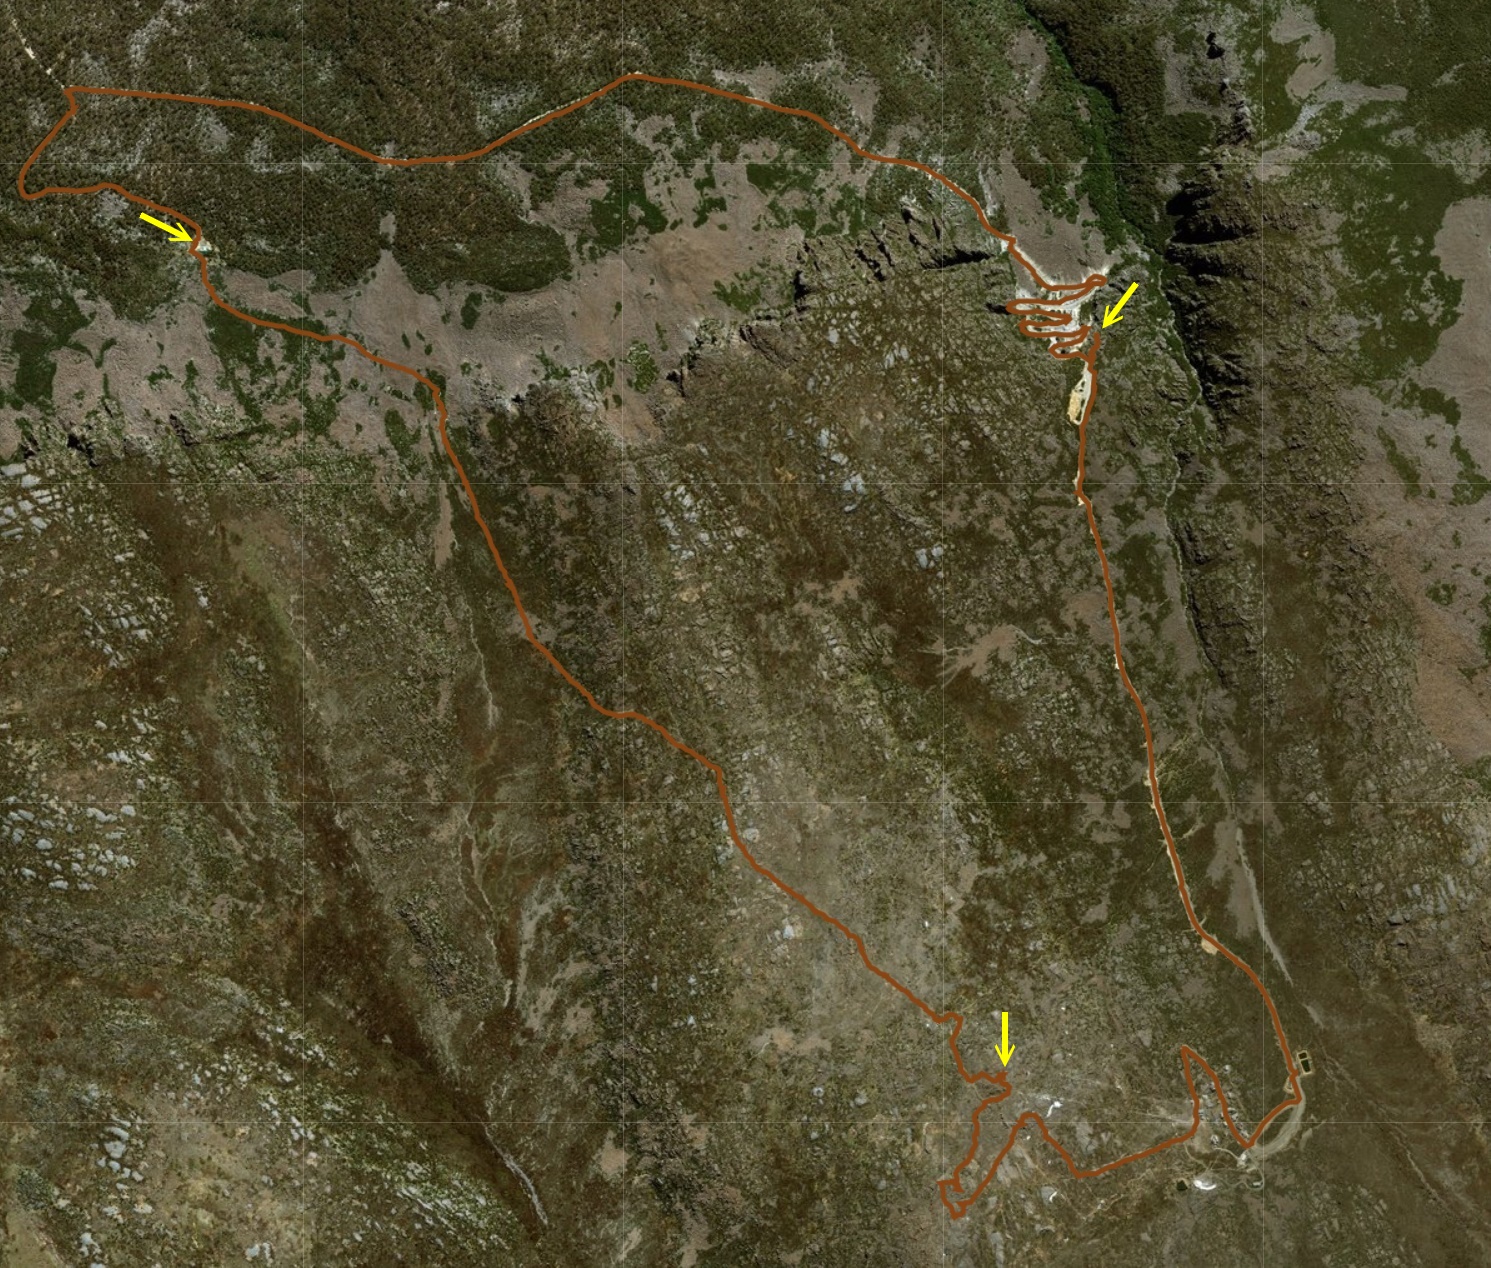
In summary, my route is:
- Start from Carr Villa
- Walk on foot track on Plains of Heaven
- To Legges Tor summit
- To Giblin Peak
- To Ben Lomond Ski Resort
- Along Ben Lomond Road, C432, to Watchtower Lookout over Jacobs Ladder
- Descend Jacobs Ladder
- Walk on Ben Lomond Road back to Carr Villa
Timeline & Distance
12:29 0.0 km Start at Carr Villa
13:59 3.4 km At Monds Memorial Hut (also called Summit Hut)
14:00 3.45km At Ben Bullen Hut
14:02 3.45km Resume walking
14:12 3.8 km At Legges Tor summit
14:25 3.8 km Leave summit
14:36 4.25km At Chateau Dumitchmili
14:44 4.3 km Resume walking
14:49 4.45km At top of Giblin Peak
14:53 4.45km Leave Giblin Peak
15:04 4.8 km At top of Fannys T-bar just south-east of Legges Tor summit
15:07 4.8 km Start to descend along Fannys T-bar, then along Village Poma
15:24 5.45km At Ben Lomond Ski Resort
15:34 6.05km Leave Ben Lomond Ski Resort
16:11 8.55km At top of Jacobs Ladder
16:13 8.6 km At Watchtower Lookout over Jacobs Ladder
16:20 8.65km Leave Watchtower Lookout
16:22 8.75km Back at top of Jacobs Ladder
16:48 10.3 km At bottom of Jacobs Ladder
16:50 10.3 km Resume walking
17:23 13.2 km At junction of Ben Lomond Road and access road to Carr Villa
17:37 14.2 km Back at Carr Villa
==============================================
Total: 5 hrs 8 mins
14.2 km Distance is from Google Earth
15.0 km Distance is from Garmin GPS
Pictures: Carr Villa
1) Carr Villa, a scout hut ... This is where cars can be parked for the walk to Legges Tor.
- Yellow arrow: The route to Ben Lomond massif
- Red arrow: If the hut is not there, you can see the route climbing up Ben Lomond massif.

Climbing up Ben Lomond massif
2) Climbing up Ben Lomond massif ~~~
- Yellow arrows: The route up to the plateau
- Red arrow: Misery Bluff
- To the left of Misery Bluff is Markham Heights.
- Continuation to the right of this pic is photo #3. In fact, this pic and photos #3 and #4 form an almost 270-degree panorama.

3) (Continuation to the right of previous pic ... To enlarge the image, click on it.)
- Ben Lomond massif is on the left.
- The distant mountain near the right edge is Mt Barrow.
- Continuation to the right of this pic is photo #4.

4) (Continuation to the right of previous pic)
- Looking back at Carr Villa where I started the walk
- Red arrow: Ben Nevis

5) Climbing up Ben Lomond massif ~~~
- Yellow arrows in both pics below: The way up to the plateau
- Red arrow: Misery Bluff
- To the left of Misery Bluff is Markham Heights.
- Lower pic: Continuation to the right of this pic is photo #6.

6) (Continuation to the right of previous pic ... To enlarge the image, click on it.)
- Yellow arrow: The way up to the Ben Lomond plateau

7) Nice view of the cliffs made of dolerite rocks ~~~
- I am getting closer and closer to the plateau, but I am not climbing up the peak here which is Misery Bluff. Where I'm heading is beyond the right edge of the 2 pics below.
- Lower pic: Continuation to the right of this pic is photo #8. In fact, this pic and the 3 pics in photo #8 form a 360-degree panorama.

8) (Continuation to the right of previous pic)
- Upper pic: Towards where I'm going
• A snow pole is in the middle of the pic.
- Middle pic: (Continuation to the right of the upper pic)
• Part of Ben Lomond massif
- Lower pic: (Continuation to the right of the middle pic)
• 2 red arrows point to, from left to right: Mt Barrow, Ben Nevis
- Continuation to the right of the lower pic is photo #7, thus completing a 360-degree panorama.

Crossing Plains of Heaven
Finally, I am at the Ben Lomond plateau called Plains of Heaven.
Snow poles guide the way. The foot track continues to be well defined.
Broad expensive views make the crossing of the plains most enjoyable. Alpine vegetation and boggy walking conditions is a feature of the plain.
9) Both pics below are facing the direction I'm going.
- Lower pic:
• Towards south-ish
• Continuation to the right of this pic is photo #10. In fact, this pic and the 3 pics in photo #10 form a 360-degree panorama.

10) (Continuation to the right of previous pic)
- Upper pic: Towards west-ish
- Middle pic: (Continuation to the right of the upper pic)
• North-ish ... Looking back at the foot track I just walked on
• Red arrow: Mt Barrow
- Lower pic: (Continuation to the right of the middle pic)
• East-ish
- Continuation to the right of the lower pic is the lower pic of photo #9, thus completing a 360-degree panorama.

11) Plenty of flowers blooming on the plateau ... the Plains of Heaven ~~~
This small yellow flower is growing in a boggy area.

12) Plenty of Bellendena montana (Mountain Rocket)

13) Gentianella muelleriana (Synonym: Chionogentias muelleriana)

14) Crossing a boulder field
- Yellow arrows in both pics below: Direction of walk
- Upper pic: Facing the direction I'm heading
- Lower pic: Facing backwards

15) Plenty of Richea scoparia on the plateau

16) Beautiful colours ~~~
- Yellow arrows: Direction of walk, towards south-east
- Snow poles lining the track, you won't be lost :-)
- Continuation to the right of this pic is photo #17. In fact, this pic and the 3 pics in photo #17 form a 360-degree panorama.

17) (Continuation to the right of previous pic)
- Upper pic: Towards south-west
- Middle pic: (Continuation to the right of the upper pic)
• Towards where I came from ... north-west
• Yellow arrow: Direction of walk
• Snow poles lining the track, you won't be lost :-)
- Lower pic: (Continuation to the right of the middle pic)
• North-east
- Continuation to the right of the lower pic is photo #16, thus completing a 360-degree panorama.

18) Lovely Cushion Plants

19) Still in Plains of Heaven on Ben Lomond plateau ~~~
Beautiful colours !
- Red arrow: Legges Tor ... And you can see the snow poles lining the path to it.
- Upper pic: It zooms into parts of the lower pic.
- Lower pic: Continuation to the right of this pic is photo #20. In fact, this pic and the 2 pics in photo #20 form a 180-degree panorama.

20) - Upper pic: (Continuation to the right of previous pic)
- Lower pic: (Continuation to the right of the upper pic)
• Yellow arrow: Direction of walk ... I'm facing backwards at the track I've just walked on.
• Red arrow: Mt Barrow

21) Alpine plants ~~~
- Upper pic: Facing forward
- Lower pic: Facing backward
• Red arrow: Mt Barrow

Approaching Legges Tor
22) Legges Tor is clearly in sight now.
- The 2 red arrows point to, from left to right: Legges Tor, Giblin Peak
- And you can see the cairn at the summit of Legges Tor.

23) Closer to Legges Tor ~~~
- Red arrow: The cairn at the summit of Legges Tor
- Of the 3 red circles, from left to right:
1 Ben Bullen Hut
2 Monds Memorial Hut (also known as Summit Hut)
3 Toilet, I think ... Please correct me if I'm wrong.

24) Monds Memorial Hut (also known as Summit Hut)
- Lower pic:
• Red oval: A memorial ... See photo #25.

25) Charles Fenton Monds Memorial in front of Monds Memorial Hut ... the red oval of previous pic.
The words are:
A memorial to
Charles Fenton Monds
President of the Northern Tasmanian Alpine Club
From its foundation 1930 until his death 1940

26) Ben Bullen Hut
- Upper pic: Continuation to the left of this pic is photo #27.

27) Continuation to the right of this pic is the upper pic of photo #26.
Legges Tor summit is behind these mounds and can't be seen from here.

28) Walking towards Legges Tor summit (To enlarge the image, click on it.) ~~~
- Red broken arrow on the left: Legges summit cairn & post come into view
- Red arrow on the right: Giblin Peak
- Blue arrows: Route to summit

Legges Tor summit
29) The cairn at the summit of Legges Tor, 1572 meters

30) Me and the summit cairn :-)

31) Marker at the base of the cairn ~~~
The words are:
ST 1134
Primary GPS Station
Geodetic Survey of Tasmania

Panorama from Legges Tor summit
Photos #32 to #34 form a 360-degree panorama from the summit of Legges Tor.
32) Towards south-west-ish is Giblin Peak (red arrow) and Chateau Dumitchmili (the small hut just below the peak) ... my next destination.
- Refer to photo #38 for a closer look at the peak and the hut.

33) - Upper pic: (Continuation to the right of previous pic)
- Middle pic: (Continuation to the right of the upper pic)
• Large red circle: Jacobs Ladder is down there ... towards north. Photo #35 zooms into it.
• Small red circle: In 2014 November, A small cairn was there ... See photo #16 in:
http://mntviews.blogspot.com/2014/11/legges-tor-tas-australia.html. It is gone now. Why would anyone want to remove it ?
- Lower pic: (Continuation to the right of the middle pic)

34) (Continuation to the right of previous pic)
Ski tow and solar panels at the summit
- Red arrow: A small mound to the south-east of the summit. After climbing Giblin Peak, I'll go to there.
- Continuation to the right of this pic is photo #32, thus completing a 360-degree panorama.

35) Zooming into the red circle in photo #33 ~~~
- Red arrow: Jacobs Ladder is down there ... towards north.

To Chateau Dumitchmili
I've climbed down from Legges Tor, now going to Chateau Dumitchmili, then to Giblin Peak.
36) While on my way, I look back at Legges Tor, the red arrow.
- Lower pic: This pic and photo #37 form a 360-degree panorama.

37) - Upper pic: (Continuation to the right of previous pic)
- Middle pic: (Continuation to the right of the upper pic)
• Red arrow: Giblin Peak
• In front of Giblin Peak is Chateau Dumitchmil. I'm going there now.
- Lower pic: (Continuation to the right of the middle pic)
- Continuation to the right of the lower pic is photo #36, thus completing a 360-degree panorama.

38) Walking closer and closer to Chateau Dumitchmili
- Red arrows in all 3 pics below: Giblin Peak

Chateau Dumitchmili
39) Now at Chateau Dumitchmili ... It is locked, so I can't go inside to investigate.

Giblin Peak
40) Approaching Giblin Peak ... Its summit is the top station of a ski tow called Giblin Poma

41) Now at the summit of Giblin Peak (1569 meters), looking back at Legges Tor ~~~
- Left red arrow: The cairn at the summit of Legges Tor can be seen clearly.
- Right red arrow: A mound south-east of Legges Tor summit, I'll go there next.
- Left blue arrow: I climbed to Legges Tor summit that way.
- Right blue arrow: I'll descend Legges Tor that way, then go behind the mountain to Ben Lomond Ski Resort.
- Red oval: Ski tow and solar panels ... Refer to photo #34.
- This pic and photos #42 and #43 form a 360-degree panorama.

42) (Continuation to the right of photo #41)
Ben Lomond Ski Resort ... Its name used to be Ben Lomond Ski Village. Now it is upgraded to Resort :-)
I intend to be down at the resort. But instead of going straight down towards it, I'll go back towards Legges Tor (sort of); and descend from there ... See photos #44 onwards.

43) (Continuation to the right of photo #42)
- Upper pic: Ski tow is on the left side of the pic.
- Lower pic: (Continuation to the right of the upper pic)
- Continuation to the right of the lower pic is photo #41, thus completing a 360-degree panorama.

A mound south-east of Legges Tor summit
44) Now going to a mound south-east of Legges Tor summit ~~~
- Upper pic:
• Left red arrow: Cairn at the summit of Legges Tor
• Right red arrow: Mound south-east of Legges Tor summit ... that is where I'm going now.
- Middle pic:
• Left red arrow: Can't see Legges Tor summit now, but it is in that direction.
• Right red arrow: Mound south-east of Legges Tor summit ... that is where I'm going now.
- Lower pic: Closer to the mound now

45) Almost at the top of the mound

The next few photos, photos #46 to #48 are taken from the top of the mound. They form a 360-degree panorama.
46) Looking at the summit of Legges Tor ~~~
- Red arrow: The cairn at the summit.
- Red circle: Solar panels & ski tow T-bar structure ... Refer to photo #34.
- Continuation to the right of this pic is #47.

47) (Continuation to the right of previous pic)
- The village is Ben Lomond Ski Resort.

48) - Upper pic: (Continuation to the right of previous pic)
- Middle pic: (Continuation to the right of the upper pic)
• Red arrow: Giblin Peak
• Red oval: Refer to photo #38
- Lower pic: (Continuation to the right of the middle pic)
- Continuation to the right of the lower pic is photo #46, thus completing a 360-degree panorama.

Descending Legges Tor to Ben Lomond Ski Resort
49) Time to return to the car via Ben Lomond Ski Resort ~~~
- First, descend along the Fannys T-bar course (this pic) towards the far southern end of the resort. (Then turn east/left towards the centre of the resort ... Refer to photo #50.)
- Photo #51 is another view of the same scene.

50) I've turned eastward, now descending along Village Poma towards the centre of the resort.

51) (Continuation to the right of previous pic)
Far southern end of Ben Lomond Ski Resort

52) Is this a wallaby or pademelon? ... Plenty of them on the slope of Legges Tor

53) Closer and closer to Ben Lomond Ski Resort ~~~
- Red oval: A very interesting mountain ... see photo #55.

At Ben Lomond Ski Resort
54) Now at Ben Lomond Ski Resort, looking back at the slope of Legges Tor (Click on the image to enlarge it.) ~~~
- On the left is the Village Poma course along which I walked down the slope.
- Left red arrow: The mound south-east of Legges Tor summit ... I descended Legges Tor from there.
- Right red arrow: Legges Tor summit

55) Towards east-ish are the Hamilton Crags with its 3 peaks. One day, I like to climb them all !

56) Walking around the resort ~~~
Some of the ski lodges

57) A few more steps forward compared with the previous pic ~~~
(To enlarge the image, click on it.)

58) Red oval: Entrance to the Resort

At entrance to Ben Lomond Ski Resort
59) Now at the entrance to the resort ... near the red oval of the previous pic (To enlarge the image, click on it.) ~~~
- Left red arrow: Giblin Peak
- Right red arrow: The mound south-east of Legges Tor summit ... I descended Legges Tor from there.
- (Legges Tor summit is just beyond the right edge of this pic.)
- Yellow arrow: I just walked along there to where I'm now standing.

60) Looking back at Ben Lomond Ski Resort (To enlarge the image, click on it.) ~~~
- Left red arrow: The mound south-east of Legges Tor summit ... I descended Legges Tor from there.
- Right red arrow: Legges Tor summit
- Yellow arrow: Direction of walk

61) Does any one know what is the purpose of this building and the pipe? Sewage works?
- Blue arrows: I'll be walking along Ben Lomond Road, C432, to Jacobs Ladder, the tip of the left blue arrow.

On Ben Lomond Road
62) Walking on Ben Lomond Road, C432, towards Jacobs Ladder which is at the end of the road at the centre of the pic ~~~
- Yellow arrow: Direction of walk

63) Plenty of these yellow flowers by the side of Ben Lomond Road. If you know its name, please let me know.

64) And plenty of these Bellendena montana (Mountain Rocket) too

65) Closer to Jacobs Ladder ~~~
- Upper pic:
• Red circle: Refer to lower pic.
• Red arrow: Start of a foot track to Watchtower Lookout, a lookout over Jacobs Ladder
- Lower pic: It is the boulder in the red circle of the upper pic.

To Watchtower Lookout
66) Foot track to Watchtower Lookout over Jacobs Ladder
- Lower pic:
• Yellow arrows: Foot track to the lookout
• Red arrow: Ben Nevis

Watchtower Lookout
67) This is it ... Watchtower Lookout over Jacobs Ladder
- Left red arrow: Ben Nevis
- Right red arrow: Part of Whymper Crag

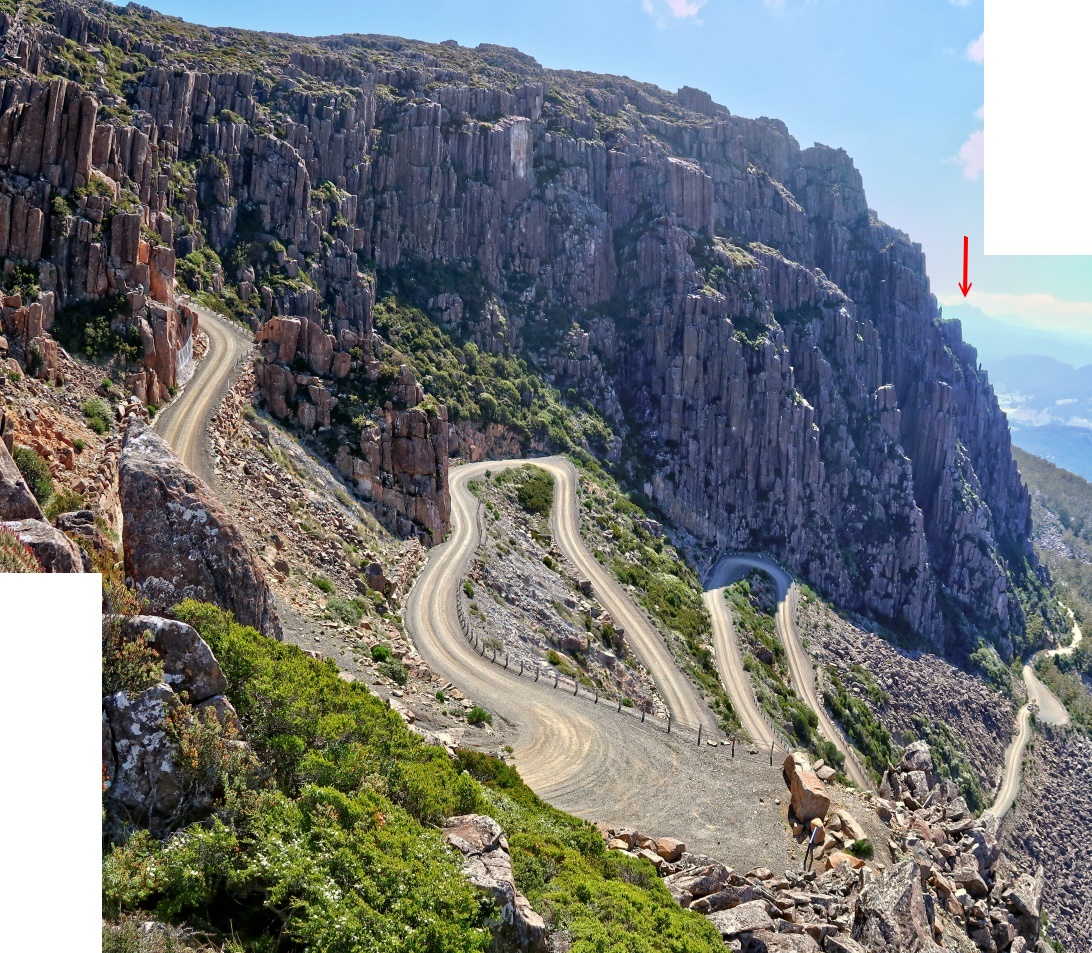
68) Jacobs Ladder from the lookout ~~~
- Red arrow: Mt Barrow
- As you can see, Jacobs Ladder is 6 scary hairpin bends one after another on a narrow unsealed road.
Each bend has been given a name. They are, from bottom of the Ladder to the top:
• Strickland Corner ... Can't be seen in this pic.
• Black Corner
• Hanging Corner ... Can't be seen in this pic.
• Waterfall Corner
• Watchtower Corner
• Gateway Corner ... You can see half a bend only ... near left edge of the pic
69) Another look at Jacobs Ladder ~~~
For a car, the road is quite steep and scary to drive through. It may not seem so from the photo, but when you are the one sitting behind the wheel, it is a different story !

70) (Continuation to the right of previous pic)
- Red arrow: Ben Nevis

71) (Continuation to the right of previous pic)
Whymper Crag is the main subject in this pic.
- Red arrow: The slope of Mt Saddleback (The mountain in the background.)

Descending Jacobs Ladder
72) Start walking down Jacobs Ladder ... facing the hairpin bends ~~~
- Upper pic: Walking towards Gateway Corner, the 1st bend from the top of the Ladder
- Lower pic: After Gateway corner, it is to Watchtower Corner.
• Red arrow: Mt Saddleback
• The dolerite mound at the centre of the pic is Whymper Crag ... Also refer to photo #71.

73) Cliffs between Gateway Corner and Watchtower Corner ~~~
Hhmmm... are the braces enough to hold the rocks??? Better is to walk through Jacobs Ladder as quickly as possible :-)

74) Still between Gateway Corner and Watchtower Corner ~~~
- Red arrow: Ben Nevis

75) Looking down at Strickland Corner ~~~
- Upper pic:
• Red circle at centre of the pic: Strickland Corner ... 1st hairpin bend from bottom of Jacobs Ladder
• Red circle at right edge: Hanging Corner
• The dolerite mound at the centre of the pic is Whymper Crag ... Also refer to photo #71 and lower pic of photo #72.
- Lower pic:
• Red circle: Strickland Corner

76) At Black Corner, 2nd bend from the bottom of Jacobs Ladder ~~~
At each bend, there is a sign naming the bend ... similar to the one in this pic.

At bottom of Jacobs Ladder
77) I'm at the bottom of Jacobs Ladder now, looking back at the way I came down.
- Red arrow on the left: Whymper Crag
- Double headed arrow on the right: Watchtower Lookout ... Refer to photo #67.
- Jacobs Ladder can be seen clearly as a series of zigzags on the right half of the pic up the slope towards Watchtower Lookout. (To enlarge the image, click on it.)

78) Zooming into the right half of previous pic ~~~
- Upper pic:
• Red arrow: Watchtower Lookout ... Refer to photo #67.
• Jacobs Ladder can be seen clearly as a series of zigzags up the slope towards Watchtower Lookout.
- Lower pic:
• Red circle: Watchtower Lookout

Then it is walking on Ben Lomond Road, C432, back to Carr Villa where my car is parked.
No comments:
Post a Comment