2017 October: Blue Mountains National Park, NSW, Australia ... day-trip to:
- Goochs Crater
- Friday Canyon
- Dargan Arch
Prolog
Goochs Crater
- A natural crater-like swamp feature, not volcanic in origin, ringed by pagoda-like rock formations
- A photogenic place, a delight for photographers
- Named in memory of Nicholas Andrew Gooch who discovered the place in 1978
Friday Canyon, GR 462 935 to 460 934
- Discovered and named by FM, NC and me in a bushwalking trip in 2016 March, about 1.5 years ago
- In an unnamed tributary south of Wollangambe River
- A wet canyon ... Water is not deep, between ankle and knee high.
- Photographs and a report of that trip are in my blog:
http://mntviews.blogspot.com.au/2016/03/dargan-arch-and-friday-canyon-blue-mts.html

And so, I have since registered the name "Friday Canyon" in BushExplorer's Encyclopaedia :
https://www.bushexplorers.com.au/encyclopaedia/friday-canyon
Post Script:
Tom Brennan said he and Michael Keats had been there a long time ago, but there were some doubts in this as Michael Keats didn't confirm it.
Dargan Arch, GR 459 919
- A sandstone arch formed out of the collapse of a cave/overhang ... one of the must-see features of the Blue Mountains.
- I am the one in this photograph :-) ... Photographer: DH

Today's trip
After seeing the above photographs, don't you just love to visit them all !!!
And indeed you can ... all in a day ... just like DH and I in today's trip :-)
I am aware of one other party, FM, NC, HT, CB from All Nations Bushwalking Club, pioneering the same walk as ours 10 months ago in 2016 December.
And so, DH and I are the 2nd party to walk this route ... visiting Goochs Crater, Friday Canyon and Dargan Arch all in one day ! Hope in future this route will be regarded as one of the iconic walks of the Blue Mountains.
Maps
LPI 1:100,000 scaled 8931 Wallerawang
LPI 1:25,000 scaled 8931-2S Wollangambe
Map 1) Below is the relevant part of the 1:25,000 scaled LPI Wollangambe map :

GPS tracklog file & route
The GPX tracklog file of the walk can be downloaded from:
https://drive.google.com/open?id=1mtIm4_RVslzoc-ricJyjj-tywXl8Fwtc
Map 2) The same GPS tracklog is drawn in red in the following 1:25,000 topographic map:
- 7 blue arrows from top to bottom:
1 GR 460 937 ... Pagoda #2
2 GR 461 936 ... Pagoda #1
3 & 4 GR 462 935 to 460 934 ... Friday Canyon is between these 2 arrows
5 GR 460 928 ... On the return leg, we leave the unnamed creek here
6 GR 459 919 ... Dargan Arch
7 GR 458 912 ... Start & end of trip, ie where my car is parked

Map 3) Zooming into Goochs Crater area:
- 7 blue arrows along the route, from lower right:
1 GR 460 948 (almost at 460 949) ... Cathedral Arch
2 GR 460 950 ... Pagoda #3
3 GR 460 950 ... Pagoda #4
4 GR 459 950 ... Pagoda #5
5 GR 458 949 ... Our lunch spot
6 GR 458 949 ... Lookout #1 (to the left of lunch spot)
7 GR 457 950 ... Lookout #2 (blue arrow pointing downwards)

Map 4) Satellite image of Map 2

Map 5) Satellite image of Map 3 ... zooming into Goochs Crater area

In summary, the route for today's trip is:
- Start at the small village of Dargan.
- Walk on path / foot track to Wollangambe River.
- Climb up some pagodas after crossing the river.
- At Goochs Crater ... climb up some pagodas on the crater rim, then descend into the bowl.
- Explore around the vicinity of Goochs Crater.
- Return to Wollangambe River.
- Wade through Friday Canyon.
- At Dargan Arch.
- Back at the car.
Timeline & Distance
Park my car at GR 458 912, about 45 meters east of Sandham Road at the village of Dargan.
08:37 0.0 km Start walking
08:50 0.35km On a walking path
10:00 3.2 km At Wollangambe River
Cross Wollangambe River
10:02 3.2 km Leave Wollangambe River
10:15 3.4 km At pagoda #1
10:17 3.4 km Leave pagoda #1
10:20 3.55km At pagoda #2
10:21 3.55km Leave pagoda #2
11:03 5.05km At a cave with a mud column inside
11:05 5.05km Leave cave
11:09 5.15km At a cave / overhang
11:11 5.15km Leave cave / overhang
11:12 5.2 km At Cathedral Arch
11:15 5.2 km Leave Cathedral Arch
11:32 5.45km At pagoda #4 (on crater rim overlooking Goochs Crater)
11:34 5.45km Leave pagoda #4
11:47 5.65km At pagoda #5 (on crater rim overlooking Goochs Crater)
11:50 5.65km Leave pagoda #5
11:57 5.85km Discover that I left my walking poles back at pagoda #5
Return to pagoda #5 to pick up my walking poles
(GPS recording is turned off during this period.)
12:07 5.85km Resume walking
12:10 5.9 km At north edge of Goochs Crater (after climbing down from the cliffs above it)
12:23 6.1 km At south-west corner of Goochs Crater
12:28 6.15km Stop for lunch
Lunch
12:44 6.3 km Resume walking
13:04 6.75km At lookout #1
Explore around
13:14 6.75km Resume walking
13:17 6.9 km At lookout #2
13:20 6.9 km Resume walking
13:23 7.05km Back at lookout #1
13:58 8.6 km At between Pagoda #1 and Pagoda #2
14:25 8.95km Cross Wollangambe River
14:34 9.1 km Start walking upstream along an unnamed tributary south of Wollangambe River.
(Friday Canyon is somewhere along this tributary.)
15:49 10.1 km Leave unnamed tributary
15:51 10.2 km Stop for afternoon tea
Afternoon tea
16:01 10.25km Resume walking
16:47 11.5 km At Dargan Arch
16:50 11.5 km Leave Dargan Arch
17:21 12.5 km Back at my car by the side of Sandham Rd
==============================================
Total: 8 hrs 44 mins at leisurely pace
12.5km Distance is from Google Earth
Pictures - Trailhead
1) DH & my car (Mazda 626) at the trailhead GR 458 912, 45 meters east of Sandham Rd at the village of Dargan ~~~
- Exactly the same spot as photo #1 in my blog on Dargan Arch & Friday Canyon 1.5 years ago in 2016 March:
http://mntviews.blogspot.com.au/2016/03/dargan-arch-and-friday-canyon-blue-mts.html

2) Telopea speciosissima, commonly known as Waratah, are starting to bloom ~~~
- Taken near where the car is parked

Initial path
3) Initially, there is a good path.

Pagoda country
4) Now in pagoda country ... Pagodas are pagoda-like rock formations.
- We won't be climbing these pagodas, instead, we'll climb the highest one about 100 meters further forward, ie further north. Panorama from that pagoda is in photos #5 and #6.

And indeed, 1.5 years ago in 2016 March, FM, NC and I did just that ... See photos #38 to #55 in my report on that trip:
http://mntviews.blogspot.com.au/2016/03/dargan-arch-and-friday-canyon-blue-mts.html
(Although we did it in reverse order compared to today's trip.)
5) We are now at top of the highest pagoda around this area. This view is from the top facing backwards.
- We didn't walk along the top of the pagodas in this pic (though we could have).
Instead we walked along the lower yellow arrow.
- Red arrow: The village of Dargan, where my car is parked
- 2 upper yellow arrows: We walked along the ridge top to here.
- The pagodas here are the same as the ones in photo #42 of this link:
http://mntviews.blogspot.com.au/2016/03/dargan-arch-and-friday-canyon-blue-mts.html
- This pic and the 3 pics in photo #6 form a 360-degree panorama.

6) Panorama from top of the highest pagoda around this area ~~~
- Upper pic: (Continuation to the right of previous pic)
• DH
- Middle pic: (Continuation to the right of the upper pic)
• Small yellow dot in middle of the pic: Goochs Crater ... One of the purposes of this trip is to go there.
• Yellow arrow: For the immediate future, we'll walk along the ridge there.
• Right half of this pic is enlarged in photo #7.
- Lower pic: (Continuation to the right of the middle pic)
- Continuation to the right of the lower pic is photo #5, completing a 360-degree panorama.

7) Facing forward ~~~
- Upper pic: (Enlarged from the black rectangle of the middle pic)
• 2 red arrows, left to right: For the purpose of this report, they are labelled as pagoda #2 and pagoda #1.
• Yellow oval: Pagodas surrounding Goochs Crater
• Yellow arrows: Our route to and from Goochs Crater
• Pink arrow: Return leg from Goochs Crater
• Cyan arrows: Wollangambe River
- Middle pic: View from top of highest pagoda around this area
• Black rectangle: Enlarged in the upper pic
• Yellow arrows: Direction of walk for the immediate future
- Lower pic: Facing the same direction as the middle pic after climbing down from the pagoda

8) Looking back at the rock sculpture of the pagoda we've just climbed down

9) Looking back at the pagoda we've just climbed ~~~
- The face of the rock nearest to us is photo #8.
- Blue arrow: Direction of walk

To Wollangambe River
10) Further along our way is this view of:
• Where we going
• Our return route
• Newnes Junction and Clarence Colliery.
- Upper pic: (Enlarged from the black rectangle of the lower pic)
• 2 red arrows, left to right: For the purpose of this report, they are labelled as pagoda #1 and pagoda #2.
We'll climb them after crossing Wollangambe River.
• Newnes Junction and Clarence Colliery are on the left side of the pic.
- Lower pic:
• Blue arrow: The way to Goochs Crater after visiting the 2 pagodas (the 2 red arrows)
• Small yellow dot: Where we'll cross Wollangambe River
• Yellow arrow on the right of the yellow dot: Forward route to cross Wollangambe River
• 5 yellow arrows left of the yellow dot: Return route after crossing back Wollangambe River from Goochs Crater ...
• ... 4 left-most yellow arrows: Along an unnamed tributary south of Wollangambe River

11) A few more minutes later compared to the previous pic (To enlarge the image, click on it.) ~~~
- Yellow oval: Where we'll cross Wollangambe River ... You can just make out a log inside the oval.
- Red arrow: Pagoda #1 ... We'll climb it after crossing Wollangambe River.
- Pagoda #2 is behind pagoda #1 and can't be seen from here.
- Blue arrow: Route to Goochs Crater after climbing the pagodas
- 4 yellow arrows on the right: Forward route to pagoda #1
- 5 yellow arrows on the left: Return route after crossing back Wollangambe River from Goochs Crater ...
- ... 4 left-most Yellow arrows: Along an unnamed tributary south of Wollangambe River

12) (Zooming into right half of previous pic)
- Yellow oval: Where we'll cross Wollangambe River ... You can see a log inside the oval.
- Red arrow: Pagoda #1 ... We'll go there after crossing Wollangambe River.
- Pagoda #2 is behind pagoda #1 and can't be seen from here.
- Blue arrow: Route to Goochs Crater after visiting pagodas #1 and #2.
- Yellow arrows: Route to pagoda #1

Wollangambe River
13) At Wollangambe River ~~~
We now go left to find the log to cross the river. (The log is in the yellow oval of previous pic.)

14) The prominent rock here is a pagoda on opposite bank of Wollangambe River ~~~
- Upper pic: Red arrow: Pagoda #1
- Lower pic: Yellow arrow: After crossing the river, climb up a steep slope along the arrow.

Crossing Wollangambe River
15) This is the log to cross Wollangambe River.
Wonder whether it is purposely fell and placed there? ... So perfectly positioned !
- Upper pic:
• Rocky slope on right edge of the pic: It is the large rock of the previous pic.
• Yellow arrow: The way forward after crossing the log ... It is a steep climb up hill.
- Lower pic: Me (Photographer: DH)

16) The 4 pics below are taken from the middle of the log.
- Yellow arrows: Direction of walk
- Upper pic: Facing downstream of Wollangambe River
- Middle pic: Upstream is another log. It is narrower ... not recommended for crossing the river.
- Lower left: Facing forward
- Lower right: Facing backwards

To pagoda #1
17) After crossing Wollangambe River, a steep climb leads us to a set of pagodas.
- Upper pic: We'll scramble up this slope.
• Black & green arrows: Same as the black & green arrows in the middle pic.
- Middle pic: After scrambling a bit up the slope
• Black & green arrows: Same as the black & green arrows in the upper pic.
• Blue & red arrows: Same as the blue & red arrows in the lower pic.
- Lower pic:
• Blue & red arrows: Same as the blue & red arrows in the middle pic.
• In particular, red arrow: Pagoda #1 ... We are going to climb to its top.

Pagoda #1
Arrive at the top of pagoda #1, red arrow in previous pic.
18) Panorama, centred towards east, from top of pagoda #1 ~~~
- Cyan arrows: Wollangambe River
- Yellow dot: Where we crossed Wollangambe River
- Yellow arrows: Route to here
- Large red circle: We are going there next. It is the blue arrow in the previous pic and is part of the pagoda #1 complex.
Photo #21 will be taken from the top of that pagoda.
- Smaller red circle: It is the large rock in photo #14, and also on the right edge of photo #15's upper pic.

19) Still at the top of pagoda #1 ~~~
There is a gap between the right edge of previous pic and the left edge of the pic below. (The missing gap is the left half of photo #21's lower pic.)
Otherwise the previous pic and the 3 pics below form a 360-degree panorama.
- Upper pic: Centred toward south-west
• Red arrow: Where my car is parked, at Dargan, towards south.
• Yellow arrow: How we walked initially.
- Middle pic: (Continuation to the right of the upper pic)
• Red arrow: Pagoda #2 ... We'll be there ... Refer to photo #22.
• Red rectangle: Enlarged in photo #20
- Lower pic: (Continuation to the right of the middle pic)
- Continuation to the right of the lower pic is photo #18, completing a 360-degree panorama.

20) (Zooming into the red rectangle of photo #19)
- Red arrow: Pagoda #2 ... We'll be there ... Refer to photo #22.
- Left half of the pic: The large pagoda is not climbed in this trip.
Newnes Junction and Clarence Colliery are in the background.

Next, I climb the nearby pagoda in the large red circle of photo #18, which is also the blue arrow in photo #17. It is part of pagoda #1 complex.
21) Panorama from top of the pagoda ~~~
- Upper pic:
• Cyan arrows: Wollangambe River
• Yellow dot: Where we crossed Wollangambe River
• Yellow arrows: We walked along the arrows.
• Red dot: It is the large rock in photo #14, and also on the right edge of photo #15's upper pic.
- Lower pic: (Continuation to the right of the upper pic)
• 2 red arrows from left to right
1 Pagodas area ... Refer to photos #4 to #9.
2 Where my car is parked, at Dargan, towards south.
• Yellow arrow: We walked along the ridge top ... along the arrow.
• DH is standing at where I was when taking photos #18, #19 and #20.

Pagoda #2
After taking photographs from top of pagoda #1, we climb pagoda #2 which is the highest point around this local area.
22) This pic and photo #23 form a 360-degree panorama from top of pagoda #2.
- DH at the top
- The background is the same as photo #21's upper pic.

23) Panorama from pagoda #2 ~~~
- Upper pic: (Continuation to the right of the upper pic) Centred toward south-west
• 5 Red arrow from left to right:
1 It is the large red circle in photo #18 ... Photo #21 was taken from its top.
2 Pagoda #1 ... photos #18, #19 and #20 were taken from its top.
3 A pagoda we didn't climb
4 Pagodas area ... Refer to photos #4 to #9.
5 Where my car is parked, at Dargan, towards south.
• Yellow arrows: Our route in the morning ... along the ridge, then down to Wollangambe River
- Middle pic: (Continuation to the right of the upper pic)
• Red rectangle: Newnes Junction and Clarence Colliery
- Lower pic: (Continuation to the right of the middle pic)
• Yellow arrow: We'll walk along the arrow next ... to Goochs Crater
- Continuation to the right of the lower pic is photo #22, completing a 360-degree panorama.

24) We've left pagoda #2, now looking back at it.
- Yellow arrow: Direction of walk

Towards Goochs Crater
A few minutes later ...
25) Typical scenery after the pagodas ~~~
- Yellow arrow: Walking along the arrow to Goochs Crater which is directly ahead, north. But we can't see it from here.
- There is an indistinct foot track formed by hikers walking towards the crater.

26) We come to a rocky area.
- Upper pic: Interesting rocks
- Lower pic: (Continuation to the right of the upper pic)
• Yellow arrow: We are heading along the arrow.

Caves
27) DH approaching a small cave ~~~
- The cave is near the tip of the yellow arrow of previous pic.

28) Inside the cave is a mud-column ~~~
It is similar to a column in a limestone cave (when a stalactite and a stalagmite meet).
There, a column is composed of the deposition of calcium carbonate and other minerals. But here, it is formed by mud dripping down from the ceiling.
- Love the colours !
- Lower pic: Me ... Photographer: DH

29) Further on, another cave ~~~
- Upper pic: Overview
- Middle pic: Left side of upper pic
- Lower pic: Continuation to the right of the middle pic

30) And further on, another cave / overhang ~~~
- DH is the guy in this pic
- Yellow circle: Cathedral Arch ... We are going there next, refer to photo #31.
- To go to Goochs Crater, walk through the gap on the left of Cathedral Arch.

Cathedral Arch
31) At Cathedral Arch (so named in BushExplorer's encyclopaedia) ... yellow oval of previous pic
- GR 460 948 (almost at 460 949)

32) From Cathedral Arch, facing where we are going next ... up the slope of a gap ... along the yellow arrow
Climb up slope (heading to Goochs Crater)
33) Now climbing up the slope, yellow arrow of previous pic ~~~
- Upper pic: Facing forward
• Yellow arrow: Where are heading
- Lower pic: Watching DH climbing up

Goochs Crater & its pagodas
34) We are almost at Goochs Crater.
- The line of pagodas across this pic forms the rim of the crater.
- Red arrow: Pagoda #5 ... We'll climb it ... Refer to photos #47 to #50.

35) Now on one of the pagodas overlooking Goochs Crater (To enlarge the image, click on it.) ~~~
- Red arrow: Pagoda #5 ... We'll climb it ... Refer to photos #47 to #50.
- Photo #36 zooms into parts of this pic.

36) (Zooming into the previous pic)
- Upper pic: Goochs crater, left side of previous pic
• Red rectangle: Newnes Junction and Clarence Colliery
- Lower pic: (Continuation to the right of the upper pic ... It is also the right side of photo #35.)
• Red arrow: Pagoda #5 ... We'll climb it ... Refer to photos #47 to #50.
• Yellow arrow on right edge: Going that way to top of pagoda #3

37) (Continuation to the right of previous pic)
- Yellow arrow: Going that way to top of pagoda #3
- Red arrow: Tip of pagoda #4 (Rest of it is blocked by pagoda #3 in front.) ... The full view of pagoda #4 is in photo #41.
- Photos #38 to #41 is taken from the pagoda in front, ie pagoda #3.

Scenery from top of pagoda #3
38) I am now on top of pagoda #3, ie the pagoda in the foreground of previous pic.
- This scene is facing backwards at DH.
- The pagodas you see here form the rim of Goochs Crater.

39) (Continuation to the right of previous pic)
Beautiful Goochs Crater !
It is ringed on all sides by pagoda-like rock formations.

40) (Continuation to the right of previous pic)
- Red arrow: Pagoda #5 ... We'll climb it ... Refer to photos #47 to #50.
- Pagoda on the right of pagoda #5: We won't climb it in this trip.

41) (Continuation to the right of previous pic)
- We'll be climbing this pagoda next, pagoda #4.
- The guys in this pic are from another hiking group. Great minds think alike ... we come here because we all reckon this place is fantastic !

Saddle between pagoda #3 & pagoda #4
42) Now at the saddle between pagodas #3 and #4 ~~~
- Upper pic: Looking back
• Pagoda #3 is on the left side of the pic.
• We were at its top when taking the previous 4 photographs (photos #38 to #41).
- Lower pic: DH & I

Scenery from top of pagoda #4
We are now at top of pagoda #4, ie the one in photo #41 (its right side peak).
Photos #43 to #46 form a 360-degree panorama from the top.
43) The main pagoda at the centre of this pic is the previous pagoda we just climbed, ie pagoda #3 in photo #42.

44) (Continuation to the right of previous pic)
Beautiful Goochs Crater !
It is ringed on all sides by pagoda-like rock formations.

45) (Continuation to the right of photo #44)
- Red arrow: Pagoda #5 ... we'll climb it next. It is the highest pagoda on the rim of Goochs Crater.
- We won't climb the pagoda on the right of pagoda #5.
- Red oval: Part of this pagoda complex ... It is also the left side peak in photo #41; whereas I'm on the right side peak now.

46) The rest of the panorama ~~~
- Upper pic: Continuation to the right of previous pic
- Lower pic: Continuation to the right of the upper pic
- Continuation to the right of the lower pic is photo #43, thus completing a 360-degree panorama.

Pagoda #5, highest pagoda on the crater rim
47) Now climbing pagoda #5, highest pagoda lining the crater rim ... It is the pagoda pointed by the red arrow in photos #34, #35, #40, #45.
- It is not easy to climb to its top. But still, if I can do it, so can you :-)

48) DH & I at the top of pagoda #5 ... looking down at Goochs Crater

I've climb down a little from the tip of pagoda #5 ... but I'm still around its top area.
49) The 3 pics below and photo #50 form a 360-degree panorama ~~~
- Upper pic:
• Red arrow: Tip of pagoda #5 ... Goochs Crater in photo #48's upper pic was taken from there.
- Middle pic: (Continuation to the right of the upper pic)
- Lower pic: (Continuation to the right of the middle pic)
• Black box: Clarence Colliery ... towards south-west-ish
• Red arrow: Part of the top area of the pagoda I'm standing on now.
I'll be standing there when taking photo #50.

50) (Continuation to the right of previous pic ... To enlarge the image, click on it.)
- This picture is taken from the red arrow of previous pic.
- The right half of the pic is facing north. You can see a foot track there. It is another way of reaching Goochs Crater. (We didn't come from there. We came from the south.)
- Continuation to the right of this pic is photo #49's upper pic, thus completing a 360-degree panorama.

Inside Goochs Crater
51) We've climbed down the pagodas. (To enlarge the image, click on it.)
- DH heading towards the bowl of Goochs Crater
- We'll exit out of the gap on the far side, then turn right.
- Photos #52 and #53 zoom into parts of this pic.

52) Same scene as previous pic ... pagodas surrounding the crater ~~~
- Upper pic: Left half of previous pic
- Lower pic: (Continuation to the right of the upper pic)

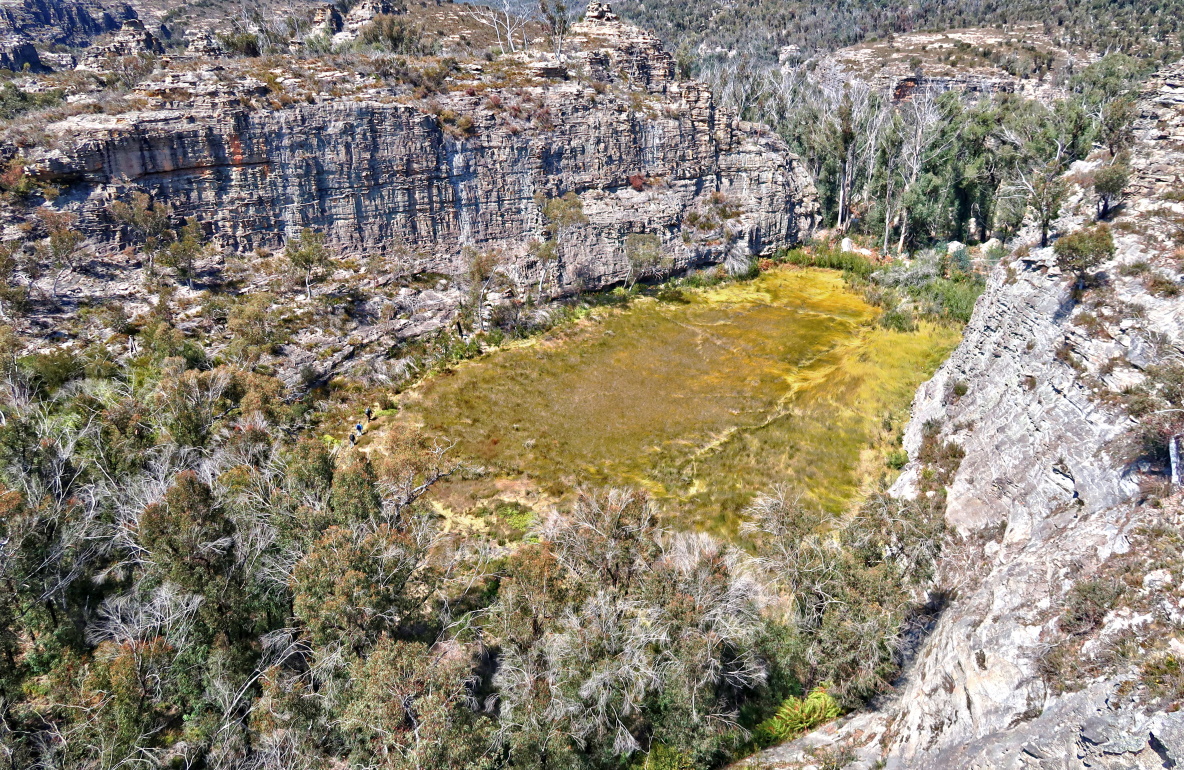
53) Goochs Crater ~~~
It hasn't rained for a while, hence the swamp is fairly dry. Otherwise this place would be wet.
- Upper pic: The middle part of photo #51
- Lower pic:
• I'm in the bowl of Goochs Crater.
• Yellow arrows: We'll exit out of the crater that way.

54) Goochs Crater panorama (To enlarge the image, click on it.) ~~~
- Left half of the pic is the west rim of Goochs Crater.
- 4 red arrows from left to right:
1 Pagoda #5, highest pagoda lining the crater rim ... ie the pagoda in photo #47; and red arrow in photo #45.
2 We didn't climb this one.
3 & 4 The 2 peaks of pagoda #4 in photo #41. We climbed to the top of the right one only.
- Yellow arrows: We'll leave Goochs Crater that way, then walk behind the main pagodas there.
- Photo #55 zooms into parts of this pic.

55) Same scene as previous pic ~~~
- Upper pic: Left half of previous pic ... west rim of Goochs Crater
- Lower pic: (Continuation to the right of the upper pic)
• 4 red arrows from left to right:
1 Pagoda #5, highest pagoda lining the crater rim ... ie the pagoda in photo #47; and red arrow in photo #45.
2 We didn't climb this one.
3 & 4 The 2 peaks of the pagoda in photo #41 ... We climbed to the top of the right one only.

West side of Goochs Crater
We are now out of Goochs Crater.
56) (To enlarge the image, click on it.)
Here, we are on the west side of the crater, behind the rocks in photo #55's upper pic, ie the rocks on the left half of photo #54.
- The main rocks you can see here is the other side of those rocks.
- The grassy area here is sort of like Goochs Crater, but much narrower. And the area is also surrounded by pagodas.
- Yellow arrows: Our route ... It hugs the base of westside pagodas surrounding the grassy area ... Refer to Map 5.
- Right-most yellow arrow: We exited out of Goochs Crater along the arrow.
- Yellow dot: We'll go around the rocks there.
- Photo #57 zooms into parts of this pic.

57) Same scene as previous pic ~~~
- Yellow arrows and yellow dot in the 3 pics below: Same as the ones in previous pic.
- Upper pic: Left side of previous pic
- Middle pic: (Continuation to the right of the upper pic)
• The rocks form the west rim of Goochs Crater.
- Lower pic: (Continuation to the right of the middle pic)
• This is the right side of photo #56.

At lookout #1
After we left the grassy area of photos #56 and #57, we climb to the top of a ridge over looking the grassy area.
58) At a lookout ... For the purpose of this report, it is labelled as lookout #1.
- It has a good view of the pagodas surrounding Goochs Crater. (To enlarge the image, click on it.)
- Yellow oval: Goochs Crater ... Refer to photo #59.
- Cyan arrow: We didn't climb this pagoda. It is the same as the cyan arrow in photo #60. Would be interesting to climb it one day.

59) (Zooming into the yellow oval of previous pic)
A wonderful view of the pagodas surrounding Goochs Crater ... The pagodas look like a lost city of an old decaying civilisation swallowed by the wilderness.
- The bowl of Goochs Crater is the depression between 2 red arrows.
- 2 red arrows from left to right:
1 Pagoda #5, highest pagoda lining the crater rim ... ie the pagoda in photo #47; and red arrow in photo #45.
(The pagoda to its right seems higher, but it is not on the crater rim.)
2 Pagoda #3 ... Photos #38 to #41 were taken from there.
- Yellow oval: The 2 peaks of pagoda #4 in photo #41 ... We climbed to the top of the right side peak only.
- Yellow arrow in upper half of the pic: How we approached Goochs Crater this morning
- 3 yellow arrows in lower half of the pic: Our route after we left Goochs Crater. The area there is photos #56 and #57.

At lookout #2
After lookout #1, we walk about 125 meters north-north-west to lookout #2.
Photos #60 to #63 form a 360-degree panorama from lookout #2.
60) Panorama from lookout #2 ~~~
- Cyan arrow: We didn't climb this pagoda. It is the same as the cyan arrow in photo #58. Would be interesting to climb it one day.

61) (Continuation to the right of previous pic)
- Yellow oval: Goochs Crater ... Refer to photo #62.
- Yellow arrows: Our route after we left Goochs Crater

62) (Continuation to the right of previous pic)
The entire pic here is filled with pagodas surrounding Goochs Crater ... They look like a lost city of an old decaying civilisation swallowed by the wilderness.
- 2 white arrows from left to right:
1 Pagoda #5, highest pagoda lining the crater rim ... ie the pagoda in photo #47; and red arrow in photo #45.
2 Pagoda #4, same as the pagoda in the yellow oval of photo #59; ie the pagoda in photo #41.

63) (Continuation to the right of previous pic)
- Red rectangle: Clarence Colliery ... towards south-west-ish
- Lower pic: (Continuation to the right of the upper pic)
- Continuation to the right of the lower pic is photo #60, thus completing a 360-degree panorama.

This completes our objective of visiting Goochs Crater and the areas around it.
Now, we make our way back to Wollangambe River, then back to the car.
Back at Wollangambe River
64) About to cross Wollangambe River ~~~
- Upper pic: Even with GPS, we are slightly off course. We should be climbing down along the 2 upward pointing arrows. Who is leading? Sshhhh :-)
• Yellow arrows: Our route this morning
• Red oval: The log over Wollangambe River ... Same as the one in photo #15.
• Cyan arrow: Our route towards Friday Canyon after crossing the river

65) Crossing Wollangambe River ~~~
- Upper pic: DH
- Lower pic: Me ... photographer: DH

Friday Canyon
After crossing the log, a short walk leads us to an unnamed tributary south of Wollangambe River.
Walking upstream along the tributary soon leads us to Friday Canyon.
Friday Canyon was discovered by FM, NC and me in a bushwalk in 2016 March, about 1.5 years ago. Photographs and trip report are in my blog:
http://mntviews.blogspot.com.au/2016/03/dargan-arch-and-friday-canyon-blue-mts.html
All the heavy weights in NSW bushwalking community haven't been here and also unaware of it :-)
And so, I have since registered the name "Friday Canyon" in BushExplorer's Encyclopaedia :
https://www.bushexplorers.com.au/encyclopaedia/friday-canyon
It is a wet canyon. Water is not deep, between ankle and knee high.
66) Entering Friday Canyon ... This point is GR 462 935.

67) Wading through Friday Canyon

68) Wading through Friday Canyon ~~~
- Left pic: Facing forward
- Right pic: Facing backwards
- Debris pointed by white arrow: It is the same debris.

69) Wading through Friday Canyon

70) Wading through Friday Canyon ~~~
- Left pic: Facing forward
- Right pic: Facing backwards ... It is the same large log in both pics.

71) Wading through Friday Canyon ~~~
- Lower left pic: Facing forward
- Lower right pic: Facing backwards
- Log pointed by white arrow: It in the same log.

Friday Canyon ends at GR 460 934.
Out of Friday Canyon, still in the unnamed tributary
72) We are out Friday Canyon, but keep wading upstream along the unnamed tributary.

73) Even though we are out of the canyon, it is still quite interesting to wade through the creek ... interesting in the sense there are obstacles along the way, no boring stretch :-)
- Upper pic: DH climbing up a rock
- Lower pic: I've just climbed up the same rock, now looking backwards downstream.

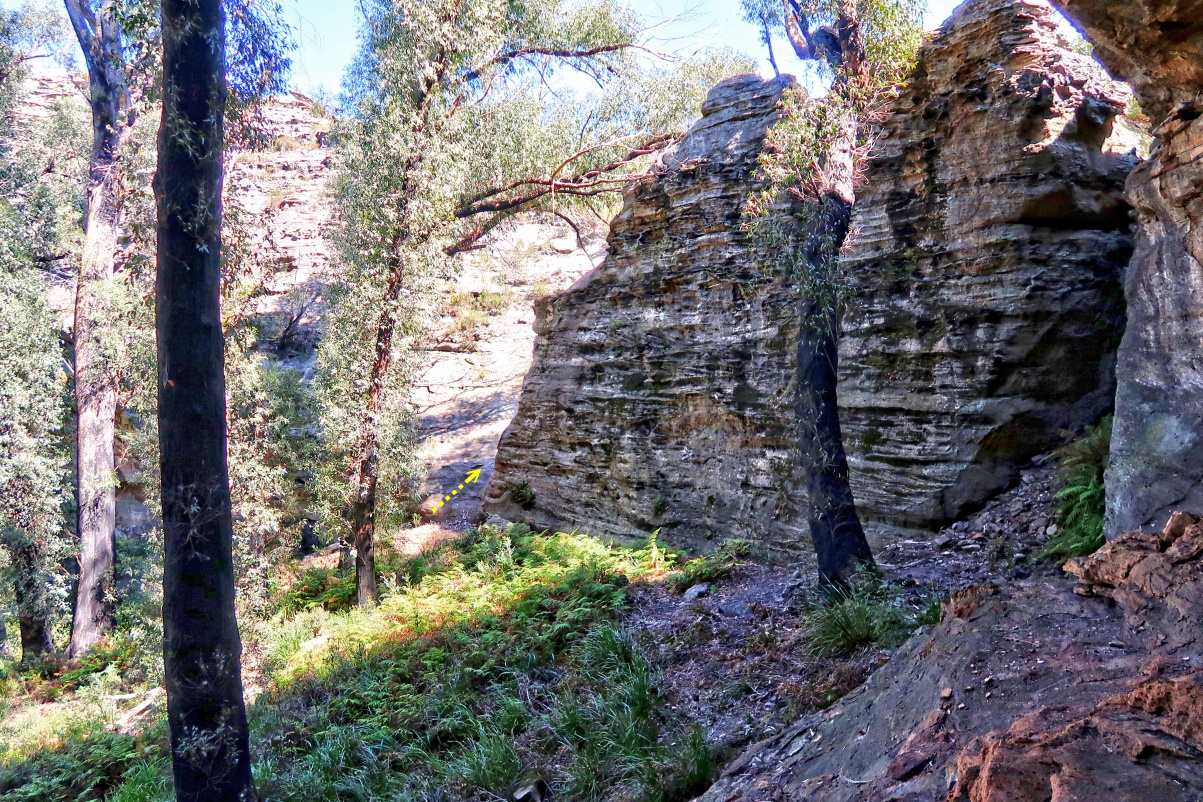
74) Passing through an overhang ~~~
In my 2016 March trip about 1.5 years ago, FM, NC and I entered the unnamed tributary here. See photo #16 in my blog:
http://mntviews.blogspot.com.au/2016/03/dargan-arch-and-friday-canyon-blue-mts.html
- Upper pic: DH
- Lower pic: Looking backwards

75) We keep wading upstream ...

76) ... But the creek upstream of the overhang (photo #74) has plenty of debris blocking our progress. And so, we spend a lot of energy to clamber over obstacles ... not pleasant :-(

Bushbash to Dargan Arch
My plan was to walk upstream all the way to Dargan Arch.
As clambering over debris along the creek bed turns out to be unpleasant, we decide to get off the creek at GR 460 928 ...
77) ... And bushbash to Dargan Arch instead.

78) Patersonia, but which species ?

Dargan Arch
Arrive at Dargan Arch - a natural sandstone bridge formed out of the collapse of a cave/overhang.
It is located near the headwaters of the unnamed creek/tributary we had been wading through.
79) I am standing on top of Dargan Arch, watching DH approaching towards me.

80) DH at Dargan Arch

81) Can't take enough pictures of Dargan Arch !
- Upper pic: DH
- Lower pic: I didn't realise I was that close to the edge until now :-) (Photographer: DH)

Comment
This trip has everything:
- Off track route finding
- River crossing ... over a log !
- Scrambling up pagodas
- Caves
- Goochs Crater ... A wonderful place !
- Friday Canyon ... Discovered and named by FM, NC and me !
- Dargan Arch ... Walk over it !
What more do you want :-)
Very very good. More than useful !
ReplyDeleteThanks - this is great - almost identical to a potential route I'd mapped out (but wasn't sure how viable it was). The only difference is I was thinking of following the creek / river all the way up the bottom of Dargans Arch.
ReplyDeleteHi Oliver,
DeleteThat was my plan too ... follow the creek all the way to Dargans Arch :-)
Then I got sick of wading through the creek ... too much debris in the creek making progress difficult.
So we baled out around midway through the creek.
Best wishes in your trip.
Cheers, Paul
This canyon has been known as ‘Billabong Canyon’ for yonks. Have a google for it and you can still find plenty of posts from around the place from prior to 2016.
ReplyDeleteHi Anonymous,
DeleteFrom Dave Noble's blog, he mentioned a trip to Goochs Crater and Billabong Canyon. However, his description of Billabong Canyon is no where near Friday Canyon !!!
(Friday Canyon is miles away from Goochs Crater. Also, Dave's photo of Billabong Canyon simply doesn't match Friday Canyon.)
I think that the GR given for Dargans Arch might be incorrect.
ReplyDeleteThank you. I have corrected the GR in the trip report accordingly ... Cheers, Paul
Delete