2019 February
Hazards Traverse ... day trip ... Climb:
- Mt Amos
- Mt Dove
- Mt Baudin
- Mt Parsons
Freycinet National Park, Tasmania, Australia
The Hazards is a mountain range
consisting of 5 rocky mountains:
- Mayson
- Amos
- Dove
- Baudin
- Parsons
(In this trip, I won't be climbing Mt Mayson.)
Why climb The Hazards?
Because it is challenging 😊 ...
like here, weaving a way up the maze of cliffs
covering the slopes of Mt Dove ...

in The Hazards !
For reward, you get to take in unparalleled views
over Freycinet National Park,
like this world renowned Wineglass Bay
and Wineglass Beach.

Prolog
"You are wise to have done it.
But a fool to even think about doing it alone." ...
plagiarizing a Japanese proverb 😊
That's how I feel after climbing through
The Hazards.
The mountains are mostly covered
with a mosaic of granite cliffs.
Climbing up and down their slopes is
like finding a way through a maze of
corridors/gaps/slots between the granites;
and fraught with difficulties.
Often you go into a gap,
only to find it becomes too steep,
or blocked by a cliff,
or comes to a vertical drop.
And so you have to backtrack out of the gap.
After doing this time after time,
you get tired and you wonder how you are ever
going to finish the trip before day light runs out.
And so, it is not a good idea
to traverse The Hazards alone ...
No one to huddle up with to keep warm
if you are be-nighted 😊
Fortunately, I carry a climbing tape with me.
It allows me to climb down short vertical drops.
Otherwise I would have to spend energy and time
to find other ways down the slopes.
But climbing up is a different matter.
A tape is no help 😭
Google Earth says the distance travelled is
merely 13.5 km. Yet it took me 12.5 hours ...
which gives you an indication of the difficulty
of the terrain.
Map
Contour map:
- Small green dot at The Fisheries:
Carpark ... also start & end of the trip
- Red arrow: Sleepy Bay beach
- 4 black arrows, left to right:
Summits of:
1 Mt Amos
2 Mt Dove
3 Mt Baudin
4 Mt Parsons
- 7 blue arrows, left to right:
1 Wineglass Bay Lookout
2 Lookout 1 (at Mt Amos)
3 Lookout 2 (at Mt Amos)
4 Lookout 3 (at Mt Amos)
5 Lookout 4 (at Mt Amos)
6 Lookout 5 (at Mt Dove)
7 Sleepy Bay lookout, photo #81

Carpark
Carpark is towards the end of Freycinet Drive.
In the above map, it is at a place called
The Fisheries.
It is also the start of
Wineglass Bay / Mt Amos walking tracks.
By the way, if you want a parking space,
make sure you reach the carpark early, by 7am.
GPS tracklog file & route
From the web, I couldn't find any
GPS tracklog file of The Hazards Traverse.
And so, my route is made up on the go.
It wouldn't be the best way the do the traverse.
For what it is worth, the GPX file of my route
can be downloaded from:
https://drive.google.com/open?id=1D0b63jmQDARsAVLPJn_9MYqLduYTWfjM
Below is the same tracklog, in red,
counter-clockwise on the contour map.
- Green & black dots at The Fisheries:
Carpark ... also start & end of the trip
- Arrows: Same as the arrows in the previous map

Satellite view of my route in brown,
counter-clockwise direction.

In summary, The Hazards Traverse is:
- Park car at a carpark towards
the end of Freycinet Drive.
- Walk on marked trail to Mt Amos summit.
While near the top, detour to lookout 1
(a bunch of boulders).
- Then to lookouts 2, 3, 4 near Amos summit.
- To Mt Dove summit.
- To Mt Baudin summit.
- To Mt Parsons summit.
- Follow cairns down to Sleepy Bay.
- Walk on foot track to Cape Tourville Road.
- Walk along Cape Tourville Road,
then Freycinet Drive, back to carpark.
Timeline & Distance
07:22 0.0 km Start walking from carpark
08:39 2.1 km Leave main track.
Detour to a bunch of boulders
labelled as lookout 1
for the purpose of this report.
08.42 2.15 km At top of the bunch of boulders,
ie lookout 1
08:44 2.2 km Start to climb down lookout 1
08:47 2.25km Back at he same spot as at 08:39
08:50 2.35km At Mt Amos summit
Morning Tea
09:00 2.5 km Leave Mt Amos summit,
heading for Mt Dove.
But first, visit a few other places ...
09:02 2.55km At a rock,
south-ish of Mt Amos summit
I try to climb the rock.
It is climbable.
But maybe tricky in climbing down.
As I'm alone by myself, so I didn't risk it.
09:06 2.55km Resume walking,
heading to lookout 2
at the top of a nearby mound ...
part of Mt Amos
09:13 2.7 km At lookout 2
09:18 2.8 km At lookout 3 which is on top of
another nearby mound ...
part of Mt Amos
09:21 2.85km At lookout 4 ... part of Mt Amos
09:58 3.35km At saddle between Amos & Dove
10:30 3.7 km At bottom of a steep slot
half way up the slope of Mt Dove
Climb up the steep slot, hoping to reach its top.
There is a hole at the top of the slot.
But it is too small for me to squeeze through 😭
So I back down the slot.
10:39 3.8 km Resume walking
12:31 4.45km At Mt Dove summit
12:34 4.5 km At lookout 5, top of a bunch of
boulders west of the summit
12:35 4.5 km Leave lookout 5,
heading for a shady area
in the nearby rocks for lunch
12:37 4.55km Stop for lunch
Lunch
12:48 4.6 km Resume walking ...
start to climb down Mt Dove
13:04 5.0 km Found a pink ribbon
tied to a shrub.
So I climb down the cliffs
of Mt Dove that way.
(Prior to finding the pink ribbon,
I was trying to find ways
down the cliffs.)
13:28 5.25km At saddle between Dove & Baudin
14:42 6.1 km Start to climb up a narrow slot
towards the top of Mt Baudin
14:56 6.35km At Mt Baudin summit
14:57 6.35km Leave summit
15:09 6.5 km Back at the start of narrow slot
where I climbed up ...
same spot as at 14:42
15:25 6.75km At where I use a climbing tape to
climb down a crack to a lower level
15:48 6.85km Resume walking
16:19 7.15km At saddle between
Mt Baudin & Mt Parsons
17:10 7.9 km Stop for afternoon tea
Afternoon Tea
17:22 7.95km Resume walking
17:27 8.0 km At Mt Parsons summit
17:29 8.0 km Leave summit
18:47 9.7 km At Sleepy Bay beach
18:57 10.15km At Sleepy Bay carpark by the side
of Cape Tourville Road
19:11 11.2 km Stop for a rest
Rest
19:15 11.2 km Resume walking
19:21 11.7 km At junction of Cape Tourville Rd
& Freycinet Drive
19:48 13.45km Back at carpark
===============================
Total: 12 hrs 26 mins
13.45 km Distance is from Google Earth
Phase 1: Mt Amos
The Hazards Traverse can be divided
into 2 phases:
- Phase 1: Climb Mt Amos.
- Phase 2: From Mt Amos
to Mt Dove, Mt Baudin, Mt Parsons
The reason why climbing Mt Amos
is considered as a separate phase is because:
- There is a well defined foot track to its summit.
Whereas there is no track to the other mountains.
- One can climb just Mt Amos.
Then return by the same path.
And indeed, that's what everyone do.
Hardly anyone goes on to climb
the other mountains.
More details/pictures of the Mt Amos climb
are in this link:
http://mntviews.blogspot.com/2019/02/mt-amos-freycinet-nat-pk-tas-australia.html
A few sample pictures from the above link
are presented below.
(Some pictures are sourced from my trip
2 years earlier in 2017 January.)
Phase 1.1 - Climbing Mt Amos
1) Climbing up the slope of Mt Amos.
- Upper pic: 2017-Jan (2 years ago)
Interesting cloud patterns ...
Is there a name to this type of cloud ?
- Lower pic: 2019-Feb (this trip, today)
Fascinating water marks on the rocks.

Phase 1.2 - Detour to lookout 1,
a bunch of boulders
Before going to the summit of Mt Amos, first,
a detour to a bunch of boulders which I label
as lookout 1 for the purpose of this trip report.
2) The boulders are at the centre
of both pics below.
- Upper pic:
• Red arrow: Mt Stacey
- Lower pic: Closer to the bunch of boulders
• White oval: The town of Coles Bay
• The bay in front of the town is also
called Coles Bay.

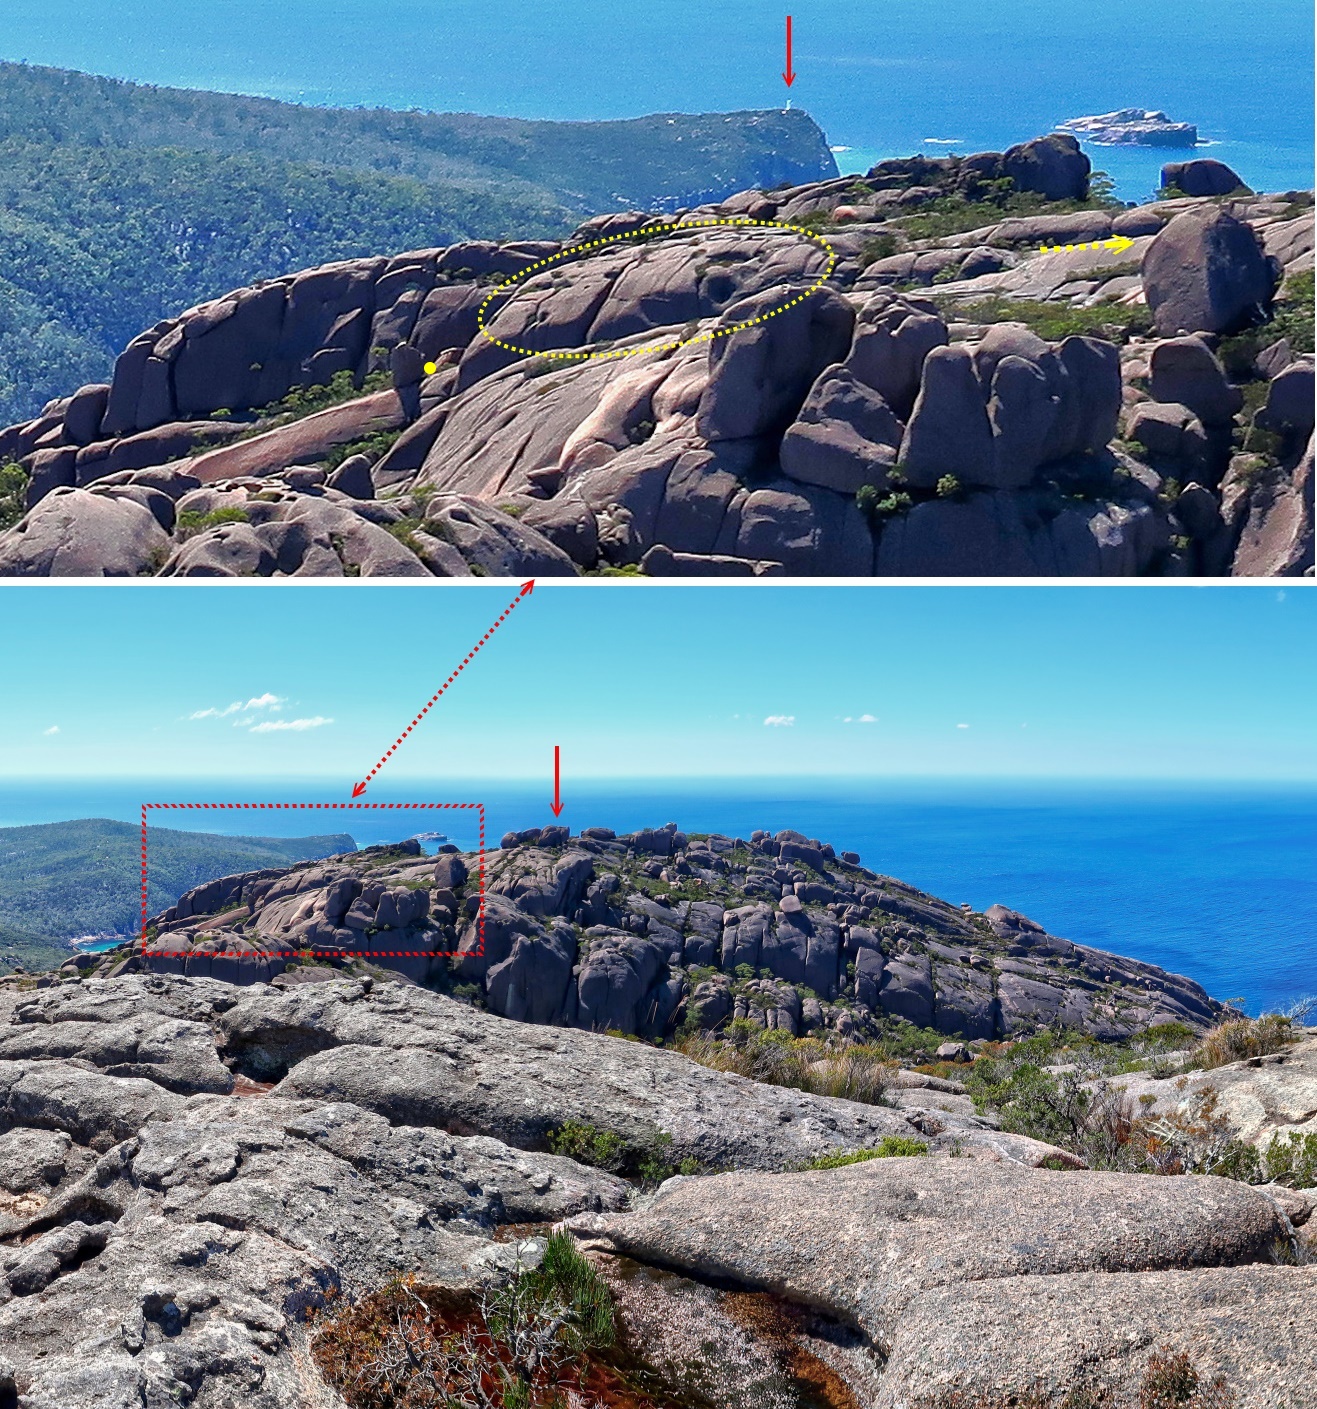
3) View towards Mt Amos,
from top of the bunch of boulders.
- Red arrow: Mt Amos summit
- Yellow arrow:
Trail to Mt Amos summit ...
The final climb to the summit is from
behind the highest point in the black box.

Phase 1.3 - At Mt Amos summit - 454 meters
Now at the summit of Mt Amos, 454 meters.
Photos #4 to #8 form a 360-degree panorama.
4) Facing Mt Dove.
- 2 red arrows, left to right:
1 Mt Dove summit trig ... east-ish
2 Lookout 2 (photos #13, #14)

5) (Continuation to the right of previous pic)
- 3 red arrows, left to right:
1 It is possible to climb to the top of this rock.
Not easy, but doable.
No, I won't be climbing it ...
Refer to photo #10.
2 Mt Graham
3 Mt Freycinet ... towards south
- Wineglass Bay & Wineglass Beach are
near the middle of the pic.
- To the right of Wineglass Beach is
Hazards Lagoon.
- To the right of Hazards Lagoon is Promise Bay.
- Photos #9, #10, #11 zoom into the centre
of this pic.

- Mt Graham
- Mt Freycinet
- Wineglass Beach
in 2017-Jan.
Photos and trip report are in my blog:
http://mntviews.blogspot.com.au/2017/01/mt-freycinet-mt-graham-wineglass-beach.html
6) (Continuation to the right of previous pic)
- Facing Mt Mayson, the mountain
in the background ... west-ish
- The letters on the rock seem to be MUP.
Are these letters natural ?
If not, what does MUP stand for ?
- Upper pic:
2017-Jan-28 Saturday 8:40am ...
No one here at the summit on a weekend
except the young woman in the lower pic.
- Middle pic:
This trip, 2019-Feb-18 Monday 8:57am ...
Around 25 people at the summit on a Monday.
- Lower pic:
2017-Jan ... This beautiful young woman
took photo #9's lower pic ...
Saves me from doing a selfie 😊

7) (Continuation to the right of photo #6)
- Yellow oval:
One can climb up this platform ...
Refer to photo #51 in this link:
http://mntviews.blogspot.com/2019/02/mt-amos-freycinet-nat-pk-tas-australia.html

8) (Continuation to the right of previous pic)
- 2 red arrows, left to right:
1 I climbed to the top of these boulders
not long ago ... Refer to:
• Photo #2 in this report
• Better still, photos #38 and #39 in:
http://mntviews.blogspot.com/2019/02/mt-amos-freycinet-nat-pk-tas-australia.html
2 Mt Stacey ... towards north
- Continuation to the right of this pic is photo #4,
completing a 360-degree panorama.

9) Zooming into the main features of photo #5.
- Upper pic:
• 4 red arrows, left to right:
1 Possible to climb to top of this rock,
not easy, but doable.
(No. I won't be climbing it.)
2 Mt Graham
3 Mt Freycinet ... towards south
4 Hazards Lagoon
• Wineglass Bay & Wineglass Beach are
at the centre of the pic.
• To the right of Hazards Lagoon is
Hazards Beach & Promise Bay.
• Left side of this pic is in photo #10.
- Lower pic:
2017-Jan: Me ... photo taken by
the young lady in photo #6's lower pic

Phase 1.4 - Rock near summit of Mt Amos
It is the same rock pointed by the red arrows
in photos #5 and #9.
It is possible to climb to the top of this rock;
but it would be a bit tricky in climbing down.
As I'm alone by myself, so I didn't risk it.
And besides, who is going to take a photo of me
if I do climb to the top ?
10) Going to the rock at centre of the pics below.
- Upper pic: 2017-Jan
- Middle pic: This trip, 2019-Feb
- Lower pic: This trip, 2019-Feb
• 2 red arrow, left to right:
Mt Graham, Mt Freycinet

More detailed trip report on Mt Amos
Above are sample pictures only
for the Mt Amos climb.
More detailed trip report & photos are in this link:
http://mntviews.blogspot.com/2019/02/mt-amos-freycinet-nat-pk-tas-australia.html
(Note: 2017-Jan
After summitting Mt Amos,
I returned to the carpark.)
Phase 2: Rest of Hazards Traverse ...
Climb Mt Dove / Baudin / Parsons
2019-Feb (this trip):
I go on to climb Mt Dove, Mt Baudin, Mt Parsons.
Read on ...
At the rock of previous pic
Photo #11 and the 3 pics in photo #12
form a 360-degree panorama.
11) Scenery from the rock of previous pic.
- 3 red arrow, left to right:
1 Mt Graham
2 Mt Freycinet ... towards south
3 Hazards Lagoon ...
It has been a dry summer,
otherwise water would fill up
all the dirt-brown area in the lagoon.
- Wineglass Bay & Wineglass Beach are
at the centre of the pic.
- Hazards Beach & Promise Bay are
to the right of Hazards Lagoon.

12) Panorama from the rock.
- Upper pic:
(Continuation to the right of previous pic)
• Red arrow: Mt Mayson
• White arrow:
People near the summit of Mt Amos
- Middle pic:
(Continuation to the right of the upper pic)
• Red arrow: Mt Amos summit
• White arrow: A couple
- Lower pic:
(Continuation to the right of the middle pic)
• 3 red arrows, left to right:
1 I'm going to top of this mound next,
(lookout 2), photos #13.
2 Mt Dove and its summit trig ... east-ish.
The sun is still behind the mountain.
3 I'll climb to the top of this mound
(lookouts 3 and 4).
Views from the lookouts are in
photos #16 to #18.
- Continuation to the right of the lower pic is
photo #11, completing a 360-degree panorama.

To lookout 2
Lookouts 2, 3 and 4 are considered
as part of the top of Mt Amos.
13) Heading towards lookout 2
which is the top of a mound.
- Upper pic:
• 6 red arrows, left to right:
1 Mt Dove
2 Lookout 2
3 Lookout 4
4 Lookout 3
5 Mt Graham
6 Mt Freycinet ... towards south
• Bay & beach below Mt Graham:
Wineglass Bay and Wineglass Beach
- Lower pic:
Zooming to lookouts 2, 4, 3 of the upper pic

At lookout 2
14) Now at lookout 2.
- Upper pic:
Facing backward, towards Mt Amos summit
• White oval: My shadow
• 3 red arrows, left to right:
1 The rock in photo #10
2 Mt Amos summit
3 Rock platform near the summit ...
Refer to yellow oval in photo #7.
And photo #51 in my blog:
http://mntviews.blogspot.com/2019/02/mt-amos-freycinet-nat-pk-tas-australia.html
- Lower pic:
Facing forward, to where I'll be going next
• 3 red arrows, left to right:
1 Lookout 4: Not far behind the rise there.
Can't be seen from where I'm now.
2 Lookout 3
3 Mt Graham
• This pic and the 3 pics in photo #15
form a 360-degree panorama.

15) Panorama from lookout 2.
- Upper pic:
(Continuation to the right of previous pic)
• 5 red arrows, left to right:
1 Mt Graham
2 Mt Freycinet
3 Hazards Lagoon
4 The rock in photo #10
5 Mt Amos summit ...
Photo #14's upper pic
zooms into this area.
• White oval: My shadow
• Left of Hazards Lagoon:
Wineglass Bay & Wineglass Beach
• Right of the lagoon:
Hazards Beach & Promise Bay
- Middle pic:
(Continuation to the right of the upper pic)
• 3 red arrows, left to right:
1 Rock platform near Amos summit ...
Refer to yellow oval in photo #7.
2 Lookout 1, a bunch of boulders ...
Refer to photo #2.
3 Mt Stacey
• White oval: The town of Coles Bay
• Bay below the town: Also called Coles Bay
- Lower pic:
(Continuation to the right of the middle pic)
• Red arrows:
Mt Dove and its summit trig ... east-ish.
The sun is still behind the mountain.
- Continuation to the right of the lower pic
is photo #14's lower pic,
completing a 360-degree panorama.

At lookout 3
The best view of
Wineglass Bay and Wineglass Beach
is probably from this lookout.
16) Wineglass Bay and Wineglass Beach.
- 4 red arrows, left to right:
1 Cape Forestier
2 Mt Graham
3 Mt Freycinet
4 Hazards Lagoon
- Left of Hazards Lagoon:
Wineglass Bay & Wineglass Beach
- Right of the lagoon:
Hazards Beach & Promise Bay
- White arrow:
Yachts like to congregate
at the southern end of Wineglass bay.
The water is calmer there.

At lookout 4
17) The 3 pics below and photo #18 form
a 360-degree panorama from lookout 4.
- Upper pic:
• 4 red arrows, left to right:
1 Cape Forestier
2 Mt Graham
3 Mt Freycinet
4 Wineglass Beach ...
The bay is Wineglass Bay
- Middle pic:
(Continuation to the right of the upper pic)
• 5 red arrows, left to right:
1 Hazards Lagoon ... To its right is
Hazards Beach & Promise Bay.
2 Lookout 3
3 The rock in photo #10
4 Mt Amos summit
5 Rock platform near Mt Amos summit ...
Refer to yellow oval in photo #7.
• White arrow: My shadow
- Lower pic:
(Continuation to the right of the middle pic)
• 3 red arrows, left to right:
1 Lookout 1, a bunch of boulders ...
Refer to photo #2.
2 Lookout 2
3 Mt Stacey
• White oval: The town of Coles Bay
• Bay below the town: Also called Coles Bay

18) (Continuation to the right of previous pic)
- Red arrow: Mt Dove and its summit trig
- Cyan arrow:
Going to the cliff edge there now ...
Refer to photo #19.
I'll climb down the cliff
from a bit to the left of the arrow.
- Yellow arrows: My route to climb up Mt Dove
- White oval:
At 10:30am, I'll try to climb up this steep slot.
Unfortunately, not successful.
- Continuation to the right of this pic is photo #17,
completing a 360-degree panorama.

As I was unable to find
other people's GPS tracklogs,
and so I make up the route on the go:
- If I can climb up, I climb up.
- If not, I go around the cliffs
to find another way up.
It is quite tiring, because often I thought
I can climb up, only to find the way ahead
blocked by a cliff or the route becomes too steep.
Then I have to climb back down to
find another way 😭
Descending Mt Amos ... towards
saddle between Mt Amos & Mt Dove
19) Now at the cliff edge ...
the tip of the cyan arrow of previous pic.
- 2 red arrows, left to right:
Mt Stacey, Mt Dove summit & its trig
- Yellow arrows: My route to climb up Mt Dove
- White oval:
At 10:30am, I'll try to climb up this steep slot.
Unfortunately, not successful.
- Below Mt Stacey is Coles Bay.
- 6 cyan dots:
Same position as the cyan dots in photo #22

20) I have climbed down, and now
looking back at the cliff edge which is
the tip of the cyan arrow in photo #18.
- I was at its top when taking photo #19.

21) Keep climbing down Mt Amos
and looking back at it.
- Highest rock at centre of the 2 pics below
is the one in the previous pic.

Near saddle between Mt Amos & Mt Dove
22) Facing Mt Dove ... still at Mt Amos slope,
but very close to the saddle
between Mt Amos & Mt Dove.
- White squares in both pics below:
They enclose identical areas.
- Upper pic:
• Red arrow: Mt Dove summit
• Yellow arrows: My route to climb up Mt Dove
• White oval:
At 10:30am, I'll try to climb up this
steep slot. Unfortunately, unsuccessful.
• 6 Cyan dots:
Same as the cyan dots in photo #19 ...
The dots help to compare the 2 images.
- Lower pic:
• Closer to the saddle compared to
the upper pic

Climbing up Mt Dove slope
23) I've just crossed the saddle
between Mt Amos and Mt Dove,
and now starting the climb up Mt Dove.

24) A little bit up the slope of Mt dove
and looking back at Mt Amos.
- This pic and the 3 pics in photo #25
form a 360-degree panorama.
- 4 red arrows, left to right:
1 The large rock in photos #20 and #21
2 Lookouts 3 and 4
3 Mt Amos summit
4 Lookout 1, a bunch of boulders ...
Refer to photo #2.
- Yellow arrows: My route down Mt Amos slope

25) Panorama ...
From a little bit up the slope of Mt dove.
- Upper pic:
(Continuation to the right of previous pic)
• Red arrow: Mt Stacey
• White oval: The town of Coles Bay
• Bay below the town: Also called Coles Bay
- Middle pic:
(Continuation to the right of the upper pic)
• Yellow arrow: My route up the slope
• 2 red arrows, left to right:
1 Mt Dove summit is around there.
Summit trig can't be seen from here.
2 I'll go around the cliff there
to climb up the Mt Dove slope.
• White arrow:
Points to a steep slot
which can't be seen from here.
It's the white oval in photos #18, #19, #22.
At 10:30am, I'll try to climb up this
steep slot. Unfortunately, unsuccessful.
• 2 cyan dots:
Same position as the 2 upper-most
cyan dots in photos #19 and #22.
The dots help to compare these images
of the Mt Dove slope.
- Lower pic:
(Continuation to the right of the middle pic)
• 2 red arrows, left to right:
Mt Graham and Mt Freycinet
- Continuation to the right of the lower pic is
photo #24, completing a 360-degree panorama.

26) 10:30am.
This is the steep slot in the white ovals
of photos #18, #19 and #22.
I thought I may be able to climb up here ...
- Left pic:
Inside the steep slot and looking up ...
There is hole at the top, but
it is too small for me to squeeze through 😭
- Right pic:
So I give up.
Turn around to face down the slot,
and climb back down 😭

27) Panorama ...
From further up the slope of Mt Dove.
- Upper pic:
• 3 red arrows, left to right:
1 Mt Graham
2 Mt Freycinet
3 Hazards Lagoon
• Left of Hazards Lagoon:
Wineglass Bay & Wineglass Beach
• Right of the lagoon:
Hazards Beach & Promise Bay
- Lower pic:
(Continuation to the right of the upper pic)
• 3 red arrows, left to right:
1 Lookouts 3 and 4
2 Mt Amos summit
3 Lookout 1, a bunch of boulders ...
Refer to photo #2.
• Cyan circle:
The large rock in photos #20 and #21
• Yellow arrows:
My route down Mt Amos slope

28) I'm close to the summit of Mt Dove now ...
just over this pile of rocks.

Mt Dove summit, 485 meters
29) This is it, Mt Dove summit, 485 meters.
- Red oval:
Same rock as the middle red arrow
in photo #32's middle pic
- Left side pics: Towards north
- Right pic: Towards south-east-ish ...
The bunch of rocks in the background
are the same as the rocks in:
• Photo #30's middle pic.
• And left edge of photo #32's lower pic.

30) The 3 pics below form a 270-degr panorama.
- These pics are taken from the faraway rocks
between the middle red arrows & the summit trig
in photo #32's middle pic;
and about 15 meters east of Mt Dove summit.
- Upper pic: Towards north-east-ish
• Red arrow: Mt Baudin summit
• Yellow dot:
When climbing up My Baudin,
I'll climb towards the dot
from the left and below it.
Refer to photos #33 and #36.
- Middle pic:
(Continuation to the right of the upper pic)
• 2 red arrows, left to right:
1 Cape Forestier ... south-east
2 Same rock as the left-most red arrow
in photo #32's lower pic.
- Lower pic:
(Continuation to the right of the middle pic)
• 2 red arrows, left to right:
1 Mt Dove summit trig
2 I'll go to these boulders next, west-ish;
also happens to be on the west side
of Mt Dove summit.
For the purpose of this report,
I label these boulders as lookout 5.

At lookout 5
31) Facing Mt Amos.
- These pics are all taken from top of the bunch
of boulders at the red arrow of previous pic.
For the purpose of this report,
I label the bunch of boulders as lookout 5,
about 30 meters west of Mt Dove summit.
- 4 red arrows, left to right:
1 Lookouts 3 and 4
2 Mt Amos summit
3 Mt Mayson
4 Lookout 1, a bunch of boulders ...
Refer to photo #2.
- Cyan circle: The large rock in photos #20 and #21
- Yellow arrows: My route down Mt Amos slope
- This pic and the 3 pics in photo #32
form a 360-degree panorama.

32) Panorama from lookout 5,
about 30 meters west of Mt Dove summit.
- Upper pic:
(Continuation to the right of previous pic)
• Red arrows: Mt Stacey
• White oval: The town of Coles Bay
- Middle pic:
(Continuation to the right of the upper pic)
• 3 red arrows, left to right:
1 Mt Baudin summit
2 Same rock as in the red oval
in photo #29
3 Mt Dove summit trig
• Faraway rock between 2nd & 3rd red arrow:
Where photo #30 was taken
• Yellow dot:
When climbing up My Baudin,
I'll climb towards the dot
from the left and below the dot.
Refer to photos #33 and #36.
- Lower pic:
(Continuation to the right of the middle pic)
• 4 red arrows, left to right:
1 Same rock as the right red arrow
in photo #30's middle pic.
2 Mt Graham
3 Mt Freycinet
4 Hazards Lagoon
• Left of Hazards Lagoon:
Wineglass Bay & Wineglass Beach
• Right of the lagoon:
Hazards Beach & Promise Bay
- Continuation to the right of the lower pic is
photo #31, completing a 360-degree panorama.

Lunch
Lunch is somewhere in the shade, in the bunch
of rocks on the left side of previous pic.
It took me almost 3.5 hours to go
from Mt Amos summit to Mt Dove summit
(9:30 am to 12:30 noon).
It was tough.
I have to decide now whether to take a beeline
to the road and return to the carpark;
or finish the Hazards Traverse by keep going
to Mt Baudin and Mt Parsons.
At the rate I have been going, potentially,
it may take another 7 hours to reach
the summit of Mt Parsons ... at 7:30pm.
Well, sunset is around 8:15pm,
so the die is cast ...
I'll go to climb Mt Baudin and Mt Parsons.
From what I gleaned from the web, there should be
some cairns to guide me down Mt Parsons slope.
And hopefully that part of the walk should be easy.
Descending Mt Dove towards saddle
between Mt Dove & Mt Baudin
33) Descending the northside slope of Mt Dove ...
heading towards Mt Baudin, this pic.
- Upper pic: It is the red rectangle of the lower pic.
• Red arrow: Cape Tourville Lighthouse
• Yellow dot:
I'll reach this spot from
the left and below the dot; then ...
• Yellow oval:
... Then climb towards Mt Baudin summit
along the far side of rocks in the oval;
then ...
• Yellow arrow:
... Then along the arrow
to the summit
- Lower pic:
• Red vertical arrow: Mt Baudin summit
• Red rectangle: Enlarged in the upper pic
- The lower pic and the 3 pics in photo #34
form a 360-degree panorama.
34) Panorama while descending
the northside slope of Mt Dove.
- Upper pic:
(Continuation to the right of previous pic)
• Red arrow: Cape Forestier
• Mt Dove summit is somewhere behind
the top of the rocks on the right side
of this pic. It can't be seen from here.
- Middle pic:
(Continuation to the right of the upper pic)
• Mt Dove north-west slope
- Lower pic:
(Continuation to the right of the middle pic)
• Red arrow: Mt Stacey
• White oval: The town of Coles Bay
• Bay below the town: Also called Coles Bay
- Continuation to the right of the lower pic
is photo #33's lower pic,
completing a 360-degree panorama.

35) Further down the slope of Mt Dove ...
facing Coles Bay ... north-ish.
- Red arrow on the right: Mt Stacey
- Red rectangle: Coles Bay
- Yellow arrows: My route down the slope
- Red square:
A pink ribbon tied to a shrub ...
From Mt Amos summit to Mt parsons,
I didn't encounter any cairns nor ribbons,
except this one.

I was trying to find ways down the cliffs,
but not successful.
And so, it is a relieve to see this ribbon ...
this must be the way down 😊
36) And a little further down the slope,
and facing Mt Baudin
(and continuation to the right of previous pic).
- Upper pic: It is the red rectangle of the lower pic.
• Red arrow: Mt Baudin summit
• Yellow dot:
I'll reach this spot from
the left and below the dot, then ...
• Yellow oval:
... then climb towards the summit
along the far side of rocks in the oval.
- Lower pic:
• 3 red arrows, left to right:
1 Coles Bay
2 Mt Stacey
3 The red rectangle is enlarged
in the upper pic
• Yellow arrows: Route to climb up Mt Baudin
• From the upper-most yellow arrow
to the yellow dot, the route is complicated ...
being dictated by topology of the rocks/cliffs

37) Facing Mt Baudin.
(I'm close to the saddle between
Mt Dove & Mt Baudin.)
- 3 red arrow, left to right:
1 Coles Bay
2 Same as the rock in the red oval
in photo #40's middle pic
3 Mt Baudin summit
- Yellow arrows: My route to climb up Mt Baudin
- Further above the upper-most yellow arrow,
I'll veer left and will eventually climb
towards Mt Baudin summit
from behind the highest rocks in this pic.
The route is complicated ... being dictated
by the topology of the rocks/cliffs.

Near the saddle
between Mt Dove & Mt Baudin
38) Some scenes around the saddle between
Mt Dove & Mt Baudin.
- Upper pic:
At Mt Dove slope, facing Coles Bay ...
north-north-west
• White arrow: The town of Coles Bay
• Bay below the town: Also called Coles Bay
• Left side of the pic: Mt Dove slope
• Valley in the middle of the pic:
Saddle between Mt Dove & Mt Baudin
- Middle pic:
Interesting rock on the lower part of Mt Baudin
- Lower pic:
• I climb up to here from beyond
the lower-right corner.
• From memory, I didn't climb further up
in the direction I'm facing (too steep).
Instead, I'll go in the opposite direction.

Climbing up Mt Baudin slope
39) Looking back at Mt Dove ...
From the slope of Mt Baudin.
- This pic and the 3 pics in photo #40
form a 360-degree panorama.
- Red arrow:
Mt Dove summit can't be seen from
where I am now.
It is somewhere behind the cliff there.
- Yellow arrows:
My route down Mt Dove, approximately

40) Panorama from the slope of Mt Baudin.
- Upper pic:
(Continuation to the right of previous pic)
• Red arrow: North-western tip of My Baudin
- Middle pic:
(Continuation to the right of the upper pic)
• Facing Mt Baudin slope
• Red oval:
Same as the rock pointed by
the middle red arrow in photo #37
- Lower pic:
(Continuation to the right of the middle pic)
- Continuation to the right of the lower pic is
photo #39, completing a 360-degree panorama.

41) Proceeding further up Mt Baudin,
I find myself in the middle of a gully.
- The 3 pics below form a 200-degree panorama.
- Upper pic:
Looking back at the gully I'm climbing down.
• Yellow arrow: Direction of my walk
• White arrow:
I would like to walk directly like that,
unfortunately not possible.
Cliff on the left (east) is too steep 😭
- Middle pic:
(Continuation to the right of the upper pic)
• West side cliffs of the gully
- Lower pic:
(Continuation to the right of the middle pic)
• Facing forward, looking down the gully
• The town I'm facing is Coles Bay.
• Bay below the town: Also called Coles Bay
• Yellow arrows:
I'll follow the arrows to go around
the rock cliffs on the right,
then find a way up Mt Baudin.
• Red arrow: Mt Stacey ... north-ish

I have rounded the cliffs on the right side
of the previous pic.
42) Now, there is line of cliffs on the east side.
I found a slightly gentler slope,
and I am attempting to climb/crawl up.
- The 2 pics below form a 180-degree panorama
from slightly up the slope.
- Upper pic:
• White arrows:
I am able to climb/crawl up
to the tip of the upper white arrow.
After that, the slope is too steep for me,
and I have to back down 😭
• Yellow oval:
After backing down from the slope,
I will walk to there;
then climb up Mt Baudin
from a slot behind the cliff.
- Lower pic:
(Continuation to the right of the upper pic)
• Yellow oval:
I came from the gully there ...
Refer to photo #41's lower pic.
• Yellow arrow: Direction of my walk
• Mt Baudin summit can't be seen from here.
It is much further back ...
behind the highest point in this pic.

Narrow Slot heading to the sky
After rounding the cliff at bottom-left corner
of photo #42's upper pic,
I come to a narrow slot that head towards the sky.
So I take it 😊
43) The narrow slot that head towards the sky.
- Upper left:
The slot is very narrow near the ground,
where it is even narrower than a shoe !
And so you walk on the walls ...
by stepping on the grey part of the walls.
• White arrow & rectangle:
A tree trunk is at the upper part of the slot.
The tree trunk is enlarged in the rectangle.
- Upper right: Closer to the tree trunk.
• White arrow & rectangle: The tree trunk
- Lower left: Looking back down the slot.
• Red arrow: The town of Coles Bay.
• Bay below the town: Also called Coles Bay
- Lower right:
Beyond the tree trunk, it becomes too narrow
to squeeze through. So I drop my backpack,
and climb up the cliff on the right
with the help of the tree trunk.
It is lucky the trunk is here,
as otherwise it may be difficult to climb up.
Also, from the markings on the trunk,
it looks like others have used the trunk too.
And so, I wasn't the first one
to climb up Mt Baudin through this slot.
Glad to know great minds think alike !

Out of the narrow slot
44) Once up and out of the slot, and looking back,
this is the view ... nice !
- Yellow dot: Where I climbed out of the slot
- Yellow arrows: How I come to where I'm now
- 2 red arrows, left to right: Picnic Island, Mt Stacey
- White oval: The town of Coles Bay
- Bay below the town: Also called Coles Bay
- This pic and the 3 pics in photo #45
form a 360-degree panorama.

45) The previous pic and the 3 pics below
form a 360-degree panorama.
- Upper pic:
(Continuation to the right of previous pic)
• Red arrow:
Part of Mt Baudin but not its summit.
No, I won't be going there 😊
- Middle pic:
(Continuation to the right of the upper pic)
• Red arrow: Mt Baudin summit ...
I'm heading there now. There are
big unclimbable boulders at the summit.
- Lower pic:
(Continuation to the right of the middle pic)
• White arrow: Mt Dove summit and its trig
• Blue oval: Northern side of Mt Amos
• Blue arrows:
This morning's climb up Mt Amos
is along the ridge there.
- Continuation to the right of the lower pic is
photo #44, completing a 360-degree panorama.

Mt Baudin summit - 413 meters
46) Almost at Mt Baudin summit.
- Upper pic: Looking back at Mt Dove ...
I was there 2.5 hours ago.
• Red arrow: Mt Dove summit trig
• Yellow arrows:
My route down Mt Dove northern slope
• White oval at left edge: Wineglass Bay
• Blue oval near right edge:
Mt Amos northern tip
- Lower pic: Facing forward
• The bunch of boulders in front:
Mt Baudin summit is these boulders.
The boulders are unclimbable ...
Well, to me anyway.
• This pic and the 3 pics in photo #47
form a 360-degree panorama.

47) Panorama from near Mt Baudin summit.
- Upper pic:
(Continuation to the right of previous pic)
• 3 red arrows, left to right:
Cape Forestier, Mt Graham, Mt Freycinet
• White oval: Wineglass Bay
- Middle pic:
(Continuation to the right of the upper pic)
• 2 red arrows, left to right:
1 Mt Dove summit ... Photo #46's
upper pic zooms into the summit.
2 Picnic Island
- Lower pic:
(Continuation to the right of the middle pic)
• 2 red arrows, left to right:
Picnic Island, Mt Stacey
• Yellow dot:
I climbed out of the slot there ...
same spot as the yellow dot in photo #44.
• White oval: The town of Coles Bay
• Bay below the town: Also called Coles Bay
- Continuation to the right of the lower pic
is photo #46's lower pic,
completing a 360-degree panorama.

48) This is it, Mt Baudin summit, 413 meters,
with some unclimbable boulders.
- Red arrow: Picnic Island
- This pic and the 3 pics in photo #49
form a 360-degree panorama.

49) Panorama from Mt Baudin summit.
- Upper pic:
(Continuation to the right of previous pic)
• 2 red arrows, left to right:
Picnic Island, Mt Stacey
• 2 white ovals, left to right:
1 The town of Coles Bay
2 Sleepy Bay ...
I'll be at Sleepy Bay beach
after climbing down Mt Parsons.
• 3 upper yellow arrows pointing left:
Route to return to carpark from Sleepy Bay
• Lower yellow arrow pointing right &
yellow dots: My route to climb Mt Parsons
- Middle pic:
(Continuation to the right of the upper pic)
• 2 red arrows, left to right:
Cape Tourville, Mt Parsons summit
• 2 white arrows:
Boulders at the summit of Mt Parsons ...
Refer to photos #65 and #67.
• Yellow dots & yellow arrow:
My route to climb up Mt Parsons
- Lower pic:
(Continuation to the right of the middle pic)
• These big boulders plus the ones in
photo #48 form the summit of Mt Baudin.
- Continuation to the right of the lower pic is
photo #48, completing a 360-degree panorama.

Descending Mt Baudin towards
saddle between Mt Baudin & Mt Parsons
As I had left my backpack behind
in the slot in photo #43,
and so after summitting Mt Baudin,
I return to the slot to pick up the backpack.
Then backtrack down the slot.
50) Panorama ...
About 5 minutes after exiting out of the slot.
- Upper pic: From north-west to north-north-east
• Red arrow: Mt Stacey
• White oval: The town of Coles Bay
• Bay below the town: Also called Coles Bay
• White circle on right edge:
Sleepy Bay ...
I'll be at Sleepy Bay beach
after climbing down Mt Parsons.
• Yellow arrows & dots:
Route to return to carpark from Sleepy Bay
- Lower pic: From north-north-east to east
(Continuation to the right of the upper pic)
• Scene is towards Mt Parsons
• Red arrow on the left: Cape Tourville
• Red arrows & rectangle on the right:
Mt Parsons summit
• White arrow:
Same rock as the white arrow on the right
in photo #49's middle pic
• White oval: Sleepy Bay
• Yellow dots & arrows:
My route to climb up Mt Parsons
• Cyan arrow:
Same rock as the cyan arrows
in photos #51 and #54.

51) Panorama ... Another few minutes
down the slope of Mt Baudin.
- Upper pic:
• Red arrow: Mt Stacey
• 3 white oval, left to right:
1 North-western tip of Mt Baudin
2 The town of Coles Bay ...
towards north-west.
Bay below town: Also called Coles Bay
3 Sleepy Bay ...
I'll be at Sleepy Bay beach
after climbing down Mt Parsons.
• Yellow arrows & dots:
Route to return to carpark from Sleepy Bay
- Lower pic: Facing Mt Parsons
(Continuation to the right of the upper pic)
• Red arrow on the left: Cape Tourville
• Red arrows & rectangle at the centre:
Mt Parsons summit
• White arrow:
- The boulder I can see
from Mt Baudin summit ...
Right white arrow in photo #49's
middle pic
- Also the same boulder as the
white arrow in photo #65's middle pic
- And the same boulder as the
white arrow in photo #67's lower pic
• Yellow dots & arrows:
My route to climb up Mt Parsons
• Cyan arrow:
Same rock as the cyan arrows
in photos #50 and #54.
- Continuation to the right of the lower pic
is photo #52.

52) (Continuation to the right of previous pic)
Mt Baudin ...
but its summit can't be seen from here.
- I didn't climb down these steep slopes.
I climbed down to where I'm now
from beyond the right edge.

53) A bit further down Mt Baudin slope.
I climbed down to where I am now
along a crack in the yellow oval.
Along the crack, there are grass and scrubs
which I can hang onto.
(Whereas the rock faces on either side
were too steep.)
But further down the crack,
there is a 3 to 4-meter drop to a lower level.
Luckily I carry a climbing tape in my backpack.
Else I would have to climb back up the crack
and find another way down.

around is not anchored solidly to the soil ...
There is not enough soil in the crack.
But I figured by the time the shrub gave way,
I won't have far to fall and should survive 😊
Well, the shrub managed to hold my weight ...
Phew !
54) Close to the saddle between
Mt Baudin & Mt Parsons.
- Yellow arrows: My route to climb up Mt Parsons
- Cyan arrow:
Same rock as the cyan arrows
in photo #50 and #51's lower pics
- White oval:
Same area as the white oval in photo #55

Near the saddle between Baudin & Parsons
55) Now facing Mt Parsons.
(I'm about to cross the saddle
between Mt Baudin & Mt Parsons.)
- Red arrows: Mt Parsons summit
- White arrow:
• Boulder I can see from Mt Baudin summit ...
Right white arrow in photo #49's middle pic.
• Also the same boulder as the white arrow
in photo #65's middle pic
• And the same boulder as the white arrow
in photo #67's lower pic
- Yellow dots & arrow:
My route to climb up Mt Parsons
- White oval:
Same area as the white oval in photo #54.

56) Looking back at Mt Baudin.
(Shortly after crossing the saddle)
- Vertical red arrow: Mt Baudin summit
- Horizontal red arrow:
Crack where I used a climbing tape
to climb down the last few meters ...
Refer to the yellow oval in photo #53.
- Yellow dots and arrows:
My route in climbing down Mt Baudin

Climbing up Mt Parsons slope
57) Looking back at Mt Baudin. (From about
halfway up the slope of Mt Parsons)
- Yellow dots and arrows:
My route down Mt Baudin to where I am now
- Vertical red arrow:
Mt Baudin summit ... south-west-ish
- Horizontal red arrow:
Crack where I used a climbing tape
to climb down the last few meters ...
Refer to the yellow oval in photo #53.
- This pic and the 3 pics in photo #58
form a 360-degree panorama.

58) Panorama ... (From about
halfway up the slope of Mt Parsons)
- Upper pic:
(Continuation to the right of previous pic)
• Red arrow: Picnic Island
• White oval:
The town of Coles Bay ... north-west-ish
• Bay below the town: Also called Coles Bay
• Yellow arrow: Direction I'm walking
• Blue arrow:
Same area as the blue arrows
in photos #60 and #62.
- Middle pic:
(Continuation to the right of the upper pic)
• Facing the slope of Mt Parsons ...
The summit is not here, refer to the lower pic.
- Lower pic:
(Continuation to the right of the middle pic)
• 2 red arrow, left to right:
1 Mt Parsons summit ...
- It is in this direction.
- But can't be seen from here.
- It is somewhere further back.
2 Eastern tip of Mt Baudin ...
towards south
• Yellow arrow:
Direction of my walk ...
towards Mt Parsons's summit
- Continuation to the right of the lower pic is
photo #57, completing a 360-degree panorama.

59) Looking back at Mt Baudin ... (From
a bit further up the slope of Mt Parsons)
- Yellow dots and arrow: My route down Mt Baudin
- Vertical red arrow:
Mt Baudin summit ... south-west-ish
- Horizontal red arrow:
Crack where I used a climbing tape
to climb down the last few meters ...
Refer to the yellow oval in photo #53.
- This pic and the 3 pics in photo #60
form a 360-degree panorama.

60) Panorama from the slope of Mt Parsons.
- Upper pic:
(Continuation to the right of previous pic)
• Facing backward
• Red arrow: Picnic Island
• White oval:
The town of Coles Bay ... north-west-ish
• Blue arrow:
Same area as the blue arrows
in photos #58 and #62.
- Middle pic:
(Continuation to the right of the upper pic)
• Facing the slope of Mt Parsons ...
The summit is not here, refer to the lower pic.
- Lower pic:
(Continuation to the right of the middle pic)
• Facing forward
• Red arrow: Mt Parsons summit ...
- It is in this direction.
- But can't be seen from here.
- It is somewhere further back.
- Continuation to the right of the lower pic is
photo #59, completing a 360-degree panorama.

61) Looking back at Mt Baudin ...
Not too far to Mt Parsons summit.
- Red arrow: Mt Baudin summit
- Yellow arrows:
My route down Mt Baudin ... approximately
- This pic and the 3 pics in photo #62
form a 360-degree panorama.

62) Panorama from the slope of Mt Parsons ...
Not far to the summit.
- Upper pic:
(Continuation to the right of previous pic)
• Facing backward ...
I just came from this direction.
• 2 red arrows, left to right:
Picnic Island, Mt Stacey
• White oval:
The town of Coles Bay ... north-west-ish
• Blue arrow:
Same area as the blue arrows
in photos #58 and #60.
- Middle pic:
(Continuation to the right of the upper pic)
• Facing the slope of Mt Parsons ...
The summit is not here, refer to the lower pic.
- Lower pic:
(Continuation to the right of the middle pic)
• Facing forward
• 3 red arrows, left to right:
1 Mt Parsons summit ...
- Can't be seen from here.
- It is somewhere further back.
- But not too far away.
2 Mt Graham
3 Mt Freycinet
- Continuation to the right of the lower pic is
photo #61, completing a 360-degree panorama.

63) Finally, Mt Parsons summit is insight.
- Red arrow: Cairn at Mt Parsons summit
- White arrow:
Boulder I can see from Mt Baudin summit ...
Right white arrow in photo #49's middle pic
• Also the same boulder as the
white arrow in photo #65's middle pic
• And the same boulder as the
white arrow in photo #67's lower pic

Mt Parsons summit - 331 meters
64) At last, at Mt Parsons summit, 331 meters.
- White oval:
The town of Coles Bay ... north-west-ish
- Red arrow: Mt Stacey
- Yellow arrow:
Direction I approached the summit cairn
- This pic and the 3 pics in photo #65
form a 360-degree panorama.

65) Panorama from the summit of Mt Parsons.
- Upper pic:
(Continuation to the right of previous pic)
• Red arrow: Cape Tourville
• White arrow: The boulder ...
I can see it from Mt Baudin summit ...
Left white arrow in photo #49's middle pic
(Also the same boulder as the
white arrow in photo #67's upper pic)
• My shadow is near the bottom-right corner.
- Middle pic:
(Continuation to the right of the upper pic)
• White arrow: The boulder ...
I can see it from Mt Baudin summit ...
Right white arrow, photo #49's middle pic
- Also the same boulder as the
white arrow in photo #63
- And the same boulder as the
white arrow in photo #67's lower pic
• 3 red arrows, left to right:
1 Cape Forestier
2 Mt Freycinet
3 Wineglass Beach & Wineglass Bay
- Lower pic:
(Continuation to the right of the middle pic)
• Red arrow: Mt Baudin summit
• Yellow arrows: My route down Mt Baudin
- Continuation to the right of the lower pic is
photo #64, completing a 360-degree panorama.

Descending Mt Parsons
Time to return to the car via Sleepy Bay.
66) Looking back at the summit cairn ...
From a little down Mt Parsons' summit.
- This pic and the 3 pics in photo #67
form a 360-degree panorama.

67) Panorama from near the summit of Parsons.
- Upper pic:
(Continuation to the right of previous pic)
• Red arrow: Cape Tourville
• White arrow: The boulder ...
I can see it from Mt Baudin summit ...
Left white arrow in photo #49's middle pic
(Also the same boulder as the
white arrow in photo #65's upper pic)
- Middle pic:
(Continuation to the right of the upper pic)
• Red arrows: Cape Forestier
• My shadow is near the bottom-left corner.
- Lower pic:
(Continuation to the right of the middle pic)
• 4 red arrows, left to right:
1 Mt Graham
2 Mt Freycinet
3 Wineglass Beach & Wineglass Bay
4 Mt Baudin summit
• White arrow: The boulder ...
I can see it from Mt Baudin summit ...
Right white arrow, photo #49's middle pic
(Also the same boulder as the
white arrow in photo #65's middle pic)
- Continuation to the right of the lower pic is
photo #66, completing a 360-degree panorama.

To Sleepy Bay
There are cairns guiding you down
Mt Parsons slope to Sleepy Bay.
And so, this part of the trip is easy.
68) Marvellous view ...
while climbing down Mt Parsons slope.
- 3 red arrows, left to right:
1 Picnic Island
2 Mt Stacey
3 Cape Tourville & its lighthouse
- 2 White ovals, top to bottom:
1 The town of Coles Bay
2 North-western ridge of Mt Parsons
- Yellow oval: Sleepy Bay
- Yellow arrows & dots:
My route to Sleepy Bay, then back to the car
- This pic and the 3 pics in photo #69
form a 360-degree panorama.

69) Panorama from the slope of Mt Parsons.
- Upper pic:
(Continuation to the right of previous pic)
• Facing Tasman Sea ... east-ish
• Yellow arrow:
Direction I'm going now ... (Then,
when not too far down the cliff, turn left.)
• White oval: My shadow
- Middle pic:
(Continuation to the right of the upper pic)
• Red arrow:
Summit of Mt Parsons is
somewhere in that direction.
- Lower pic:
(Continuation to the right of the middle pic)
• 2 red arrows, left to right:
1 Mt Baudin summit
2 Picnic Island
• Yellow arrow:
My route down Mt Baudin slope ... approx
- Continuation to the right of the lower pic is
photo #68, completing a 360-degree panorama.

70) The 3 pics below form a 270-degr panorama.
(From further down the slope of Mt Parsons)
- Upper pic:
• Beyond the left edge is Tasman Sea
separating Australia and New Zealand.
• Red arrow: Cape Forestier
- Middle pic:
(Continuation to the right of the upper pic)
• I just climbed down this slope
to where I am now.
• Mt parsons summit is
somewhere behind the highest point.
- Lower pic:
(Continuation to the right of the middle pic)
• Yellow oval: Sleepy Bay
• Yellow arrows:
My route to Sleepy Bay, then to the car
• 3 red arrows, left to right:
1 The town of Coles Bay ...
Bay below town: Also called Coles Bay
2 Mt Stacey
3 Cape Tourville & its lighthouse
- To the right of the lower pic is Tasman Sea.
And further to the right is the upper pic.

71) Facing where I'm going.
(As mentioned already ...
From Mt Parsons summit to Sleepy Bay,
there are cairns at regular intervals
to guide you down.)
- Yellow circle & oval: Some of the cairns
- Yellow arrows: Route to Sleepy Bay
- Red arrow on the left: Mt Stacey

72) Thru this narrow gap between large boulders.
- Yellow arrows: Direction of walk
- Red arrows: A cairn

73) Sleepy Bay from Mt Parsons slope.
- White ovals in the 2 pics below:
They circle the same boulder.
- Red arrows: Cape Tourville
- Lower pic:
• Yellow dot: The upper pic is taken from here.
• Yellow arrows: The way to the yellow dot
- Continuation to the right of both pics:
Tasman Sea
- Further to the right is photo #74,
forming a 360-degree panorama

74) The 3 pics below together with the
previous pic form a 360-degree panorama
(missing a small section facing Tasman Sea).
- Upper pic:
(Continuation to the right of previous pic
is Tasman Sea. Further to the right is this pic.)
• Yellow arrow:
I came through the gap between
the boulders ... Refer to photo #72.
- Middle pic:
(Continuation to the right of the upper pic)
• Red arrow:
Facing backward at Mt Parsons summit
• Yellow arrows:
Route I climbed down Mt Parsons
- Lower pic:
(Continuation to the right of the middle pic)
• 2 red arrow from left to right:
Picnic Island, Mt Stacey
• 2 white oval, left to right:
1 The town of Coles Bay ...
Bay below town: Also called Coles Bay
2 Same boulder as the white ovals in
photo #73.
• Yellow oval: Sleepy Bay
• Yellow dot & yellow arrows:
My route to Sleepy Bay, then to the car
(Photo #73's upper pic
is taken at the yellow dot.)
(Route to yellow dot is
from beyond the right edge.)
- Continuation to the right of the lower pic is
photo #73, completing a 360-degree panorama.

75) Closer to Sleepy Bay.
- 2 red arrows, left to right:
1 Mt Stacey
2 Cape Tourville & its lighthouse
- Yellow arrows:
Route down to Sleepy Bay, then back to the car

Sleepy Bay
76) At Sleepy Bay.
- Red arrow:
Below the arrow is the beach at Sleepy Bay.
(The beach can't be seen from here.
It is in photos #78 and #79.)
- Yellow arrow:
Route to the beach ... along the cliff top
- This pic and the 3 pics in photo #77
form a 360-degree panorama.

77) Panorama from Sleep Bay seashore.
- Upper pic:
(Continuation to the right of previous pic)
• Facing Tasman Sea
• Red arrow: Cape Forestier
- Middle pic: Facing backwards
(Continuation to the right of the upper pic)
• Red arrow:
Mt Parsons summit is in that direction,
although it can't be seen from here.
• Yellow dot & arrows:
My route down Mt Parsons slope
• 2 red bars, left to right:
1 Mt Baudin can't be seen from here.
It is blocked by this rocky block.
2 North-west part of Mt Dove
- Lower pic:
(Continuation to the right of the middle pic)
• Yellow arrows: Route to Sleepy Bay beach
- Continuation to the right of the lower pic is
photo #76, completing a 360-degree panorama.

Sleepy Bay beach
78) Sleep Bay beach.
- It is under the red arrow in photo #76.
- Red square:
Lone couple at the beach ...
Beside these two, no one else is here.
When they see me, they decide to leave.
I must have looked like Scarface 😊
But perhaps it is 6:47pm, getting late and cold.
(Sun sets around 8:15pm.)
- Yellow arrow on the left:
Foot track to the main road,
and thence back to the car ...
Refer to photo #79's lower pic.
- Yellow arrow on the right: Direction I came from
- Green oval:
Same rock as the green circle in photo #79

79) Sleepy Bay beach.
- The 3 pics below form a 270-degree panorama.
- Upper pic: Sleepy Bay
- Middle pic: Sleepy Bay Beach
(Continuation to the right of the upper pic)
• Red arrow: Mt Parsons summit ... due north
• Yellow dot & arrows:
Route from Mt Parsons summit to here
• Green circle:
Same rock as the green oval in photo #78
- Lower pic:
(Continuation to the right of the middle pic)
• Red arrow:
Mt Baudin summit can't be seen here.
It is blocked by the rocky block.
• Red bar: North-west part of Mt Dove
• Yellow dot:
Where I climbed down Mt Baudin slope
• Yellow arrow:
Foot track to the main road,
and thence back to the car.

To Car
80) Foot track ...
from Sleepy Bay to Cape Tourville Road.
- The foot track is meant for tourists,
hence nicely built 😊

81) Lookout to Sleepy Bay along the foot track.

Towards the end of a walk, it is always
most satisfying to be able to look back
at where you have been for the day ...
See the pic below ...
82) Walking on Freycinet Drive (C302),
towards the carpark and
looking back at The Hazards Range.
- 4 red arrows, left to right: The Hazards ...
Mt Parsons, Mt Baudin, Mt Dove, Mt Amos
(Summits of each mountain are further back
and can't be seen from here.)
- Yellow dot:
I climbed up Mt Amos through there.
(Then turn left towards the summit.)
- Yellow arrow:
Direction to the carpark
which is where I'm heading now.

Phew ...
I made it to the car half an hour before sunset !
Despite the short distance travelled,
only 13.5 km,
it is definitely one of the more challenging trips
I have done.
Other walks in Freycinet National Park
Another interesting hike in Freycinet National Park
is a circuit walk to:
- Wineglass Bay Lookout
- Hazards Beach
- Cooks Beach
- Mt Freycinet
- Mt Graham
- Wineglass Beach
Photographs and trip report are in my blog:
https://mntviews.blogspot.com/2017/01/mt-freycinet-mt-graham-wineglass-beach.html
Amazing account. I did the Hazards Traverse a few years ago and our experience was similar. It's a very challenging walk!
ReplyDelete